grilled shrimp with melon, cucumbers and mozzarella

Image: Olaiya Land

Hello!

I hope you won’t mind that I’ve been keeping my blog posts short and sweet lately. We’ve been having an absolutely perfect summer and I find myself constantly itching to be outside rather than planted in front of my computer. The dreary, grey weather we have for 9 months of the year leads Seattleites to lose their minds in the summertime. The normally reserved (and somewhat grumpy) population is all smiles and small talk and walking-around-town-with-extra-spring-in-their-step when the sun is shining. It’s basically impossible for us to stay inside one second longer than absolutely necessary. 

Image: Olaiya Land
Image: Olaiya Land

This glorious summer weather is also why I’ve been posting simple, low-prep recipes. I don’t know about you, but I want to cook everything on the grill when it’s warm out. I’m loath to heat up my little kitchen when it’s already hot. And there’s something about cooking outdoors that seems so right for long days and balmy nights. 

Feeling the cool breeze on your skin and the heat from the grill, watching the flames dance under the grate and the smoke waft through the air--it all has an elemental quality to it that reminds me people have been cooking this way for thousands of years. The simplicity of preparing a meal over a fire has a certain grace that allows me to slow down and be present in a way cooking in my appliance-filled kitchen does not. 

Image: Olaiya Land

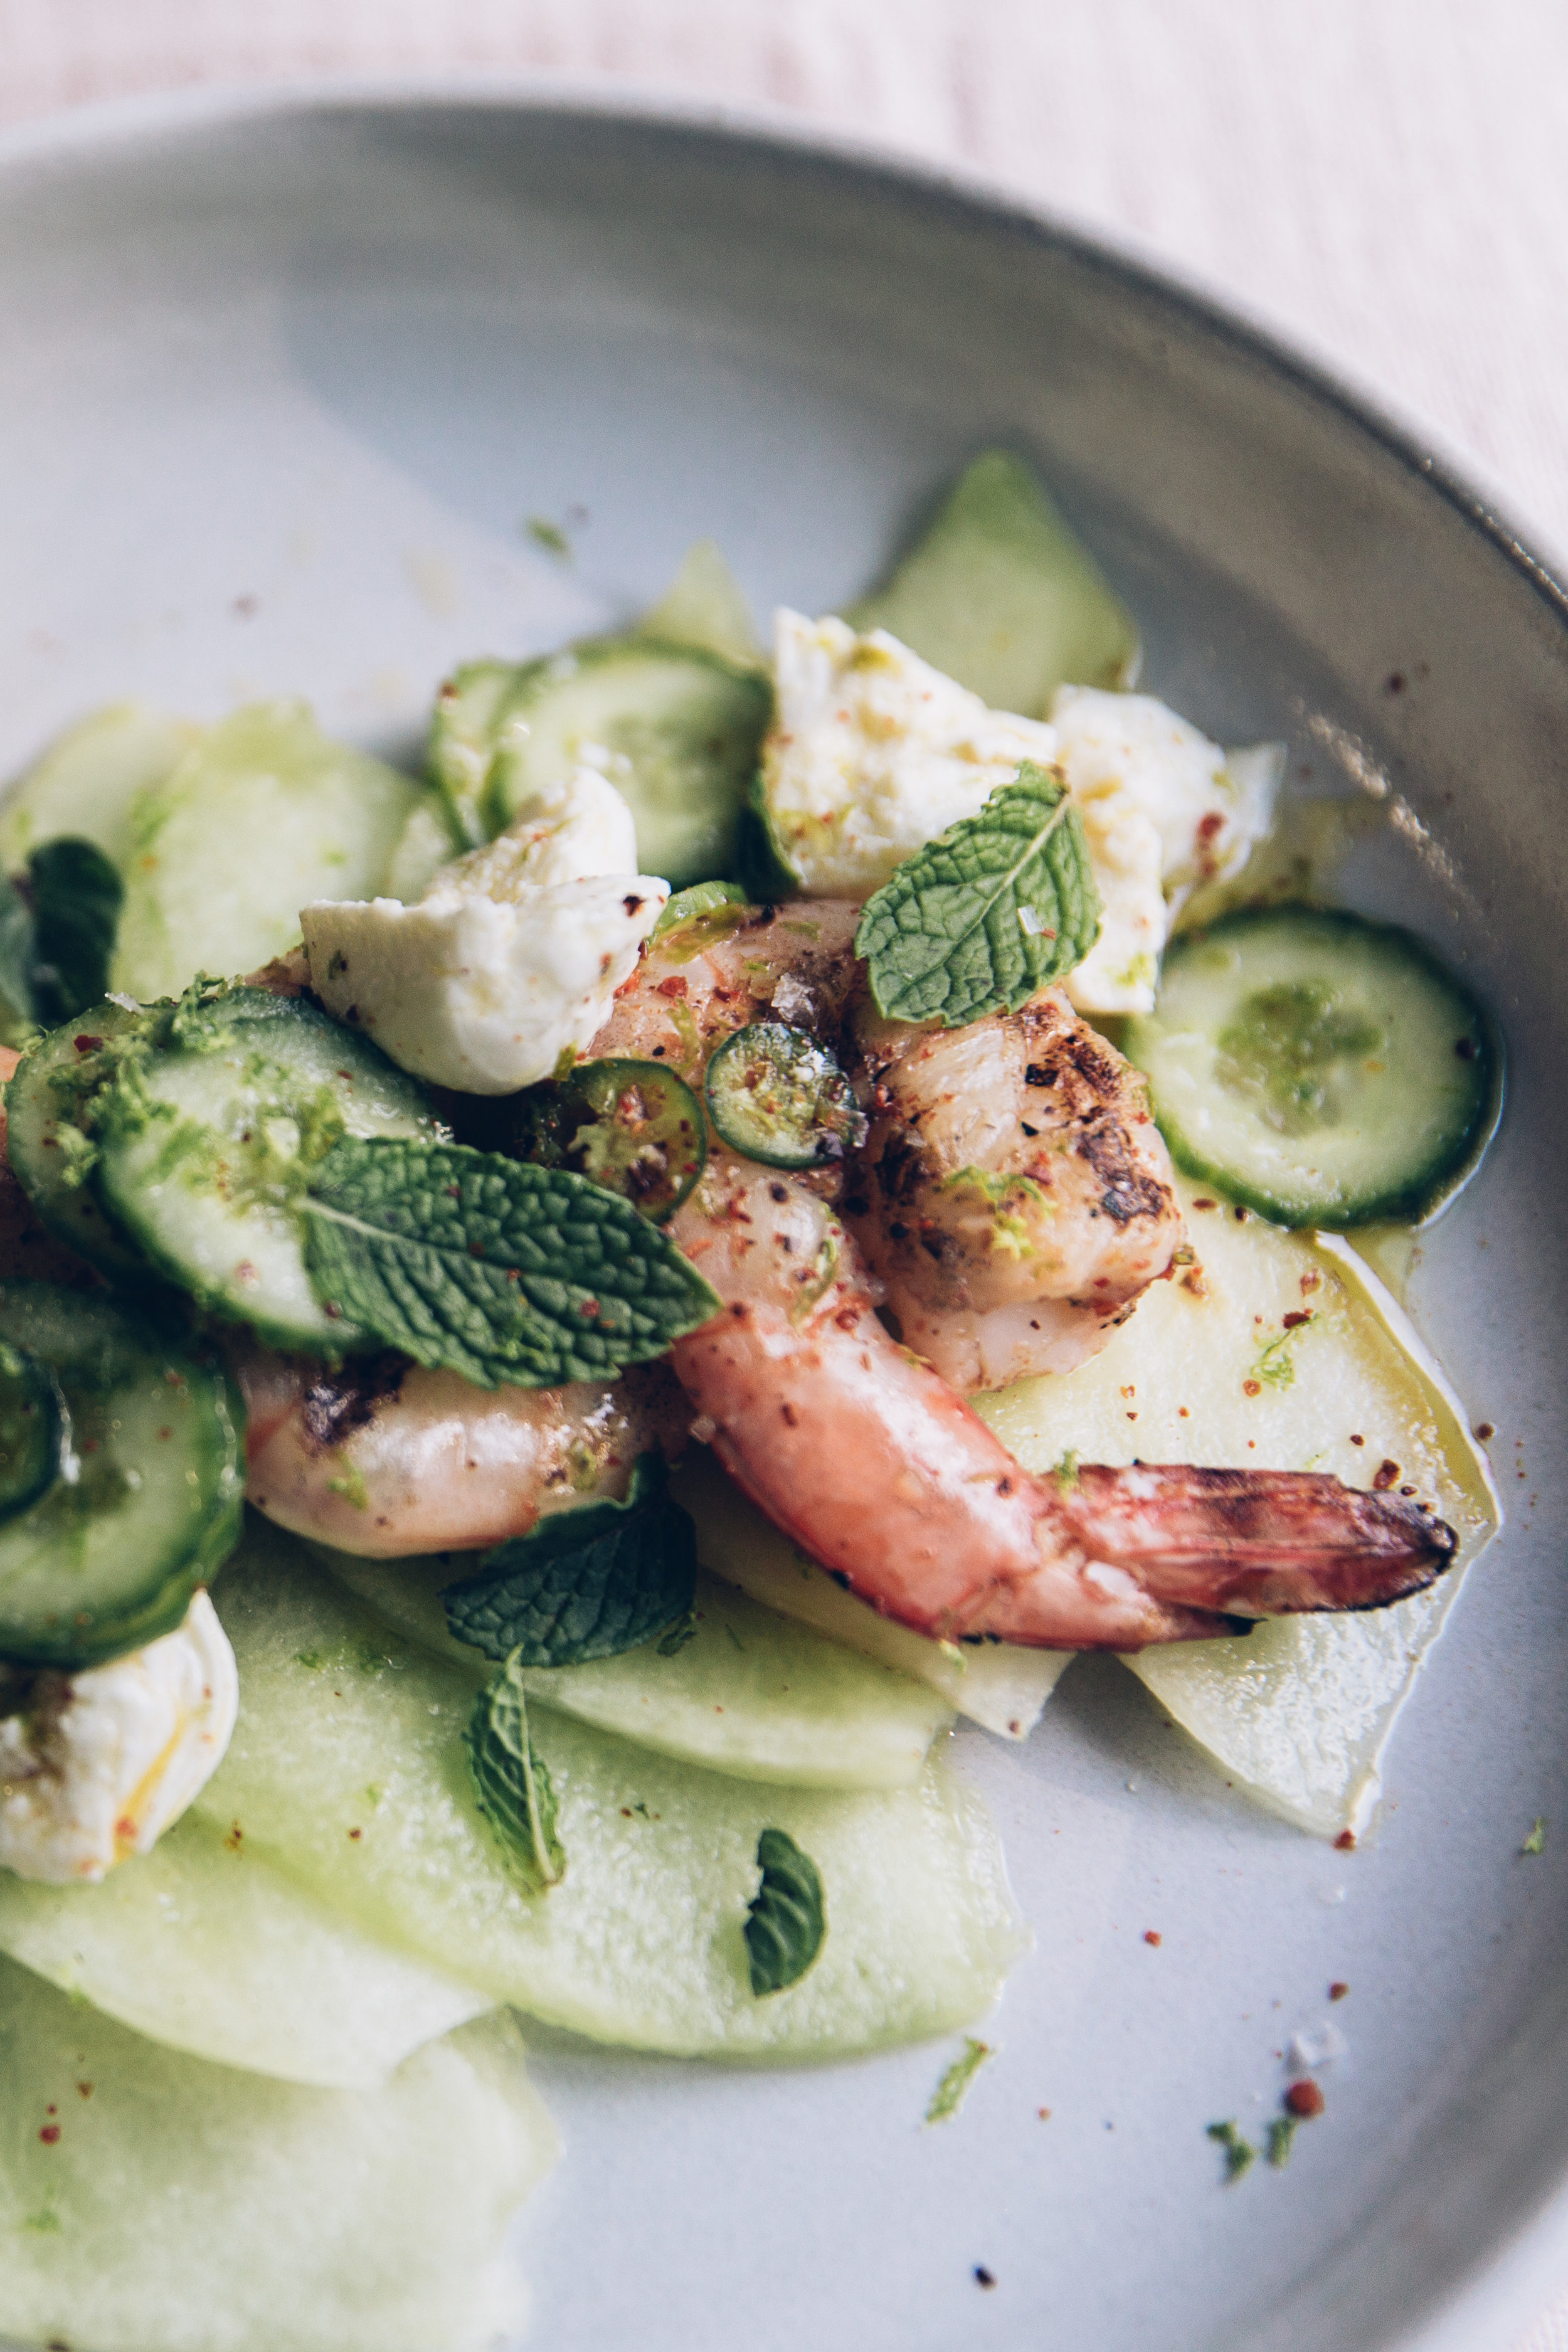
So my plan for the summer is simply to post the best of what I’ve been cooking for myself here on the blog. I made this Grilled Shrimp with Melon, Cucumbers and Mozzarella a few weeks back and loved how it turned out. I’m a big fan of contrasting sensations and flavors, so what made this dish for me was the spice of the chile against the crisp cucumbers and creamy mozzarella and the smoky grilled shrimp paired with the sweet-tart melon. It's got all the flavors I want in a light, summer salad.

I hope you’re enjoying the long days as much as we are in Seattle and that you get the chance to cook out-of-doors at least once this year!

XO,

Olaiya
 

Image: Olaiya Land

Grilled Shrimp with Melon, Cucumbers and Mozarella

  • ¼ to ⅓ medium ripe honeydew or other melon, seeded and skin removed
  • 2 limes
  • 3 tablespoons extra-virgin olive oil
  • Piri Piri, Aleppo or other ground dried chile, to taste
  • Salt, to taste
  • 1 clove garlic, minced or crushed
  • ¼ serrano chile, very thinly sliced (optional)
  • 2 small Persian cucumbers, sliced into thin rounds or ribbons
  • 1 large ball of fresh mozzarella or about 12 bocconcini-sized balls (about 4 oz. total), torn into bite-sized pieces
  • ½ lb. medium to large sustainable shrimp (I used size 16-20 wild gulf prawns), shelled
  • 2 tablespoons mint leaves, torn if large
  • Special equipment: metal or wooden skewers

*Notes: If you’re using wooden skewers, soak them in hot water while you prep the salad. (This keeps them from burning on the grill.)

- If you don’t have a grill or don’t feel like grilling the shrimp, you can also poach them according to the directions in this recipe

- I think this salad is delicious with or without the mozzarella. 

Image: Olaiya Land

Thinly shave or slice the melon about ⅛-inch thick. Arrange the melon on a serving platter or divide between individual plates. Halve one of the limes and squeeze a little lime juice over the melon. Melons vary greatly in terms of sweetness and acidity, so taste your melon and season accordingly. You want a nice balance of sweet and sour. Set aside. 

Zest the other lime with a microplane and set the zest aside. 

In a medium bowl, whisk together 2 tablespoons of lime juice, 1 teaspoon of the zest, the olive oil, a pinch of chile, a generous pinch of salt, the garlic and the serrano (if using). Whisk to combine. Taste and adjust seasonings to your liking. 

Place the shrimp in a small bowl and toss with a little of the chile-lime vinaigrette. Place the cucumber and torn mozzarella in the medium bowl with the rest of the vinaigrette and toss to cover. Set aside to marinate for 10 minutes. While the shrimp, cucumber and cheese are marinating, preheat a grill or grill pan to high heat. 

When the grill is quite hot, skewer the shrimp and grill on each side for 45 seconds to 2 minutes, pressing down on them with a set of grill tongs to make sure they get some nice char. The time will vary depending on the size of your shrimp. You want them to be just a tiny bit translucent inside when you take them off the grill. They’ll continue to cook off the heat and be perfectly done instead of overcooked and rubbery. If you’re unsure of their doneness, pull one of your skewers and cut into a shrimp with a paring knife to check.

When the shrimp are done, carefully remove them from your skewers and add to the bowl with the cukes and mozzarella. Toss to coat, taste and adjust seasoning again, if necessary. 

To serve, very lightly salt the melon. Spoon some of the mozzarella and cucumbers over the melon then top with shrimp. Sprinkle a little of the reserved lime zest over the shrimp then scatter the mint leaves over the top. Serve immediately.

Image: Olaiya Land

spicy shrimp deviled eggs

Image: Olaiya Land

Hello!

I’m currently in the middle of wading through a mountain of dishes, clothing and furniture destined for the garage sale I’m holding tomorrow. I’m not the tiniest bit ready, so it should be interesting to see how it all comes together! Somehow these things always seem to work themselves out so I’m sure it will be fine. (And if my sale isn’t the most neatly organized and well-planned on the block, the world will probably keep turning.)

In addition to pulling together a last-minute garage sale, I’m also preparing to launch a new Paris culinary tour for September. Registration will be open next week, so check back then for details! You can also sign up for the First To Know List to receive early access to all tours, workshops and retreats.

Image: Olaiya Land

Despite having accidentally scheduled way too many projects for myself this week, I didn’t want to leave you without a recipe! So thought I’d share the Spicy Shrimp Deviled Eggs I made for our Fourth of July BBQ. These are spicy and creamy and just a touch sweet from the shrimp. They're perfect for all your summer picnics and outdoor gatherings!

Happy Weekend and XO,

Olaiya
 

Image: Olaiya Land

Spicy Shrimp Deviled Eggs

  • 6 large eggs
  • Kosher salt
  • 1 teaspoon black peppercorns
  • 2 bay leaves
  • ¼ lb. medium to large sustainable shrimp (I used size 16-20 wild gulf prawns), preferably with shells on
  • 6 tablespoons best quality or homemade mayonnaise
  • Pinch cayenne pepper
  • 1 ½ teaspoons fresh lemon juice
  • 1 tablespoon very thinly sliced green onion (dark green part only)
  • 2-3 tablespoons thinly sliced or roughly chopped spicy pickled peppers
  • Small sprigs savory or tarragon or additional sliced green onions, to garnish

*Notes: This recipe can easily be doubled and the filled deviled eggs will keep, covered and refrigerated, for one day if you want to make them in advance. Garnish just before serving. 

- I used Mamma Lil's pickled peppers, but any spicy sweet pickled pepper will work.

- Any additional filling that doesn’t fit in your hard-boiled eggs makes a decadent egg salad that’s fantastic on a slice of toast.

Image: Olaiya Land

Fill a medium saucepan ⅔ full of water. Bring to the boil over high heat. Gently add the eggs and cook for 13 minutes. Drain the hot water and run cold water over the eggs, or place them in an ice bath, until they feel cool to the touch. Peel the eggs and set them aside. (Can be done up to 2 days in advance.)

Fill the same saucepan about halfway full of water and place over high heat. Salt the water until it tastes like the ocean then add the peppercorns and bay leaves. When the water comes to the boil, add the shrimp. Adjust heat to cook the shrimp at a bare simmer until cooked through (just past the point of translucence). Cooking the shrimp at a gentle heat will help keep them from turning tough and rubbery. Check the shrimp often as they cook, cutting into one with a paring knife if necessary to check for doneness. The time will vary depending on the size of the shrimp. Mine took 4 minutes.

Drain the poaching water from the shrimp and run them under cold water or place in an ice bath to stop the cooking. When the shrimp are completely cool, peel them then dry thoroughly. Roughly chop and set aside.

Image: Olaiya Land

Cut the hard boiled eggs in half and scoop the yolks into a small bowl. Add the mayonnaise, cayenne, lemon juice and a pinch of salt. Mash with a fork or, for a smoother filling, puree the yolk mixture with an immersion blender or in a food processor. Add the green onion, pickled peppers and chopped shrimp. Stir to combine. Taste and adjust seasonings to your liking. 

Spoon the shrimp filling into the halved hard boiled eggs. Chill for at least 30 minutes before topping with herb sprigs or green onions and serving. 

Makes about 6 servings.

apricot triple berry galette

Image: Olaiya Land

Seattle has bestowed an improbably beautiful June upon us. Normally, it rains right up to (and often through) the Fourth of July. But this year, the days have been bright and warm and the nights perfect for sleeping. My street is fragrant with jasmine and roses bending under the weight of their blooms. The tomato plants in my neighbors' gardens are growing like jungle vines.

The days are magnificently long, too. (I’m writing this at 9.16pm and the sun is only just starting to set). Which means Beau and I have been fixing simple dinners--whatever vegetables we have, thrown on the grill along with a few sausages or maybe a pork chop, and a bottle of rosé--and eating most of our meals outside. This is my idea of summer perfection.

Image: Olaiya Land

Baking has felt decidedly unappealing--all that time and mess and heating up the house when I could be spending time outdoors. But last week at the farmers market, I spied a pile of the season’s first tiny apricots. They were so cute with their downy, blushing cheeks--I couldn’t not buy them. I loaded up my basket and told myself I’d figure out what to do with them later.

Naturally, I let them sit on my counter, until they teetered on the very edge of being usable.

Image: Olaiya Land
Image: Olaiya Land

Then I decided to suck it up and turn on the oven. It was time for a galette. 
 
With their tart, fruit filling and buttery crust, galettes are one of my favorite pastries. Their free-form nature makes them relatively easy to throw together on the fly (and thus perfectly in line with my no-fuss summer cooking policy), especially when made with this super easy galette dough.

Image: Olaiya Land
Image: Olaiya Land
Image: Olaiya Land

After I pulled this beauty out of the oven, all caramelized and bubbling, Beau and I cut ourselves thick slices, topped them with vanilla ice cream and took them outside to eat in the afternoon sun. I didn’t regret turning on the oven or dirtying a few dishes for one second.


Image: Olaiya Land

Apricot Triple Berry Galette

  • ½ recipe Galette Dough
  • 1 lb ripe apricots, pitted and halved if small, quartered if larger
  • 1 ½ cups mixed berries (I used raspberries, golden raspberries and tayberries)
  • 3-5 tablespoons sugar, divided (or to taste)
  • 1 teaspoon cornstarch
  • Salt
  • 1 egg
  • Coarse sugar, such as Turbinado, Demerara or sanding sugar (regular old sugar will work, too)
  • Vanilla ice cream, creme fraiche or sweetened whipped cream, to serve

Preheat the oven to 400°. Line a large rimmed baking sheet with parchment paper. On a lightly floured work surface, roll out the disk of dough to roughly 1/4-inch thickness. Transfer to the baking sheet (the pastry will likely hang over the edges a little bit). Refrigerate the for 10 minutes.
 
While the dough is in the fridge, place the apricots in a large bowl and place the berries in a medium bowl. Add 3 tablespoons of sugar, the cornstarch and a tiny pinch of salt to the apricots. Toss, then taste and add more sugar if your apricots are a bit tart. Add 1 tablespoon of sugar and a tiny pinch of salt to the berries. Toss, taste and add more sugar if your berries need it.
 
Spread the apricots on the pastry to within 2 inches of the edge. Arrange the berries over the apricots. Fold the edge over the filling, pleating as you go. In a small bowl, whisk the egg with a tablespoon of cold water and brush it over the dough then sprinkle with the sugar. (For an extra pretty galette, place it in the fridge or freezer for 15-20 minutes before baking--this keeps it from slumping in the oven.) 
 
Bake in the center of the oven for 50-60 minutes, until golden brown and bubbling. Let the galette cool slightly before cutting into wedges and serving with ice cream, creme fraiche or sweetened whipped cream.
 
Serves 6-8.

Image: Olaiya Land

Galette Dough
13 ¾ oz (3 cups) all-purpose flour
2 tablespoons sugar
1 ¾ teaspoons kosher salt
9 oz (1 cup plus 2 tablespoons  or 2 ¼ sticks) chilled unsalted butter, cut into ½ inch cubes
8 tablespoons (or more) ice water
1 ½ teaspoons apple cider vinegar
 
*Note: This is a tender (as opposed to flaky) dough because it's made in the food processor. It's the most failsafe, forgiving dough I've ever encountered (it's been my go-to for over a decade) and a great place to start if you're nervous at all about working with dough. If you don't have a food processor, you can substitute my pie dough, or use the method described in my pie recipe to rub the butter into the dry ingredients. This will yield a flakier, but equally delicious galette dough.

- This dough can be refrigerated for up to 2 days, or placed in a ziploc bag and frozen for up to 2 months. If frozen, thaw the dough in the refrigerator overnight and soften slightly at room temperature before rolling out.

Image: Olaiya Land

Blend the flour, sugar and salt in a food processor to combine. Add the butter, one piece at a time, using on/off turns. Process until the dough looks like sand with some pebbles in it. Drizzle in the cider vinegar while pulsing the dough. Then add the 8 tablespoons of ice water and blend until moist clumps form. 
 
The mixture should be moist enough to form a dough when you pinch it together. If you have used 8 tablespoons of water and the dough seems dry, give it a few more pulses in the food processor and then pinch off a golf ball sized piece. Squeeze it and see if it wants to come together into a dough. If it’s too crumbly and won’t form a dough, blend in a bit more water, a teaspoon at a time, until the mixture forms a dough when you pinch it together.
 
Turn out the dough onto a large work surface and gather it together into a ball. Do not knead it as this will toughen the dough. Divide it in half with a bench scraper or knife. Form each half into a ball and then flatten each ball into a disk about ¾-inch thick. Wrap each disk in plastic wrap and chill for at least an hour before rolling. (Ok, to be honest, this dough is so forgiving, I’ve rolled it out without chilling it. But that’s only for emergencies. You’ll get a much nicer galette if you chill the dough!)
 
Makes 2 dough disks (enough for 2 galettes).