sides

smoky tomato broth with masa dumplings and black beans

smoky tomato broth with masa dumplings || millys-kitchen.com

After my trips to Paris and Oaxaca, arriving home in the middle of our depressing political situation and abysmal Seattle weather had me in a proper funk.

The kind of funk that leaves you struggling to get out of bed in the morning. A funk that makes eating cookies for breakfast, lunch and dinner sound like a good idea. The sort of funk that requires spending as much time as possible in stretchy clothing (preferably pyjamas) in order to avoid feeling bad about all those cookies you ate.

smoky tomato broth with masa dumplings || millys-kitchen.com

But the good news is I think I’m finally emerging from this tailspin. 

Beau once told me about a Kanye interview in which Mr. West declared his personal mantra: “My life is dope and I only do dope things.” Now, when I find myself feeling small or like an impostor or afraid to pursue my dreams, I try to channel Kanye’s manifesto of personal awesomeness. 

smoky tomato broth with masa dumplings || millys-kitchen.com

To that end, I have started taking better care of myself again. I’m wearing grown-up clothes with zippers and buttons instead of lycra and spandex. I have replaced cookies with home-cooked meals. I’ve booked tickets to go see my best friend and her kidlets in Wichita and to spend some time under the California sun. I’m planning some fun travel around my Paris workshop in May (Hello, Scotland!). I’m organizing volunteers and testing recipes for next week’s Love Trumps Hate fundraising dinner

smoky tomato broth with masa dumplings || millys-kitchen.com

Earlier this week, I wanted to go back to bed and sleep until summertime. Today, I managed to shop for, test and shoot this Smoky Tomato Broth with Masa Dumplings and Black Beans. So things are looking up!

Hoping things are looking bright for you this weekend and sending you a reminder that your life is dope and you should only do dope things!

XO,

Olaiya


Smoky Tomato Broth with Masa Dumplings and Black Beans

  • 1/2 cup dried black beans, soaked and cooked (or 1 can black beans)
  • 1 large onion
  • 4 dried smoked serranos (or other smoky dried chiles)
  • 2 teaspoons whole cumin seed
  • 2 tablespoons neutral tasting high-heat oil (I used avocado oil), plus additional for frying the dumplings
  • 2 cloves garlic, minced
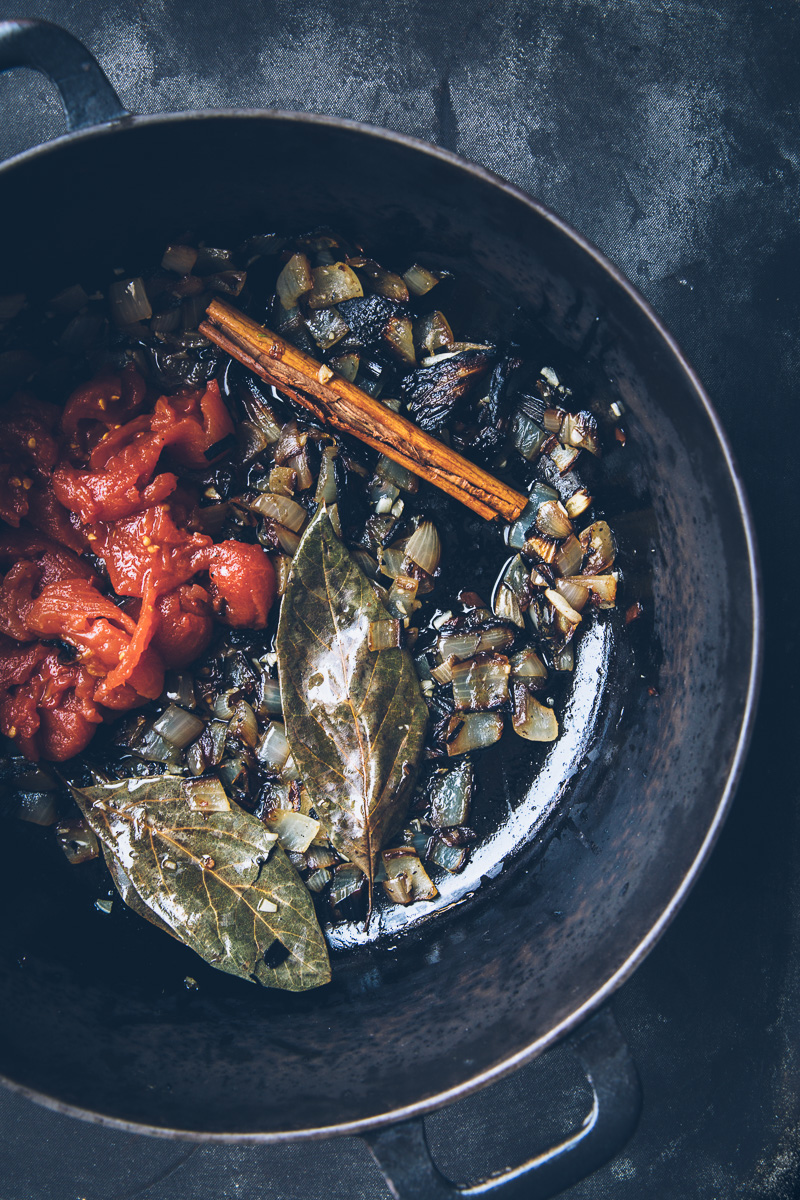
  • 3 avocado leaves or 2 bay leaves
  • 1 stick canela (Mexican cinnamon, also known as Ceylon or true cinnamon)
  • 1 28-oz can whole peeled tomatoes or diced tomatoes
  • 2 tablespoons Mexican chocolate or cocoa powder
  • 3-4 cups bean cooking liquid or vegetable or chicken stock (preferably homemade)
  • Salt, to taste
  • Piloncillo or brown sugar, to taste
  • 1 cup instant masa harina
  • 1 thinly sliced avocado, to serve
  • ½ cup crumbled queso fresco (or mild feta), to serve
  • ¼ cup cilantro leaves, to serve

*Notes: Home cooked beans are best in this recipe but canned will work in a pinch. 

- I recommend searching out the specialty Mexican ingredients in this recipe if you can. If there’s a Mexican tienda near you, you’ll likely be able to find them there. If not, you can order on-line. I get it if you don’t want to track them all down, but this soup is so much more wonderful and subtle with these ingredients instead of substitutes.

- For the masa dumplings, called chochoyotes, you can fry them as I call for in this recipe or you can cook them in your soup for 10-15 minutes until they’re cooked through. I like the crunch of the fried chochoyotes to add some textural variance, but they’re delicious both ways.

- The broth tastes even better the next day, so make it a day in advance if you have time. The dumplings should be made just before serving.

- I wanted to keep this recipe vegan- and vegetarian-friendly, but you can use lard instead of oil if you want. You can also add a tablespoon of lard to the dumpling dough to make your dumplings a bit more tender. If you have access to the lard left over from making chicharrones, a) you are a very lucky person and b) you should use that.

- To turn this soup into a heartier meal, you can add a poached egg or two or some shredded cooked chicken or pork.

smoky tomato broth with masa dumplings || millys-kitchen.com

Soup prep
If you've cooked your own beans, let them cool in their cooking water then remove them with a slotted spoon (dumping them into a colander while they’re hot leads to smooshed beans). Be sure to reserve the cooking liquid. If you’re using canned, drain and rinse them before using. Set aside.

Preheat your broiler and line a sheet pan with foil. Peel your onion. Leave the root end intact but trim the hairs down. Slice the onion in half through the root end then slice each half into sixths, so that each section has a little bit of the root holding it together. Place the onion, cut-side-down on your sheet pan and broil until the onion is nice and charred (but not burnt to a crisp). Flip and cook until the other side looks the same then remove from the oven and set aside to cool. (You can do this on a grill heated to high if you prefer.)

Place the smoked serranos in a heatproof bowl and cover with 2 cups of boiling water. Set aside for at least 30 minutes to soften. Do not discard the soaking liquid.

Toast the cumin seeds in a heavy pan over medium-low heat until fragrant and a shade or two darker. Set aside to cool before grinding them in a spice grinder. Set ground cumin aside. 


To make the soup
When the onions have cooled enough to be handled, roughly dice them, discarding the root ends. Dice enough of the soaked chiles to yield 2 teaspoons (discard the seeds unless you LOVE super spicy food). Heat 2 tablespoons of the oil in a heavy-bottomed stock pot or Dutch oven over medium heat. Add the diced onion, garlic, avocado leaves and 2 teaspoons of the diced chiles. Cook until the onions and garlic have softened, about 5 minutes) then add the canela and ground cumin. Cook for 1 minute, stirring often. 

Add the tomatoes with their juice, Mexican chocolate or cocoa powder, 3 cups of the bean cooking liquid or stock, ½ cup of the chile soaking liquid and a generous pinch of salt. If you want more spice, add more of the chile soaking water and/or diced chiles. Add piloncillo or brown sugar to taste--you want just enough to balance out the acid in the tomatoes and any bitterness from the chocolate. Bring to the boil over high heat then reduce heat to low and cook, covered, at a bare simmer for 30-40 minutes. 

While the soup is simmering, make the chochoyote (dumpling) dough. In a medium bowl, mix the masa harina, a generous pinch of salt and ½ cup plus 3 tablespoons hot water. Knead until pliable and smooth, about a minute. Form the dough into a ball, wrap tightly with plastic wrap and rest for 30 minutes.

When the broth is done, carefully strain it through a sieve, pressing on the solids to extract as much liquid as possible. If your broth is thicker than you’d like, add a bit more bean liquid, stock or water to thin it. Taste and adjust seasonings. Return to the pot, add the beans, and keep warm while you make the chochoyotes.

Pour high-heat vegetable oil to a depth of 1 ½ inches in a small saucepan. Heat over medium heat to around 325°F. While the oil is heating, cut the dough into quarters and roll each quarter into a log roughly 1-inch thick. Use a knife or bench scraper to cut the log into 1-inch pieces. Roll a piece of dough into a ball then place on your work surface and use your finger to make a deep indentation in the ball. Repeat with the rest of the dough. 

Add some of the dumplings to the hot oil, taking care not to crowd the pan. Fry, turning once, until golden brown, about 4 minutes. Transfer cooked chochoyotes to a paper towel lined plate and salt generously. Repeat with the rest of the dumplings.

Ladle the hot soup into serving bowls. Add a few of the chochoyotes and garnish with avocado, queso fresco and cilantro. Serve immediately.

Makes 4-6 servings.

smoky tomato broth with masa dumplings || millys-kitchen.com

pineapple and jicama salad with chile-lime vinaigrette

pineapple and jicama salad with chile-lime vinaigrette | millys-kitchen.com

We’ve been in our house for a little over a year now. I’ve walked the streets of our new neighborhood dozens--maybe even hundreds--of times since we moved in. So I thought I had a pretty decent handle on the highlights of this little corner of Seattle.

Earlier this week, however, I learned that I had been overlooking one of the hidden culinary treasures of the city: the Discoteca los 3 Reyes.

This is not, as the name might suggest, a Latin nightclub, but rather a little grocery store jam-packed with every sort of Mexican ingredient your heart could desire. They stock the more familiar offerings: hot sauce and canned beans and spice packets for taco meat. But also corn husks for tamales, hibiscus flowers, dozens of chiles and fat kernels of Mexican corn ready to be ground into masa harina. They have piloncillo and Mexican cinnamon and dried avocado leaves. In short, they carry everything I need to get my Oaxaca food fix on.

pineapple and jicama salad with chile-lime vinaigrette | millys-kitchen.com

Naturally, I filled my shopping bag with tons of ingredients I don’t entirely know how to use (what do you do with yerba santa anyway?) and over the next couple weeks I’ll be testing recipes for my upcoming Oaxaca-inspired dinner--and just for fun. I’ll be posting my successes here.

Today's experiment was a Pineapple and Jicama Salad with Chile-Lime Vinaigrette and I'm calling it a success. This dish was inspired by a salad we had as part of our photography workshop in Oaxaca. As well as by all the chile-dusted tropical fruit sold in the streets of the city. It treads a thin line between savory and sweet and has some crunchy toasted peanuts and fresh herbs thrown in to round things out. 

pineapple and jicama salad with chile-lime vinaigrette | millys-kitchen.com

Beau and I devoured a plate of this for lunch alongside some jalapeño eggs. Then we started dreaming up other ways to eat it in the coming weeks: as a salsa on top of a nicely charred steak, as a bed for roasted halibut, with yogurt and toasted coconut. Beau even thinks you could get away with adding a scoop of sorbet or ice cream. (Of course, he thinks you can improve a lot of things with a scoop of ice cream, so I’ll have to let you know about that one.)

However you decide to serve this salad, I hope you enjoy it. I’ll be back soon with more dispatches from the Discoteca los 3 Reyes and more Oaxaca-inspired kitchen experiments.


Pineapple and Jicama Salad with Chile-Lime Vinaigrette

  • 2 oranges, (I used cara caras)
  • 1 ripe pineapple, peeled, halved lenghtwise and thinly sliced
  • 1 cup peeled and julienned jicama
  • 3 dried arbol chiles (or to taste)
  • 2 tablespoons fresh lime juice
  • 2 teaspoons honey
  • 1/4 cup neutral-tasting oil (I used avocado oil)
  • 1/4 cup roasted peanuts, roughly chopped
  • Salt, to taste
  • 6 radishes, very thinly sliced
  • 1 tablespoon roughly chopped mint, plus a few leaves for garnish
  • 1 tablespoon roughly chopped cilantro, plus a few leaves for garnish

*Notes: This salad is fairly spicy. If you don't like spice, either cut back on the arbol chile or use a milder chile.

- I think this salad would also be delicious topped with crumbled queso fresco.

pineapple and jicama salad with chile-lime vinaigrette | millys-kitchen.com

Using a sharp knife, slice the peel and pith from the oranges. Carefully slice them into 1/4-inch rounds and then cut each round into sixths (you'll have six little triangles for each slice). Arrange the sliced pineapple, oranges and jicama on a serving platter. 

De-stem the chiles and place them in a spice grinder. Process into fine flakes. Place the chiles in a medium bowl along with the lime juice, honey, oil, peanuts and chopped herbs. Stir to combine then add salt to taste (you want it to be a bit on the salty side). 

Pour the vinaigrette over the pineapple, oranges and jicama. Scatter the radishes and reserved herb leaves over the salad and serve.

Makes 6-8 side dish servings.

pineapple and jicama salad with chile-lime vinaigrette | millys-kitchen.com

salt-roasted beef with lemon-hazelnut pesto, pears and celery root

salt-roasted beef with lemon-hazelnut pesto on millys-kitchen.com

Hello from Paris!

I hope you had a beautiful Christmas. I was a bit under the weather/jet-lagged, so Beau and I had a pretty mellow holiday: a walk over to Notre Dame to hear the Christmas bells toll, a leisurely stroll through the Luxembourg gardens with a stop for coffee at the Café de Flore. A seafood extravaganza for two and early to bed. We didn’t even pop the bottle of champagne we bought!

salt-roasted beef with lemon-hazelnut pesto on millys-kitchen.com
Salt-Roasted Beef with Lemon-Hazelnut Pesto, Pears and Celery Root

But I’m planning to make up for our rather subdued Christmas celebration in a few days. As far as I’m concerned, there’s no better place to ring in the new year than the city of light. Beau and I have a table booked at one of our favorite restaurants. There will be oysters. There will be champagne. There will be all manner of other deliciousness and then there will be heading out into the chill to watch the Eiffel Tower sparkle over the city. 

salt-roasted beef with lemon-hazelnut pesto on millys-kitchen.com

But before all that, let’s talk about your New Year’s Eve dinner. 

If I were home, I’d be fixing this Salt-Roasted Beef with Lemon-Hazelnut Pesto, Pears and Celery Root. My friend Kyle and I served this at the pop-up dinner we hosted earlier this month. This beauty is Kyle’s invention. How he comes up with such creative dishes, I have no idea. Also, it takes him about two seconds to whip up an entire menu. Without cracking a cookbook. While I am jealous, I am also thrilled to be the beneficiary of his chef-brain. And even more thrilled that I got to eat this dish three times in one month: once while we were testing it, once at the dinner and again when I shot it for the blog with my friend Carrie

salt-roasted beef with lemon-hazelnut pesto on millys-kitchen.com

This roast sits at the intersection of easy and impressive. Exactly what you want on a holiday where you should be sipping champagne with your guests instead of sweating away in the kitchen. The salt crust seasons the meat while sealing in all the delicious juices. The roasted pears and celery root are a meltingly soft, subtly sweet base for the beef--far sexier than mashed potatoes. And the bright, herby pesto makes it all sing. Plus, how often do you get to smash open your meal with a hammer? Very exciting stuff.

However you decide to ring in 2017, I hope it brings you joy. Thank you for following along here and for all your kind comments and emails over the past year. You make this adventure I’m on so much more fun! 

With much love,

Olaiya


Salt-Roasted Beef with Lemon-Hazelnut Pesto, Pears and Celery Root

  • 2-3 lb boneless cross-rib roast (also known as a flat iron roast)
  • 6 cups kosher salt
  • 3 egg whites
  • ½ cup cold water
  • Freshly-grated black pepper
  • 1 recipe Lemon-Hazelnut Pesto (below)
  • 1 recipe Roasted Pears and Celery Root (below)

Lemon-Hazelnut Pesto

  • ½ cup hazelnuts

  • ¼ cup mint, gently packed

  • ¼ cup parsley, gently packed

  • ¼ cup cilantro, gently packed

  • 2 tablespoons dill

  • 1 preserved lemon

  • ¼ cup minced shallot (about 1 large)

  • Finely grated zest of 1 lemon

  • Juice of 1 lemon

  • ½ teaspoon kosher salt

  • 1 cup hazelnut or olive oil


Pears and Celery Root

  • 2 slightly underripe pears

  • 1 large celery root

  • Extra-virgin olive oil

  • Kosher salt


*Notes: My wonderful neighborhood butcher turned me onto the boneless cross-rib (or flat iron) roast called for in this recipe. I love this cut because it’s flavorful and a great value when you’re feeding a crowd. It does have more connective tissue and marbling in it than some other cuts (sort of like a prime rib roast). If that’s not your thing, you might want to consider a different cut of beef. They’re considerably more expensive, but a tenderloin roast or strip roast never disappoint. 

- If you roast or grill a larger cut of meat even once a year, I recommend you purchase a corded meat thermometer like this one. You stick the probe in the middle of your roast, while the display sits on the countertop by your oven. Set the desired temperature and it will beep when your meat is ready. No opening the oven door and letting out the precious heat. No guessing as to when your roast will be the exact doneness you like. A corded thermometer will take your roast game to a whole new level. 

salt-roasted beef with lemon-hazelnut pesto on millys-kitchen.com

Remove the beef from the fridge about an hour before you want to cook it so it can warm up slightly.

Preheat your oven to 375°F. Spread the hazelnuts on a rimmed sheet pan and toast until the nuts turn golden-brown and fragrant, 8-12 minutes. Transfer to a plate to cool. When cool, roughly chop the nuts or crush them with the side of a chef’s knife or with a mortar and pestle (no need to peel). Place the nuts in a medium bowl. Roughly chop the herbs and add them to the bowl. Cut the preserved lemon into quarters and scoop out the flesh and toss or reserve for another use. Finely dice the peel and add it to the bowl. Add the minced shallot, lemon zest and juice, salt and olive oil and stir to combine. Taste and adjust seasonings to your liking. Set aside to let the flavors come together.

To prepare the beef, mix the salt, egg whites and water in a large bowl until the salt is evenly moistened. Place a thin layer of the salt mixture just wider than your beef roast on a rimmed sheet pan. Place the beef on top of this layer and generously sprinkle with black pepper. Use the rest of the salt mixture to cover the roast, pressing to seal the beef in. Place in the oven and roast to desired doneness: 120°F for rare, 125°F for medium rare, 130°F for medium. Remove from the oven and set aside to rest, without breaking open the salt crust. (Don't worry if the crust has a few cracks in it when it comes out of the oven; that's fine.) Rest the beef for at least 15 minutes before you crack open the crust and slice it. 

While the beef is roasting, prepare the pears and celery root. Remove the skin and any roots from the celery root and slice into ⅓-inch thick pieces. Core the pears and slice into ⅓-inch thick pieces. Place the pears and celery root on a parchment-lined rimmed sheet pan. Sprinkle generously with salt and  toss with olive oil to coat. When the roast is about 10 degrees under the desired doneness, place the pears and celery root in the oven. When you remove the beef, increase the oven temperature to 475°F and roast until the pears and celery root are tender and golden brown, turning occasionally, 30-35 minutes. 

When the pears and celery root are done, crack open the salt crust on the beef using a rolling pin, meat mallet or hammer. Brush the salt off the beef and slice. Transfer the roasted pears and celery root and the beef to a serving platter. Spoon some of the pesto over the beef and serve immediately, passing the rest of the pesto alongside. 

Makes 6-8 servings.

Recipe by Kyle Wisner

salt-roasted beef with lemon-hazelnut pesto on millys-kitchen.com