sweets

toasted buckwheat granola with tahini and dark chocolate

Buckwheat Granola with Tahini and Dark Chocolate // Image: Olaiya Land

Hello people!

Today’s the day! It's the final post in the holiday blognanza I put together for you with Megan from Cream + Honey! In case you missed them, you can check out our previous posts here:

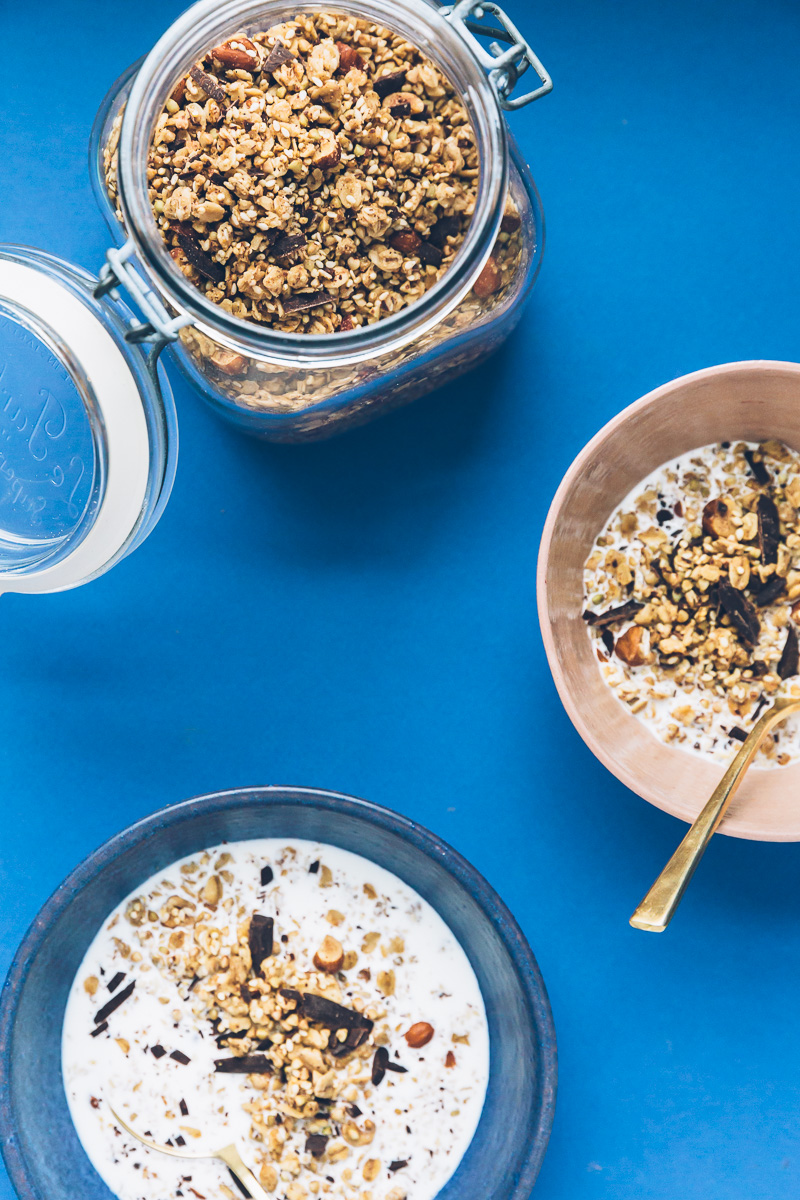
Every year, I like to share an easy last-minute edible holiday gift recipe with you. This year, I’ve got this Buckwheat Granola with Tahini and Dark Chocolate. This one goes out to all the procrastinators among us (including myself) who are scrambling for a last-minute homemade gift idea. And to all you overachievers who want to spread a little extra holiday cheer! Whichever camp you fall into, you most definitely need to make this granola.

Buckwheat Granola with Tahini and Dark Chocolate // Image: Olaiya Land

In an effort to switch things up this year, I dialed back the oats in my go-to granola formula and decided to throw in a generous amount of lightly toasted buckwheat groats. This turned out to be a pretty good move on my part (thank you Alison Roman for the inspiration) because the buckwheat lent an earthy complexity to this granola and made it extra crunchy and sog-proof. 

I hate getting hungry halfway through my morning, so to make this more filling, I added protein-packed quinoa to the mix. I’ve got hazelnuts in there too because, duh, I AM OBSESSED WITH HAZELNUTS. (I might lay off the hazelnuts in the new year. Can’t make any promises though…). 

Lastly, I’ll admit that the super sexy tahini + dark chocolate combo could be considered showboating (mostly by people who eat bran flakes for breakfast). In my defense, however, it elevates this way beyond your basic bulk-bin affair and turns it into the sort of granola your brunch guests will ooh! and ah! about and your children will fight over. (Don’t blame me, blame the chocolate.)

Buckwheat Granola with Tahini and Dark Chocolate // Image: Olaiya Land

This takes about 15 minutes of active time plus 50 minutes in the oven, which gives you just enough time to whip up a batch of Megan’s Amaro Sprtiz Punch and kick the holiday weekend off in boozy style!

I myself will most likely be subsisting on handfuls of this granola over the next 48 hours as I attempt to distribute the last of my holiday baked goods, prep the house for our AirBnB guests (so nerve racking!) and pack my bags for Paris.

Buckwheat Granola with Tahini and Dark Chocolate // Image: Olaiya Land

I’m not sure if I’ll have time to post before the new year, so I’ll take this opportunity to tell you how immensely grateful I am to all of you who joined my workshops, followed my adventures on Instagram and stopped by to read this blog. Thank you, thank you, THANK YOU! Your kindness and support over the past year mean so much to me. 

I wish you a beautiful, restful and delicious holiday and I can’t wait to see you in 2018!

XOXO!

Olaiya


Toasted Buckwheat Granola with Tahini and Dark Chocolate

  • ¼ cup sugar
  • ½ vanilla bean
  • 2 cups raw buckwheat groats
  • 3 cups rolled oats (not instant)
  • 1 cup raw hulled sesame seeds
  • 1 cup raw hazelnuts, roughly chopped
  • ½ cup uncooked quinoa
  • 1 teaspoon ground cardamom
  • 1 teaspoon coarse salt
  • ¼ cup avocado oil, refined coconut oil (or other neutral-tasting oil)
  • ¼ cup extra-virgin olive oil
  • 2 tablespoons maple syrup
  • ¼ cup rice bran syrup or agave
  • 6 tablespoons tahini
  • 1 cup (4 oz) shaved dark chocolate (I used Callebaut 60%)

*Note: There are two kinds of buckwheat groats--raw (or lightly toasted) and darkly toasted (also known as kasha). For this recipe you want raw or lightly toasted buckwheat groats since they're going in the oven for quite a while. These will be green or light brown and shouldn't have much of a scent to them. It's pretty easy to distinguish from kasha which is dark brown or reddish brown and has a nutty, toasted smell to it. If you can't find raw buckwheat groats where you live, feel free to substitute more oats or a mix of other dry ingredients like flax seeds, raw sunflower seeds, spelt flakes, etc.


Buckwheat Granola with Tahini and Dark Chocolate // Image: Olaiya Land

Preheat your oven to 300° F.

Place the sugar in a small bowl. Using a paring knife, split the vanilla bean lengthwise and use the sharp edge of the knife to scrape the seeds from the pod. Add the seeds to the sugar and use your fingers to rub the vanilla into the sugar, breaking up any clumps. Place the buckwheat, oats, sesame seeds, hazelnuts, quinoa, cardamom and salt in a large bowl. Add the vanilla sugar and stir to combine thoroughly.

Combine the oils, syrups and tahini in a medium bowl and whisk well to combine. Pour the wet ingredients over the dry ingredients and stir until all the dry ingredients are completely coated.

Divide the granola between two parchment-lined sheet pans. Spread the granola out and place the pans in the oven. Bake for 50-60 minutes, rotating the pans and stirring the granola every 15 minutes or so. You want to remove the granola from the oven when it's golden brown. Don't worry if it's not completely dry; it will crisp up as it sits. Place the sheet pans on wire racks to cool. When the granola is completely cool, stir in the shaved chocolate. 

Transfer the granola to an airtight container (I like a big mason jar) and store in a cool dry place. Tightly covered, the granola will keep for several weeks.

Buckwheat Granola with Tahini and Dark Chocolate // Image: Olaiya Land

hazelnut amaretti with orange and vanilla

hazelnut amaretti with orange and vanilla // image: Olaiya Land

Have I mentioned what a sap I am about Christmas? This morning I might have teared up a little bit listening to Michael Bublé sing I’ll be Home for Christmas. (Don’t judge.)

I’ve always loved Christmas. It probably started because my birthday is on Christmas day. When I was little, the holiday season represented a shower of gifts and cake and celebration after a year-long drought spent watching my friends celebrate their non-Christmas birthdays.

People always think Christmas birthdays suck. But they only suck if your family and friends suck. My family has always celebrated Christmas on December 24th and my birthday on the 25th. And I’ve never once received a combo Christmas/birthday present. So I think it’s a pretty sweet deal.

hazelnut amaretti with orange and vanilla // image: Olaiya Land

Now that I’m an adult and no longer staying up to catch a glimpse of Santa and his reindeer, I still love Christmas. I love the decorations and the food and the music. I love the baking and the wrapping and the anticipation that if we're lucky, there just might be snow. 

But Christmas and I had a dark patch.

There was a period when I had let things spiral up into Martha-Stewart-level insanity and was crumbling under the pressure to buy amazing gifts, decorate the perfect tree, bake and ship an assortment of holiday cookies and plan a Christmas Eve feast like no other. 

As I wrote in this post, it struck me (probably while I was stuck in holiday traffic) that I was super pissed about Christmas. I wanted to abandon the whole thing, book a flight to a sunny beach somewhere and drink margaritas for about a week. Not exactly holiday cheer.

That was the year I decided to reign in the crazy. I took a step back and asked myself what the essence of the season was for me. And of course it was all about people. Letting people know they’re loved and appreciated. Spending time with our friends and family. And also taking some time away from work to recharge our batteries (possibly by watching many holiday movies snuggled on the couch with said loved ones).

hazelnut amaretti with orange and vanilla // image: Olaiya Land

So now I’m on a mission to keep Christmas easy, breezy and fun. Like it should be. To that end, I’m teaming up with Megan from Cream & Honey to bring you a month of posts centered around celebrating the holiday in style without losing your mind. We’ll have recipes, entertaining tips, gift guides. Maybe even a holiday playlist with Michael Bublé crooning I’ll be Home for Christmas. (Don’t play it cool. You know you secretly love the Bubs.)

I’m kicking things off with this recipe for Hazelnut Amaretti with Orange and Vanilla. This is my version of a cookie I saw in my friend Caroline’s Instagram feed. She was kind enough to translate the recipe from Dutch and send it to me. After I tasted them, I decided these cookies would be perfect with a cup of coffee or a glass of wine. Because I am incapable of following a recipe as written, and because I love hazelnut with coffee, I played around with Caroline’s recipe until I came up with this version. 

That I was the year I decided to reign in the crazy. I took a step back and asked myself what the essence of the season was for me. And of course it was all about people. Letting people know they’re loved and appreciated. Spending time with our frie…

Calling these cookies is a little misleading. They lie somewhere between a cookie and a confection. On the first day, they are crisp on the outside with a bit of softness in the center. On the next day, however, they are tender and chewy under their crisp, airy crust. I like them better the second day. I imagine that, like most amaretti-type cookies they will hold for ages in a well-sealed tin. But they have yet to make it past a second day in our house, so I can’t tell you for sure. 

To help you keep things simple this holiday season, these are super easy to make. These come together in about 10 minutes (plus additional chilling and baking time, when you can be sipping a glass of wine and waiting for these to come out of the oven so you can dunk them). You don’t have to candy citrus or roll out shortbread or make a citrus glaze like I asked you to do for last year’s holiday cookie (it was so good though!). You can freeze the dough and bake these off as you need them. Aaaand these little guys are sturdy. They will happily hold their shape if you decide to ship them across town or to the other side of the globe. Ta-da!

That I was the year I decided to reign in the crazy. I took a step back and asked myself what the essence of the season was for me. And of course it was all about people. Letting people know they’re loved and appreciated. Spending time with our frie…

And for even more inspiration on how to keep the holiday season Classy Not Crazy this year, click on over to Megan’s recipe for Pine Shortbread Cookies. In addition to this awesome recipe (Pine, people! It's hip. It's a thing. Look it up.), you'll also get Megan's tips on how to plan a killer holiday party with ease and some great gift ideas.

Let me know in the comments below what sort of holiday tips you'd like more of. And I’ll be back next week with more ideas for keeping your holiday baller status high and your stress-levels low.

xo,

Olaiya 


Hazelnut Amaretti with Orange and Vanilla

  • 200g (1 1/2 cups) raw hazelnuts
  • 200g (1 cup) granulated sugar, divided
  • 2 tablespoons coconut flour (All-Purpose flour or cornstarch will also work)
  • 1 teaspoon baking powder
  • 1 teaspoon finely grated orange zest
  • Pinch salt
  • 1/2 vanilla bean
  • Whites from 2 large eggs
  • 1 cup powdered sugar

*Notes: I highly recommend using weight measurements for all baking, since it is so much more precise than volume measurements. I especially recommend it for these cookies since the size (and thus volume) of hazelnuts can vary so widely.

- I also made a batch of these with almonds instead of the hazelnuts and lemon zest instead of the orange that was lighter in flavor, but also delicious. Feel free to play around with the nuts and flavorings to make these cookies your own. The only test batch I didn't love were the 100% pistachio version. They were way too rich. If you want to make a pistachio version, I would use roughly half pistachios and half almonds.

Preheat your oven to 300°F/150°C. 

Place the hazelnuts on a rimmed sheet pan and toast until fragrant, about 12 minutes. Remove the nuts from the pan and place them in the middle of a large kitchen towel. Bring the four corners of the towel towards each other and twist them together to make a little parcel. Vigorously rub the hazelnuts together inside the towel for a minute or so. When you open the towel most of the skins should have fallen off. Lift the nuts off the towel with a slotted spoon, leaving the skins behind (it's ok if some are still attached) and place them on a plate to cool. Set aside.

When the hazelnuts are completely cool, place them in a food processor along with 150 g (3/4 cup) of the sugar, the coconut flour, baking powder, orange zest, and the salt. Using a sharp paring knife, split the vanilla bean in half lengthwise and scrape the seeds from the pod. Add the seeds to the mixture in the food processor. Process until the mixture looks like sand. (Take care not to over-process or your nuts will start to turn to nut butter.) Set aside.

Place the egg whites in the bowl of a stand mixer and beat at medium speed with the whisk attachment. (You can also use a hand mixer or beat the eggs by hand with a whisk.) When the whites look foamy, increase the speed to high and gradually sprinkle in the remaining 50g (1/4 cup) sugar. It should take about 30-45 seconds to drizzle in the sugar--don't rush it. Continue to beat at high speed until the whites are dense and glossy and just hold soft peaks.

Gently fold the nut mixture into the egg whites. The egg whites will deflate quite a bit, but try to use a light hand so the dough retains some of the lightness from the whipped eggs. Place the dough in the refrigerator to chill for at least 30 minutes (this makes it easier to scoop).

When the dough has chilled, place the powdered sugar in a rimmed plate or pie pan. Use a small scoop (I used a 1-tablespoon scoop) to form walnut-sized balls of dough. Drop them in the powdered sugar and roll them around until they are coated in sugar. Transfer the coated dough balls to the refrigerator or freezer to rest for another 30 minutes. I prefer to freeze mine. If you want to freeze them for later use, just pop the coated dough balls in a freezer bag once they're sold and bake from frozen.

If the dough balls have absorbed most of the powdered sugar coating, roll them in the powdered sugar again before baking. Then place them on a parchment-lined sheet pan, leaving 2 inches between cookies. Using a sharp knife, cut a shallow "X" onto the top of each cookie. This is what gives these cookies their crispy, craggy surface. Bake for 15-20 minutes. You want them to be golden on the bottom with crispy edges and soft in the middle. Keep in mind that they will crisp up as they cool. For a softer, blonder cookie, bake closer to 15 minutes. For a crispier, slightly darker cookie, bake closer to 20. Bake completely frozen dough balls for 18-20 minutes.

When the cookies are done, cool them on their pan for 5-10 minutes then transfer them to a wire rack to cool completely. Store cookies in an air-tight container after baking.

That I was the year I decided to reign in the crazy. I took a step back and asked myself what the essence of the season was for me. And of course it was all about people. Letting people know they’re loved and appreciated. Spending time with our frie…

orange-pistachio semolina cake

orange pistachio semolina cake || Image: Olaiya Land

Hello lovely people,

I’m back in Seattle after seven glorious weeks in Europe. And by glorious I mean crazy chaotic and jam-packed with work! I think I might be constitutionally incapable of being realistic about my own limitations. If a project sounds fun/interesting/novel/challenging, I feel compelled to say yes. Sleep and sanity be damned.

I’m not complaining. I got to discover beautiful Bordeaux. And collaborate with talented artists. And people-watch in Paris. And eat amazing food from my favorite chefs. And see friends. And make new ones. And drink a little too much deliciously funky French champagne. 

orange pistachio semolina cake || Image: Olaiya Land

But I landed in Seattle sort of flattened from all those weeks of living out of a suitcase and navigating the stress of travel abroad. (Not once, but twice, restaurants I had booked for my retreat guests lost our reservation. One for 12 people on a Saturday night during Paris fashion week!) 

So since I got home, I’ve tried to be extra kind to myself. I’ve been making space for ample amounts of sleep. (I actually just woke up from a long Friday afternoon nap, which is unheard of for me.) Plenty of water and nourishing food. Runs through the fall foliage. Lots of laughter and connection with friends and family. And just generally more pleasure. You know--all those things we know we should be doing but don’t.

orange pistachio semolina cake || Image: Olaiya Land

I have a mountain of images from my trip to sift through and I can’t wait to share them with you! But as part of taking my foot off the gas for a moment, I decided to opt for something a little easier this week. This superb cake was left over from a cooking class I taught at Book Larder. It wasn’t really on my agenda to shoot it and put it up on the blog. But then I woke up the day after my class and realized I had a delicious, fully-baked cake in my possession and that it would be pretty easy-peasy to shoot and share it.

Now don’t go thinking I’d throw any old junk up here on the blog; this cake is ridiculously good. I hadn’t made it in a couple of years and had forgotten how truly fantastic it is. When I cut myself a slice in class, topped it with a mound of delicately floral orange blossom whipped cream and took a bite, I was momentarily transported.

orange pistachio semolina cake || Image: Olaiya Land

In line with this week’s theme of keeping things easy, this cake comes together with very little fuss. No egg whites to whip up. No need to remember to bring your ingredients to room temperature. You don’t even need a mixer. So if you also want to be extra nice to yourself this weekend, this cake is for you!

I’ll be back soon to share new work from my Paris and Portugal trips with you. In the meantime, I’ll be spending my weekend cooking, listening to records, watching the rain come down, and hopefully fitting in a nap or two.


Orange-Pistachio Semolina Cake

  • 2 cups sugar, divided
  • 1/2 cup water
  • 1 cinnamon stick
  • Kosher salt
  • 3 tablespoons freshly-squeezed orange juice (zest the orange before juicing and reserve zest)
  • 3/4 cup shelled pistachios
  • 1 cup sugar
  • 1/2 cup all-purpose flour
  • 1 1/4 teaspoon baking powder
  • 2 cups fine semolina
  • 1 1/4 cup whole milk
  • 1/2 cup (8 tablespoons) butter

To serve

  • 1 recipe Orange Blossom Whipped Cream (below)

  • ¼ cup roughly chopped pistachios


*Note: This cake is better the next day, so make it in advance if you have time. Leave it covered out of the refrigerator overnight. 

orange pistachio semolina cake || Image: Olaiya Land

Preheat the oven to 350F. In a small saucepan, combine 1 cup of the sugar, water, cinnamon stick and a small pinch of salt. Bring to a simmer over medium heat and cook at a bare simmer, stirring occasionally, until the sugar has dissolved and the syrup has thickened slightly, 5-6 minutes minutes. Remove from the heat, stir in the orange juice. Set aside to cool until the cake is done.

Butter an  8” x 8” square or 9” round cake pan. 

Combine the pistachios and sugar in a blender or food processor. Process into a fine powder. Sift the pistachio sugar, flour, baking powder, 1/4 teaspoon salt and semolina into a large bowl. (The pistachios won't fit through a fine-mesh sieve, so if you don't have a medium-mesh sieve, use a fork or whisk to aerate your ingredients and remove lumps.) Add 1 teaspoon of the reserved orange zest and whisk to combine. Use your fingers to break up any remaining lumps.

Melt the butter in a small saucepan then transfer to a medium bowl. Heat the milk in the same pan over medium-low heat until it feels warm to the touch. Add to the bowl with the butter and whisk to combine. Add the milk and butter to the semolina mixture and stir to combine, making sure there are no pockets of dry semolina at the bottom of the bowl. 

Pour the batter (it will be thick) into the prepared baking dish. Bake for 40-45 minutes, until a toothpick inserted in the center comes out clean. 
 
When the cake is done, remove the cinnamon stick from the syrup. Pour the cooled syrup over the hot cake. Let the cake sit until the liquid has been fully absorbed and the cake has cooled to room temperature. Cut the cake into roughly 3-inch squares or diamonds. Top slices with Orange Blossom Whipped Cream and sprinkle with chopped pistachios before serving. 

Makes 8-10 servings.


Orange Blossom Whipped Cream 

  • 1 cup cold heavy cream

  • 2 teaspoons sugar (preferably superfine), or to taste

  • 1-2 tablespoon orange blossom water


Place the cream, sugar and 1 tablespoon of the orange blossom water into the bowl of an electric mixer fitted with the whisk attachment and beat on medium-high speed until the sugar has mostly dissolved. (You can also whip the cream with a hand blender or by hand with a whisk.) Taste and add more orange blossom water and/or sugar if desired. Beat until soft peaks form and serve.

Makes about 2 cups.

orange pistachio semolina cake || Image: Olaiya Land