french

northwest niçoise salad

Image: Olaiya Land

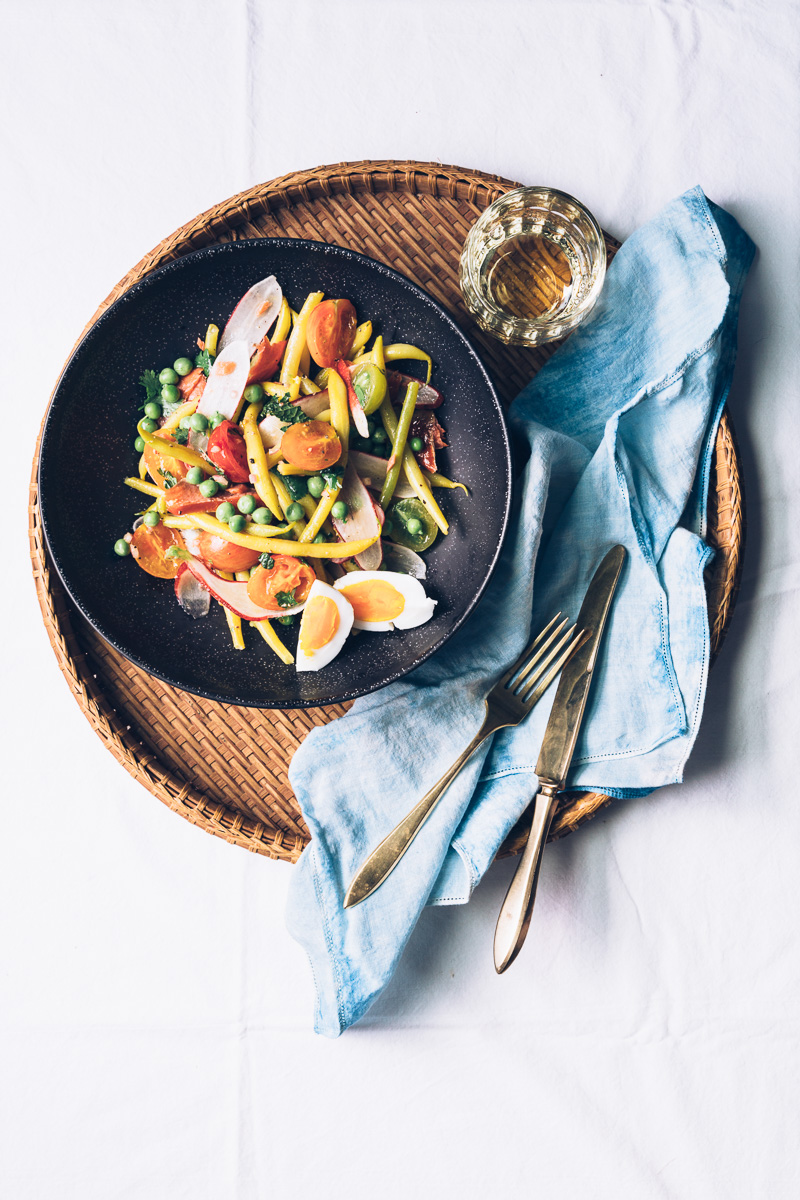
A few weeks ago, I threw together this salad with my haul from the farmers market. I wasn’t aiming for anything in particular as I grabbed ingredients from the fridge, just a quick supper. But as it came together, I realized I had made a sort of a Pacific Northwest version of a Niçoise salad.

After I made the salad again a couple weeks later, my thoughts turned to the many little ways I’ve managed to weave pieces of my travels to France into my Seattle life.

Unlike the many books out there suggesting you can transform yourself into a Parisienne overnight with a little red lipstick and a few glasses of heart-healthy red wine, I don’t think the French mystique can be exported wholecloth to the other side of the globe. Let’s be honest, most Americans are not ready for 5 sinful weeks of paid vacation or multiple glasses of wine over lunch on a Tuesday. 

Image: Olaiya Land

Though it would be challenging, ridiculous even, to go full-on French here in the U.S. of A., I happen to think there’s a lot to be gained by folding cherished bits of another country’s way of life into our own. So I sat down and made a list of some of the Paris-inspired habits that have improved my life:

First up is walking. Seattle is not a particularly walkable city. It’s easy to get in your car for every little trip. In Paris, you walk. Once I started going everywhere on foot in Paris, I realized that those walks around the city gave rise to my best thinking. They created a space to disconnect and unfurl my thoughts in a way I can’t behind the wheel of a car or crammed against a stranger in the Metro. Now I walk everywhere I can. It’s helped me drop a dress size (while still eating croissants and cream puffs on my tours), shake stress more easily and come up with better ideas than I would otherwise. I've decided walking is one of the best (and easiest) things I can do for my body and my mind. 

Next, is the very French art of making yourself feel beautiful. It is no secret that Parisians don’t run around grocery shopping or dropping their kids at school in their sweats. In Paris, when you leave the house, you dress like an adult, preferably an attractive one.

Before traveling to Paris often, I was a bit more--shall we say, lackadaisical--in my get-out-the-door routine. Especially since, as someone who works from home, I don’t actually need to get out the door most days. But all-day pajama parties are a thing of the past! I may not be pulling on my sexiest heels for a trip to the butcher (though don’t put it past me), I have discovered that I feel more confident, competent and beautiful when I take the time to wear clothes I love, brush on a coat of mascara and apply a hint of my favorite perfume. 

Image: Olaiya Land

On a related note, I’ve decided to prioritize skincare over makeup. For the most part, French people have gorgeous skin. I have developed an elaborate, Beautiful-Mind sort of theory as to why this is the case. But the short version is that they seem less stressed than Americans and they learn to care for their skin at an early age. (It's a thing. If you have a French friend, ask them at what age their mother introduced them to a formal skin-care regime!) 

Having not been born into a culture that teaches its youth how to cultivate glowing skin, I've had to hack my own quasi-French skincare routine. It involves some fancy-sounding French cleansers and creams--and even a dramatic spritz of thermal water! But it works. My skin has never looked better, which means I spend almost no money on makeup and still get to feel like a total babe. 

Parisians are also great at turning a few stellar ingredients into an amazingly satisfying meal. I’m talking a plate of creamy burrata, fruity olive oil, some aged ham and a handful of Sicilian almonds. Or maybe a pint of perfectly ripe cherry tomatoes tossed with olive oil, feta and dill spooned over a slice of toast or a pan-seared lamb chop. Or, a personal favorite: a whole steamed artichoke accompanied by a bright, lemony aioli. You get the idea--delicious, sophisticated flavors that come together in a flash. I’ve made it my mission to master this kind of weeknight dinner sorcery and I think you should, too. It’s creative, delicious and way more satisfying than grabbing take-out.

Image: Olaiya Land
Image: Olaiya Land

This one has been the biggest game-changer for me: Sitting down at the table for all meals. No phones. No TV. No scarfing a burrito over the kitchen sink or shoveling a sandwich into my face while I drive. 

Eating a meal undistracted allows you to slow down and fully taste what’s going in your mouth. I’m not going to lie, sometimes it’s a pain in the ass; I want to grab something quick and run out the door. Or answer emails over lunch. But I am amazed at how much more delicious food has become since I started eating this way! The bonus side effect is that I need less food to feel satisfied. (Why has it taken me so long to figure this out?!?)

Last, and most certainly not least, is wine. Yup. Wine. Before Paris became a regular part of my life, I was more of a weekend drinker: maybe a cocktail with friends before dinner or glass of wine if we had a bottle on hand. Now we always have a bottle on hand! Not that we’ve turned into great lushes. But I’ve fallen in love with some of the natural wines I first tasted in France. And there's something magical about how a glass of wine with dinner serves as a marker of sorts, a signal that the work day is done and that things can become a touch looser, more fun. With friends, the best conversation always seems to start after a bottle of wine has been opened and everyone’s feeling buzzy and bright and a little more open than usual. (And then of course there's that whole heart-healthy thing.) So when it comes to pouring myself a glass or two, I'm most definitely a convert.

Image: Olaiya Land


There you have it, friends: Some of the things Paris has taught me about how to live a beautiful life. I hope this list encourages you to work the most inspiring elements from your own travels into your everyday life. Drop me a line in the comments below if you do--I’d love to hear what habits you're making your own!

XO,

Olaiya


To experience the best of Paris for yourself, join my September Paris Revelry culinary & culture tour! There are still 2 spots left. Click here to grab yours!


Northwest Niçoise Salad

  • 4 large eggs
  • 2 tablespoons minced shallot
  • 2 teaspoons dijon mustard
  • 3 tablespoons red wine vinegar
  • Sea salt and freshly-ground black pepper
  • ½ cup olive oil

  • 1 lb. young wax beans (or green beans), stems removed
  • 1 cup shelled English peas (from 1 pound unshelled peas) or thawed frozen peas
  • 6 breakfast radishes, shaved lengthwise
  • 1 cup cherry or other small tomatoes, halved
  • 1 tablespoon mint, cut into chiffonade (thin strips)
  • 3 tablespoons whole cilantro leaves
  • 8 oz hot smoked wild salmon, broken into bite-size pieces

*Notes: If peas aren't your thing, try subbing in shelled fava beans or cooked chickpeas.

- The vegetables (except tomatoes), eggs and vinaigrette can all be prepped up to 2 days before serving. Store covered in the fridge and bring to room temperature before assembling the salad.

Image: Olaiya Land

Heat enough water to cover the egg in a small saucepan over high heat. When the water comes to the boil, add the eggs and cook for 10 minutes. Pour off the hot water and run cold water over the eggs until they are cool to the touch. Peel, halve and set aside.

On a separate burner, fill a large saucepan ⅔ full with water. Salt generously (it should taste like the ocean) and bring to the boil over high heat. (You’ll use this to blanch your vegetables in a moment.)

While the eggs are cooking, make the vinaigrette. In a medium bowl, combine the shallot, mustard, vinegar, a generous pinch of salt and several grinds of black pepper. Gradually whisk in the olive oil. Adjust seasonings and set aside.

When the salted water has come to a rolling boil, add the fresh peas and cook for about 1 minute (no need to blanch if you're using thawed frozen peas). Remove with a slotted spoon or spider to a small bowl and cover with ice water. Add the beans to the pot and cook to your desired doneness (I like mine to remain a little snappy). When done, transfer the beans to a medium bowl and cove with ice water. When completely cool, pour off the water and dry the peas and beans well.

To assemble the salad, place the beans, peas, radishes, tomatoes, herbs and salmon in a large bowl along with the herbs. Salt lightly and toss with some of the vinaigrette. Add more vinaigrette to taste. Transfer to a serving platter or individual plates and arrange the eggs over the salad. Salt the eggs and pour a bit of the vinaigrette over them just before serving. 

Makes 4 servings.
 

Image: Olaiya Land

apricot triple berry galette

Image: Olaiya Land

Seattle has bestowed an improbably beautiful June upon us. Normally, it rains right up to (and often through) the Fourth of July. But this year, the days have been bright and warm and the nights perfect for sleeping. My street is fragrant with jasmine and roses bending under the weight of their blooms. The tomato plants in my neighbors' gardens are growing like jungle vines.

The days are magnificently long, too. (I’m writing this at 9.16pm and the sun is only just starting to set). Which means Beau and I have been fixing simple dinners--whatever vegetables we have, thrown on the grill along with a few sausages or maybe a pork chop, and a bottle of rosé--and eating most of our meals outside. This is my idea of summer perfection.

Image: Olaiya Land

Baking has felt decidedly unappealing--all that time and mess and heating up the house when I could be spending time outdoors. But last week at the farmers market, I spied a pile of the season’s first tiny apricots. They were so cute with their downy, blushing cheeks--I couldn’t not buy them. I loaded up my basket and told myself I’d figure out what to do with them later.

Naturally, I let them sit on my counter, until they teetered on the very edge of being usable.

Image: Olaiya Land
Image: Olaiya Land

Then I decided to suck it up and turn on the oven. It was time for a galette. 
 
With their tart, fruit filling and buttery crust, galettes are one of my favorite pastries. Their free-form nature makes them relatively easy to throw together on the fly (and thus perfectly in line with my no-fuss summer cooking policy), especially when made with this super easy galette dough.

Image: Olaiya Land
Image: Olaiya Land
Image: Olaiya Land

After I pulled this beauty out of the oven, all caramelized and bubbling, Beau and I cut ourselves thick slices, topped them with vanilla ice cream and took them outside to eat in the afternoon sun. I didn’t regret turning on the oven or dirtying a few dishes for one second.


Image: Olaiya Land

Apricot Triple Berry Galette

  • ½ recipe Galette Dough
  • 1 lb ripe apricots, pitted and halved if small, quartered if larger
  • 1 ½ cups mixed berries (I used raspberries, golden raspberries and tayberries)
  • 3-5 tablespoons sugar, divided (or to taste)
  • 1 teaspoon cornstarch
  • Salt
  • 1 egg
  • Coarse sugar, such as Turbinado, Demerara or sanding sugar (regular old sugar will work, too)
  • Vanilla ice cream, creme fraiche or sweetened whipped cream, to serve

Preheat the oven to 400°. Line a large rimmed baking sheet with parchment paper. On a lightly floured work surface, roll out the disk of dough to roughly 1/4-inch thickness. Transfer to the baking sheet (the pastry will likely hang over the edges a little bit). Refrigerate the for 10 minutes.
 
While the dough is in the fridge, place the apricots in a large bowl and place the berries in a medium bowl. Add 3 tablespoons of sugar, the cornstarch and a tiny pinch of salt to the apricots. Toss, then taste and add more sugar if your apricots are a bit tart. Add 1 tablespoon of sugar and a tiny pinch of salt to the berries. Toss, taste and add more sugar if your berries need it.
 
Spread the apricots on the pastry to within 2 inches of the edge. Arrange the berries over the apricots. Fold the edge over the filling, pleating as you go. In a small bowl, whisk the egg with a tablespoon of cold water and brush it over the dough then sprinkle with the sugar. (For an extra pretty galette, place it in the fridge or freezer for 15-20 minutes before baking--this keeps it from slumping in the oven.) 
 
Bake in the center of the oven for 50-60 minutes, until golden brown and bubbling. Let the galette cool slightly before cutting into wedges and serving with ice cream, creme fraiche or sweetened whipped cream.
 
Serves 6-8.

Image: Olaiya Land

Galette Dough
13 ¾ oz (3 cups) all-purpose flour
2 tablespoons sugar
1 ¾ teaspoons kosher salt
9 oz (1 cup plus 2 tablespoons  or 2 ¼ sticks) chilled unsalted butter, cut into ½ inch cubes
8 tablespoons (or more) ice water
1 ½ teaspoons apple cider vinegar
 
*Note: This is a tender (as opposed to flaky) dough because it's made in the food processor. It's the most failsafe, forgiving dough I've ever encountered (it's been my go-to for over a decade) and a great place to start if you're nervous at all about working with dough. If you don't have a food processor, you can substitute my pie dough, or use the method described in my pie recipe to rub the butter into the dry ingredients. This will yield a flakier, but equally delicious galette dough.

- This dough can be refrigerated for up to 2 days, or placed in a ziploc bag and frozen for up to 2 months. If frozen, thaw the dough in the refrigerator overnight and soften slightly at room temperature before rolling out.

Image: Olaiya Land

Blend the flour, sugar and salt in a food processor to combine. Add the butter, one piece at a time, using on/off turns. Process until the dough looks like sand with some pebbles in it. Drizzle in the cider vinegar while pulsing the dough. Then add the 8 tablespoons of ice water and blend until moist clumps form. 
 
The mixture should be moist enough to form a dough when you pinch it together. If you have used 8 tablespoons of water and the dough seems dry, give it a few more pulses in the food processor and then pinch off a golf ball sized piece. Squeeze it and see if it wants to come together into a dough. If it’s too crumbly and won’t form a dough, blend in a bit more water, a teaspoon at a time, until the mixture forms a dough when you pinch it together.
 
Turn out the dough onto a large work surface and gather it together into a ball. Do not knead it as this will toughen the dough. Divide it in half with a bench scraper or knife. Form each half into a ball and then flatten each ball into a disk about ¾-inch thick. Wrap each disk in plastic wrap and chill for at least an hour before rolling. (Ok, to be honest, this dough is so forgiving, I’ve rolled it out without chilling it. But that’s only for emergencies. You’ll get a much nicer galette if you chill the dough!)
 
Makes 2 dough disks (enough for 2 galettes).

swiss chard gratin

swiss chard gratin on millys-kitchen.com

Hello!

This week I’m dropping in with an easy little recipe for Swiss chard gratin. Now that Halloween is behind us, my thoughts are turning to Thanksgiving dinner and which dishes will make the cut. I haven’t decided if I’ll roast a turkey. Or maybe a goose? A glazed ham never disappoints. I’ve even been toying with the idea of a crown roast or salt-crusted rack of lamb or some other dramatic dish.

For those of you who look forward to turkey and stuffing and cranberry sauce all year, this must sound like nothing short of heresy. But alas, we have no set Thanksgiving ritual in my family. For most of the 90s, for example, we chose a different country or region each year and fashioned our holiday feast around its cuisine. (Ireland was my favorite, if you’re curious. Followed by Cajun.)

swiss chard gratin on millys-kitchen.com

But back to this gratin. This is the only dish that’s Thanksgiving 2016 approved thus far. I made it for a cooking class I taught during my Paris culinary retreat in September and it struck me then what a wonderful holiday dish it would make. I served it alongside chicken with roasted turnips and grapes (recipe coming soon) and it was the perfect creamy foil for those earthy-sweet flavors.

So to all the Thanksgiving purists: This gratin may not be traditional, but I’m thinking it will do your turkey and cranberry sauce proud.

swiss chard gratin on millys-kitchen.com

Swiss Chard Gratin

  • 1 large bunch (about 1 1/2 pounds) white-stemmed Swiss chard
  • Sea salt and freshly-ground pepper
  • 3 tablespoons butter
  • Squeeze of fresh lemon juice
  • 2 shallots, minced (should yield about 1/4 cup)
  • 3 tablespoons all-purpose flour
  • 1/2 cup crème fraîche or heavy cream
  • Freshly-grated nutmeg (optional)
  • 1/2 cup grated aged Comté or Gruyère cheese
swiss chard gratin on millys-kitchen.com

Trim the stems from the chard, discarding any that are wilted. If any stems seem tough, peel them with a vegetable peeler to remove the strings. Bring a large pot of generously salted water (it should taste like the ocean) to a boil. Cut the chard stems crosswise into slices about 1/2 inch thick. Coarsely tear the green tops. Drop the stems into the boiling water and simmer for 5 minutes. Add the green tops and continue to cook until the tops are wilted and the stems are just tender, 3 to 5 minutes longer. Set a colander over a large bowl or pot. Drain the chard well, pressing on it with a flexible spatula or ladle to get out as much water as possible. Reserve the cooking liquid.

While the chard is cooking, generously butter a gratin dish. Set aside.

Meanwhile, make the bechamel: Melt the butter in a large sauté pan over medium heat. Add the shallots and cook, stirring, until soft and translucent, but not browned. Stir the flour into the shallots and cook for about about one minute, stirring constantly, to cook out the raw flavor. Measure out one cup of the chard cooking liquid and add it to the pan. Bring to a boil, whisking constantly, until the sauce thickens. Add the crème fraîche and bring just back to a boil. Remove from the heat. Season to taste with lemon juice and nutmeg.

Arrange the drained chard over the bottom of the gratin dish. Pour the bechamel over the chard, sprinkle the cheese over the top and heat under the broiler until golden brown and bubbling. Set aside to rest for a few minutes before serving.

Recipe adapted from Anne Willan, The Country Cooking of France