dairy free

red rice with coriander, apricot and herbs

Image/styling: Olaiya Land

Once upon a time, before Beau and I got married, I had a boyfriend who was a vegetarian. Please know that I love and cherish the vegetarians in my life. But this boyfriend was the worst sort of non-meateater. The sort of judgy vegetarian who, when we were in the early stages of our relationship, had no problem with me cooking and eating meat, then would randomly get angry about my “disgusting meat addiction”. The sort of vegetarian who, when we were out, would finish my hamburgers and slices of pepperoni pizza because it was “better than wasting”. A vegetarian who was actually more of a carb-atarian and who occasionally cooked horrible hippie food with whatever strange dregs were rolling around in the fridge (sauerkraut burritos, anyone?).

I’m embarrassed to admit that my relationship with this particular ex contaminated my feelings about vegetarians in general. For several years after we broke up, I projected his condescending sense of superiority onto all the vegetarians and vegans I met. (After we broke up, I started dating a meat-eating, Southern, ex-republican who’s job in the Special Forces saw him jumping out of helicopters on a regular basis. Needless to say, he did not complain about my “meat addiction”. Oh, what a painfully obvious rebound.)

I’m happy to report that my anti-vegetarian sentiment disappeared along with the presence of this ex in my life. Unexpectedly, my time with him left me with a deeper empathy for people who don’t eat meat. In our five years together, I saw first-hand how thoroughly vegans and vegetarians are treated as a fussy nuisance or an afterthought at holiday gatherings.

Image/styling: Olaiya Land

Turkey! Ham! Rack of lamb! Gravy and stuffing--made with pan juices, of course! These are the traditional stars of the holiday table. Vegetarians and vegans are left to cobble together a meal of cranberry sauce, gloppy green bean casserole, dinner rolls and perhaps a Brussels sprout or two. (Let’s not even discuss the inedible Field Roast, which is an approximation of no roast I’ve ever tasted.)

If you’re not a vegan or vegetarian yourself, you’re likely to have one or more at your holiday table. Which is why we need more holiday dishes that can accompany meat (if you go that route) and are sexy enough to keep our non-meateating friends and fam from feeling shafted.

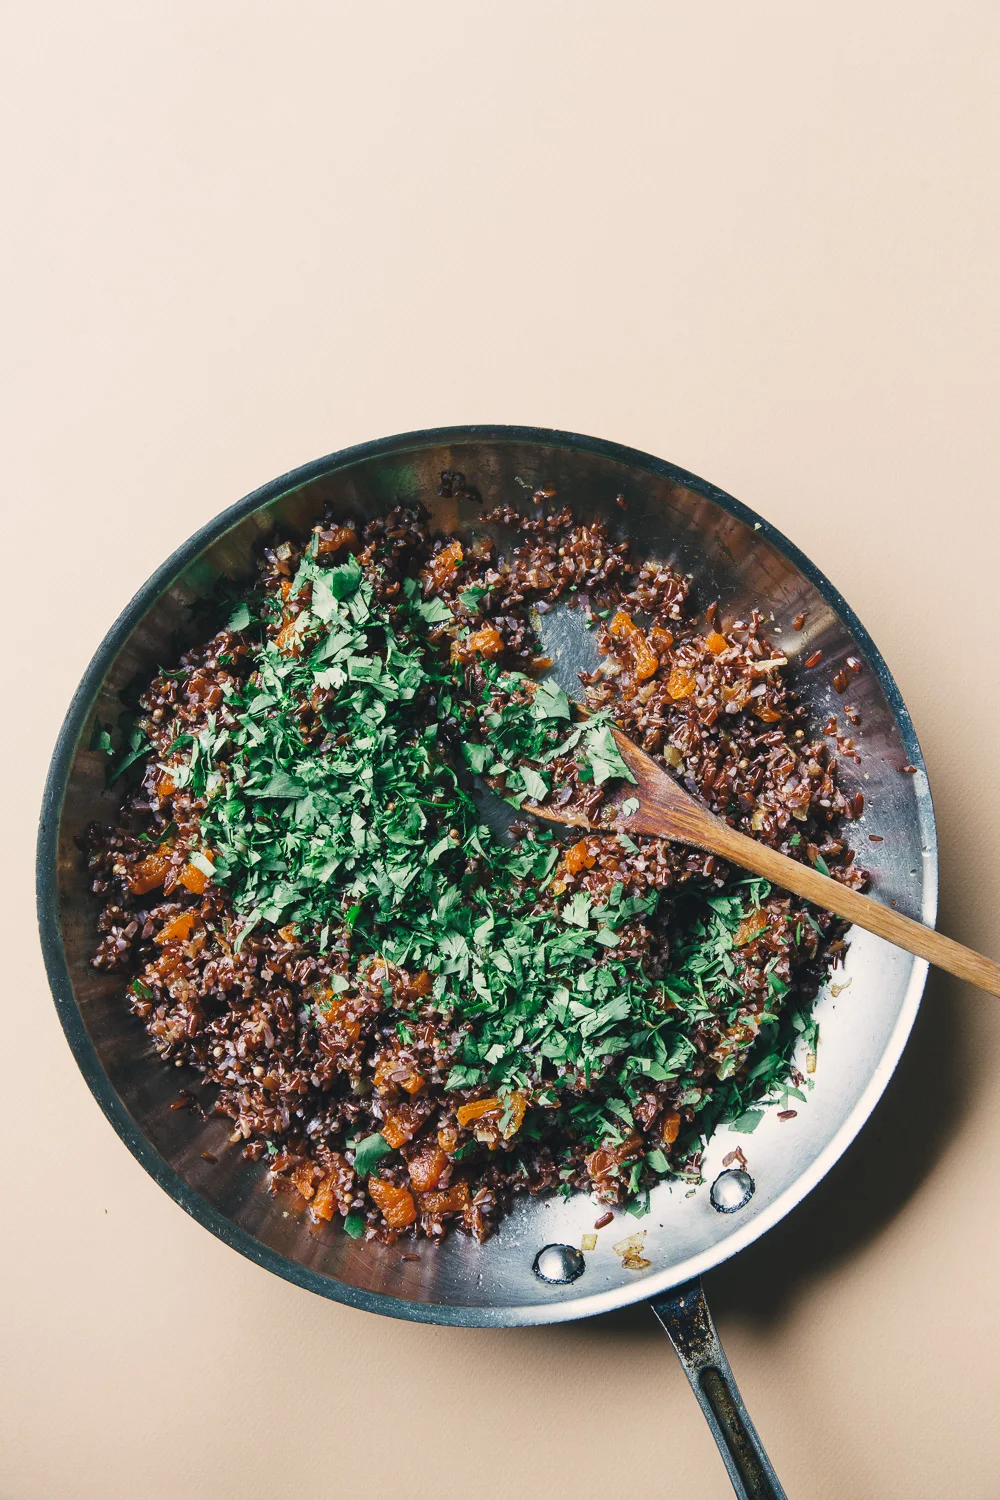
Enter this Red Rice with Coriander, Apricot and Herbs.

Image/styling: Olaiya Land

I found this amazing red rice on my last trip to Paris. It’s hearty, nutty and subtly sweet, with a beautifully firm texture. (Wild rice is a great substitute if you don’t feel like tracking this down.) Whole coriander seeds and fresh lemon zest add zing. The jewel-toned dried apricots lend sweet-tart balance and keep this rice dish from looking blah. And fresh herbs because, fresh herbs on everything. Always and forever.

Because we all have shit to do at the holidays, this is super easy to make. You cook the rice using the pasta method (boil and drain) and prep everything else while it cooks. The whole thing comes together in about 30 minutes. I’m going to go ahead and say this vegan, gluten-free dish will please pretty much everyone at your holiday feast.

Which is what the holidays are all about--making everyone who gathers around your table feel welcome.


Red Rice with Coriander, Apricot and Herbs

Red Rice with Coriander, Apricot and Herbs

  • 1 ¼ cup Camargue Red Rice (or wild rice)
  • Kosher or sea salt
  • ¼ cup extra-virgin olive oil, plus more for drizzling
  • 1 medium yellow onion, diced
  • 1 teaspoon freshly-ground black pepper
  • 2 teaspoons coriander seeds (the smaller, the better)
  • ½ cup roughly chopped dried apricots
  • 1 tablespoon lemon zest (from 1 small lemon)
  • 1 tablespoon fresh lemon juice
  • 2 tablespoons roughly chopped parsley
  • ¼ cup roughly chopped cilantro

*Notes: I used red rice grown in the wetlands of southern France. You can buy the same sort of Camargue red rice here. Wild rice would also be great in this dish.

- My very favorite dried apricots are the Blenheim variety. They are more tart than Turkish Apricots. I buy mine at Trader Joe’s, but you can also get them here.

- If you want to kick the heartiness up a notch, a handful of chopped pistachios or toasted walnuts would be a great addition.

- This dish can be served warm or at room temperature. It’s good on the first day, but maybe even better the day after. (I just ate some cold, straight out of the fridge and it was pretty delicious.) If you make it in advance, I recommend reheating it, covered, in a low oven before serving.

Image/styling: Olaiya Land

Place the rice in a large saucepan along with a generous pinch of salt. Cover with water by 3 inches and bring to the boil. Reduce the heat to a gentle simmer and cook until the rice is done but still firm. Mine took about 25 minutes. Drain and set aside.

While the rice is cooking, heat a large sauté pan over high heat for about 1 minute. Add the oil. When the oil starts to shimmer, add the diced onion, black pepper and a generous pinch of salt. Reduce the heat to low and cook until the onion is very tender. If it browns a bit, that’s ok, but the goal is not to get it brown and crispy. You want meltingly soft onions, so keep the heat low and stir often. When the onions are soft, add the coriander seed and cook for 1 minute. Add the chopped apricot and lemon zest and cook for a minute or two more. If the rice is still cooking, turn off the heat on the onion mixture and set aside.

When the rice has been cooked and drained, add it to the pan with the onion mixture and cook over medium heat until everything is warm and the flavors have come together, 2-3 minutes. Season with the lemon juice and stir in the parsley and cilantro. Taste and add more salt, pepper, lemon or olive oil as desired. Serve warm or at room temperature.

Makes 4-6 side-dish servings

Image/styling: Olaiya Land

roasted white beans with fennel + mint chimichurri

Image: Olaiya Land

Ok. It’s time to get real with y’all. I have struggled with my weight for pretty much my entire life. As I wrote about in this post, I was a chubby bi-racial kid growing up in a super white, rural farming community. We moved to Wichita when I was 9, where I was the chubby brown girl who didn’t quite fit in with the white kids and wasn’t quite accepted by the black kids. I have a vivid memory of bawling my head off around this age because my hair wasn’t long and straight and blond like my mother’s. From the time I can remember anything, I remember feeling like I didn't belong. 

As a single-parent, my mom worked a lot when I was little. I spent most of my days with my grandparents, both of whom had lived through the Great Depression. They kept their house stocked to the rafters with every manner of foodstuff imaginable. They fed me sugar cereal, mac-n-cheese and candy bars. Fried chicken, frozen pizza and Hostess fruit pies. 

Food was love. And they loved the shit out of me. 

Image: Olaiya Land

It was the early 80s and we didn’t know as much back then about how sugar and processed carbs are essentially garbage. I know my grandparents just wanted to spoil me--their only grandchild for 9 years--and make sure I never went without the pleasures they had to forgo as children.

Food was my solace and my secret shame. By the time I was 12, I had a full-on eating disorder. I wanted to be thin and popular and look like the other girls at a time when almost no one looked like me. But I needed food to assuage my awkwardness and my fear of not being good enough. It was a vicious cycle.

Image: Olaiya Land

Fast-forward to adulthood. I’ve learned to love myself and love the body that I’m in. But it’s been a long road. From the time I graduated college until today, I’ve experimented with a vast panoply of diets. Weight Watchers. The Zone. Atkins. Keto. Low-fat. High-fat. Intuitive Eating. Extreme calorie restriction. The works. 

Things started to get better in the body kindness department the day I banished my scale. That sly dictator lounging under the bathroom sink had been running my life for years. I decided he had to go. Not weighing myself has been a major boost to my self-esteem. (And I’m serious about it--I don’t even let my doctor tell me my weight when I go to see her.) 

Next came finding a way of eating that works for me. I’ve been tweaking this over the past couple of years, but the gist of it is that I go easy on the sugar and carbs. I’ve learned that counting calories is absolutely toxic for me; I quickly tip over into crazytown if I go down that path, anxiously obsessing over everything that goes in my mouth. 

Image: Olaiya Land
Image: Olaiya Land
Image: Olaiya Land

I’m currently eating slow carb, which means lots of vegetables, protein, healthy fats and unrefined carbs, like beans and lentils. And zero calorie counting. Saturday is a free day when I eat whatever I want. So I don’t feel like anything is permanently out of bounds. (A girl has to get her pizza on from time to time!)

On the exercise front, I’ve decided only to do activities that I would do even if they burned no calories. I will play tennis in the freezing cold or blistering heat. I'd play in the rain if I could. There’s almost nothing that can keep me off the courts. So this is definitely on the list. I do strength training that involves a lot of balancing and compound movements because it feels like play and makes me feel strong and capable. And I walk with Beau in the evenings. That’s it. 

Image: Olaiya Land

So, about these beans. 

A slow-carb lifestyle involves A LOT of beans. And though I love beans in all their many shapes and sizes, here’s the truth of the matter: beans can get pretty boring when you eat them night after night.

One evening, I decided to toss some beans in with the vegetables I was roasting. What came out of the oven was AMAZING. (Some might even call it culinary genius. I’m not saying who.) These roasted beans were crispy on the outside and pillowy soft on the inside. Like dreamy little roasted potatoes. Or tater tots. Only healthier. 

Image: Olaiya Land

Now I am obsessed with roasted beans. They are my new go-to weeknight starch. I toss them on a sheet pan along with whatever vegetables I have lazing around in my fridge. Thirty minutes later--voilà! Supper is served. If you’re feeling fancy, poach a couple eggs or throw a piece of fish on the grill to serve alongside. Add a squeeze of lemon or a few dashes of hot sauce. It’s hard to go wrong.

For those of you who are perhaps less experimental in the kitchen, here is a recipe to get you started. You roast up a tray of plump corona beans (or gigantes or any other large bean really) with a bit of shallot. Grill up some squid (if you’re into seafood). Add some shaved fennel for crunch and a fresh, zingy chimichurri and your weeknight supper just got extra sexy.

Wherever you are in your relationship with food and your body, I think you can feel pretty good about this salad. It’s delicious whole foods, simply prepared. Miles away from Kraft mac-n-cheese and Hostess fruit pies. But with all the love.

XO,

Olaiya


Image: Olaiya Land

Roasted White Beans with Fennel and Mint Chimichurri

  • 4 cups cooked corona beans (or other large white beans), rinsed
  • 1 medium shallot, sliced
  • Extra-virgin olive oil
  • Sea salt
  • finely grated zest of 1 lemon
  • 2 tablespoons lemon juice, plus an extra squeeze for the fennel
  • 2 large cloves of garlic, finely minced or pressed
  • 1 teaspoon chopped calabrian chiles in oil or a generous pinch of chile flakes
  • 1/2 cup roughly chopped fresh mint, plus additional mint to garnish
  • 1/2 medium fennel bulb, fronds reserved for garnish
  • 1 recipe Grilled Squid (see below), optional

*Notes: Canned beans will work for this recipe, but home cooked beans are best. Plus it's difficult to find large beans like coronas or gigantes in a can. Here are some tips on how to cook a perfect pot of beans.

- When it comes to Calabrian chiles, I love this brand. (Seattle friends: I buy these at PFI in SoDo)

- Grilled octopus would also be delicious in this recipe!


Preheat your oven to 475° F.

While the oven is preheating, dry your beans thoroughly with paper towels then transfer them to a sheet pan lined with parchment paper. Scatter the sliced shallot over the beans and sprinkle with salt. Drizzle generously with olive oil and toss to coat the beans and the shallot. When the oven is hot, roast the beans, stirring occasionally for even browning, for 12-20 minutes. The exact time will depend on the size of your beans and how wet they are when they go in. You want them to be golden brown in spots, crispy on the outside and tender and fluffy on the inside. Don't worry if some of them split open. Remove them from the oven and set aside to cool.

While the beans are cooking, make the chimichurri: in a medium bowl, stir together 6 tablespoons of the olive oil along with the lemon zest, juice, garlic, chiles, mint and a pinch of salt.

With a sharp knife, Japanese slicer or mandoline, thinly slice the fennel and place it in a bowl. Toss it with a tablespoon or so of the chimichurri and an extra squeeze of lemon juice. Taste and add more chimichurri or lemon juice if you like.

When the beans have cooled somewhat, drizzle most of the chimichurri over them (save a tablespoon or so if you are making the squid). Toss to coat. Season to taste with more salt if necessary. Place the seasoned beans in a serving bowl and top with the dressed fennel and the grilled squid (if you're adding them). Sprinkle the reserved mint and torn fennel fronds over the salad and serve. 


Tender Grilled Squid

• 1 lb. squid, cleaned, cut into large pieces and patted very dry with paper towels
• Extra-virgin olive oil
• Sea salt

*Note: You can buy cleaned, pre-cut squid from your fishmonger or clean it yourself, which is a lot cheaper. Here's a video if you need help.

Roasted Beans with Fennel and Squid-15.jpg

Heat a large pan over high heat for a minute or so. Add enough olive oil to film the bottom of the pan, then add the squid pieces. Cook, stirring occasionally, until the squid is opaque and just barely cooked through, 2-4 minutes. It will give off a lot of water. Don't worry, this is normal. Do not overcook the squid or it will get rubbery.

Immediately transfer the squid to a large plate to cool. While the squid is cooling, heat a grill or grill pan to high heat.

Toss the squid in olive oil to barely coat (use some of the mint chimichurri if you have it) then grill until char marks appear, 1-2 minutes. Turn and grill for another minute or so until char marks appear on the other side. Transfer to a bowl to cool or eat immediately. 


oil-poached salmon with roasted beets and garlicky cauliflower puree

Image: Olaiya Land

Hello!

I landed in Glasgow a few hours ago and am now writing you from the the corner of a wood-paneled Scottish pub. I’ve crossed eight time zones on zero sleep--so I’m feeling simultaneously exhausted and hopped up--and I’m starting to wonder if chasing a huge coffee with a glass of red wine is as effective a jet lag cure as it seemed at the outset!

When I first arrive in a new city with no clue of how to get around or where to find a good meal or what to do with myself, I am beset by a panicky sense of dread. Right now, for example, I’m surrounded by gentlemen leafing through the local paper, sipping pints and speaking in a Glaswegian accent so thick I can barely make out what they’re saying. Not only do I feel like a crazy person from the jet lag, I feel completely out of my element. 

Image: Olaiya Land
Image: Olaiya Land
Image: Olaiya Land

But, I think getting outside my comfort zone is important. 

I always come back with new ideas to incorporate into my Seattle life and new creative inspiration. Which is why I’ve been thinking a lot about how to incorporate a sense of exploration into my life even when I’m not traveling--how to experiment and take risks and step outside my comfort bubble at home. 

Lately, I’ve been experimenting with my photography, trying out new techniques to figure out what I find most compelling. Just like traveling, shooting this week’s recipe was uncomfortable at first. I felt overwhelmed and unsure of which direction to go. But once I started trying out different color schemes and compositions and lighting, it started to flow and feel more like an adventure than a nerve-racking foray into uncharted territory. 

Image: Olaiya Land

It’s a good reminder that taking risks and venturing into the unknown keeps me growing and moving forward, even when I fear I’m sticking out like a sore American thumb and want to slink back to the hotel for a nap.

Image: Olaiya Land
Image: Olaiya Land

I’m heading to northern Scotland in a few days for my friend Natasha’s photography workshop. So I’ll be checking in with you next week from the Highlands. Until then, I hope you keep exploring--whether in your own living room or half-way around the globe.


Oil-Poached Salmon with Roasted Beets and Garlicky Cauliflower Puree

  • 1 lb wild salmon (I used king)
  • Good quality extra virgin olive oil (amount will vary depending on the size of your pan)
  • 1 spring onion, halved lengthwise
  • 2-3 sprigs each parsley, tarragon and dill (feel free to substitute other herbs)
  • 4 1-inch strips lemon zest
  • 1 recipe Garlicky Cauliflower Puree (see below)
  • 1 recipe Roasted Beets (see below)
  • 2 tablespoon roughly chopped dill, to serve
  • 2 tablespoons finely sliced scallion (green part only), to serve
  • 1 tablespoon, torn mint leaves, to serve

*Notes: This technique works well with any flaky fish. Cod and halibut are good choices if you prefer whitefish. Feel free to use whatever herbs you like.

Image: Olaiya Land

Place the salmon in a single layer in a deep saucepan or saute pan. Cover with olive oil and add the spring onion, herbs and lemon zest. Cover and cook on low heat until the salmon is just cooked through. Times will vary significantly depending on the thickness of your salmon, so start checking after 15 minutes or so. Remove the salmon from the oil and transfer to a large plate or platter. Salt generously and set aside to cool. Strain the oil through a fine mesh sieve and discard the solids. (You can use the strained oil in the cauliflower puree and the roasted beets. Refrigerated, the oil will keep for a day or two. Freeze or discard any strained oil that you don’t use within this window.)

When you’re ready to serve, spread the cauliflower puree on a serving platter. Arrange the sliced beets and salmon over the puree. Sprinkle with salt and top with the dill, scallions and mint. Can be served warm or at room temperature. 

Makes 4-6 servings.


Garlicky Cauliflower Puree

  • 1 large head cauliflower (about 2 lbs.), cut into ½-inch pieces

  • 1 cup blanched slivered almonds

  • Coarse sea salt

  • 1-2 cloves garlic

  • 2 teaspoons red wine vinegar

  • ½ cup good quality extra virgin olive oil (can be the strained olive oil leftover from poaching the salmon)

Image: Olaiya Land

Place the cauliflower and almonds in a stock pot and add ½ cup water. Bring the water to the boil over high heat. Reduce the heat to medium, cover and cook, stirring occasionally, until the cauliflower is very tender, 30-35 minutes. Remove the lid in the last 5 or so minutes of cooking to allow any water in the bottom of the pot to evaporate.

Transfer the cauliflower and almonds to a blender or food processor along with a generous pinch of salt, 1 clove of garlic and the red wine vinegar. Process on high speed, stopping to scrape down the sides as necessary, until very smooth. Taste and add the other garlic clove if your puree isn’t as garlicky as you’d like. With the motor running, drizzle the olive oil into the blender or food processor in a thin stream. Process until the oil is completely emulsified and the mixture is smooth. Taste and add more salt, if necessary. Set aside.

Makes 4-6 servings.


Roasted Beets

  • 4-5 medium beets (1 to 1 ¼ lbs), greens removed

  • Olive oil, for drizzling

  • Coarse sea salt

  • 1 cinnamon stick

  • 1 teaspoon allspice berries

  • 2 garlic cloves, peeled and smashed

  • 1/2 cup water

  • 2 tablespoons red wine vinegar, plus more to taste

Image: Olaiya Land

Preheat your oven to 400°F.

Place the beets in a non-reactive baking dish. Drizzle with a little olive oil. Sprinkle with the salt. Place the cinnamon, allspice and garlic in the dish. Add the water and vinegar. Cover tightly with aluminum foil and roast for 45-60 minutes, until tender at the center when pierced with a paring knife. Set aside. Strain the cinnamon stick, allspice berries and garlic from the juices in the bottom of the baking dish. Discard the solids and keep the beet cooking liquid.

When the beets are cool enough to handle, remove the skins (use latex gloves or paper towels to avoid staining your hands) and cut into quarters or large dice. Place the cut beets in a non-reactive bowl and toss with their cooking liquid. Adjust seasonings, adding more red wine vinegar, salt and olive oil to taste.

Makes 4-6 servings.