brunch

simple suppers: huevos rancheros with salsa verde

huevos rancheros // millys-kitchen.com

I'm a big fan of cooking projects. (Hello from-scratch pie crust and braised octopus!) But I know that even the most adventurous home cook doesn't have the time to pull together a culinary masterpiece at every meal. I definitely don't.

So I'm introducing a new feature here on the blog: Simple Suppers. These are recipes that come together without too much fuss; use fresh, seasonal ingredients and are delicious enough you’ll want to add them to your permanent line-up. They’re the sorts of dishes we eat at my house when I’m not recipe testing or in the mood for a more challenging enterprise.

huevos rancheros // millys-kitchen.com

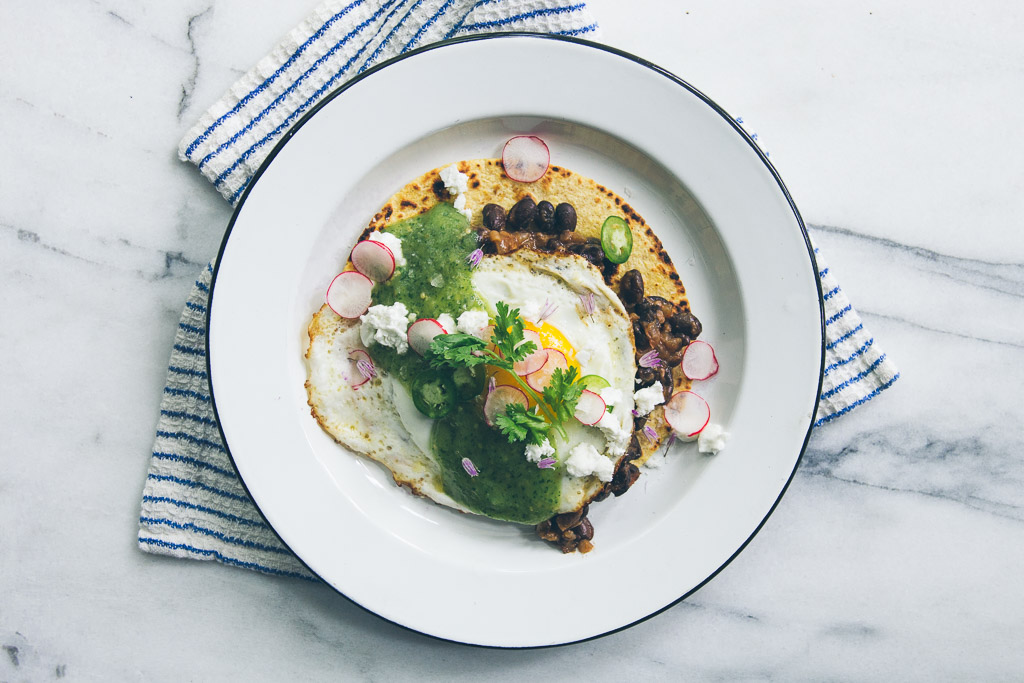
So without further delay, I give you: Huevos Rancheros! That brunch staple that is oh-so-easy to make, satisfying and infinitely customizable. All of which make it an ideal dinner for one or a fantastic brunch for the whole fam. 

huevos rancheros // millys-kitchen.com

I hope you’ll make this simple supper your own. And I’d love to hear back in the comments what exciting variations you come up with!


huevos rancheros with salsa verde

Huevos Rancheros with Salsa Verde

  • 8 medium corn tortillas
  • 8 large eggs
  • Butter, for frying eggs
  • 1 recipe black beans (see below), warmed
  • 1 recipe salsa verde (see below), warmed
  • Kosher or sea salt
  • 4 radishes, very thinly sliced into rounds
  • 1 serrano or jalapeño pepper, very thinly sliced into rounds
  • Crumbled cotija cheese, to garnish
  • Cilantro leaves, to garnish
  • Chive blossoms, to garnish (optional)
huevos rancheros // millys-kitchen.com

For the black beans

  • 1 tablespoon neutral-tasting oil (I used canola)

  • ½ medium onion, diced

  • Kosher or sea salt

  • 2 teaspoons ground cumin

  • Pinch chili flakes

  • 1 medium tomato, peeled and diced (canned works fine)

  • 1 ½ cups cooked black beans (homemade or canned)


For the salsa verde

  • 1 pound fresh tomatillos, husked, rinsed, and quartered (you can use canned when fresh aren't in season)

  • 1 fresh serrano chile, roughly chopped (remove the seeds for less heat)

  • 1/2 large white onion, roughly chopped

  • 2 garlic cloves

  • 1/2 cup water

  • 1/2 cup finely chopped cilantro

  • 1-2 tablespoons fresh lime juice, or to taste


huevos rancheros // millys-kitchen.com

*Notes: I’m crazy for green sauces with eggs, so my version is topped with a bright, spicy salsa verde (which you should definitely make a double batch of and put on everything you make for the next week!), but a red sauce or even a salsa fresca would be great, too.

The sky’s the limit when it comes to garnishes. Here are a few to try: finely shredded cabbage, sour cream or crema, a melty cheese like pepper jack or sharp cheddar, halved cherry tomatoes, diced onion, sliced green onions or crispy tortilla strips.

I like my huevos rancheros with a fried egg, but poached or scrambled work, too.

Lastly, don't be intimidated by the fact that you need to make beans and salsa for the huevos; they both come together in a snap!


Start by making the beans: Heat the oil in a medium sauté pan over medium heat. Add the onion and a pinch of salt. Reduce heat to low and cook until the onion has softened and turned golden brown, about 10 minutes. 

While the onion is sautéing, make the salsa verde: Place the tomatillos, chile, onion, garlic, water and 1 teaspoon salt in a blender. Process until you have a coarse purée. Transfer the mixture to a large sauté pan and simmer, stirring occasionally, until slightly thickened, 10-15 minutes. Add the cilantro. Taste and season with lime juice (you may not need much if your tomatillos are tart like mine were) and salt. Set aside until you're ready to assemble the huevos.

When the onions for the beans are tender, add the cumin and chile flakes. Cook for 1 minute then add the tomato and the beans. Cover and cook until the flavors come together, about 5 minutes.

To assemble the Huevos Rancheros: Heat a large cast iron or carbon steel pan over medium-high heat.  When hot, cook the tortillas in batches until warmed through. I like a little char on my tortillas, so I leave them on a little longer. Wrap the heated tortillas tightly in aluminum foil and set aside. 

Next fry your eggs. Heat the same pan you used to cook the tortillas over high heat. Add about two teaspoons butter to the pan and swirl. It should melt immediately and start bubbling vigorously, otherwise, your pan isn’t hot enough. Crack 4 eggs into the pan (or as many as your pan will hold) and cook until the edges are lacy and crisp and the whites are completely set, about two minutes. Use a metal spatula to separate the eggs and transfer them to a platter or sheet pan. Repeat the process to fry the rest of the eggs.

When all of the eggs are fried, divide the tortillas among four plates. Top with some of the warm beans. Place two eggs on top of the beans on each plate and season the eggs with a sprinkle of salt. Top the eggs with a generous amount of the warm salsa verde. Garnish with the radishes, sliced chiles, cheese, cilantro and chive blossoms and serve immediately.

Makes 4 servings.

huevos rancheros // millys-kitchen.com

Salsa Verde adapted from Gourmet Magazine

baked french toast with pears, hazelnuts and blackberry-cardamom syrup

Baked French Toast with Pears, Hazelnuts and Blackberry-Cardamom Syrup // Milly's Kitchen

I heard someone speaking the other day about the fear of catastrophe that follows intense joy. Like a streak of lightning after thunder. As though, gazing upon your sleeping babe, your soulmate, your safe and beautiful home, the happiness you feel is too great. So big it aches in your chest. Incomprehensible. And so you must conjure some horrible disaster in your mind to ward off the fear of what might be. A psychic sacrifice to the demons that poke and prick at us all. 

I'm all too familiar with that feeling. 

More often than I’d like to admit, I am afraid that the good things I have might be snatched away from me. Who am I to receive such gifts, experience such joy?, I think. To forestall the unthinkable, I tell myself: Don't get too comfortable. Be vigilant. Work harder. 

But to think like this is to not be fully alive. So for the past several years, I've been trying to let the negative and the dark hold less sway. To be in the here and now and to be wholeheartedly grateful for the many blessings I have.

Baked French Toast with Pears, Hazelnuts and Blackberry-Cardamom Syrup // Milly's Kitchen

So as one year turns into another, I try to carve out a quiet moment to imagine fresh adventures. And to look back over my year at the many things I have to be grateful for.

This year, that list is huge. 

I got married to a kind and loving man who has made me laugh precisely every single day since we met. I have a husband who loves me as I am and helps me remember that nothing is ever as daunting as it seems with a friend at your side. For this, I am beyond grateful.

Baked French Toast with Pears, Hazelnuts and Blackberry-Cardamom Syrup // Milly's Kitchen

My work is more inspiring and fulfilling than I ever could have imagined. When I left a business that I helped found and had poured my entire being into, to teach and write and lead culinary adventures, I was terrified. There were lots of days spent wanting to stay in bed with the covers pulled over my head. What if everyone thought my plan was frivolous or stupid? Worse, what if no one showed up?

But you did show up. The tour I led to Paris last year was a lifechanger. Forming friendships with the women who came with me to Paris and watching them marvel in the city’s delights, was one of the high points of my year. For this I am grateful.

Baked French Toast with Pears, Hazelnuts and Blackberry-Cardamom Syrup // Milly's Kitchen

As was connecting with all of you through this blog. In the beginning, I thought this space would be about posting recipes and sharing tips. Explanations of food science and proper technique. But when I sit down to write, this is what comes out. Thoughts on why cooking and gathering loved ones around the table is so essential. Things I hadn’t articulated clearly before. Even to myself. And the ability to catapult back in time. To summers past and trips to France. To the Thanksgivings of my childhood when my grandmother was still turning out huge trays of her oyster stuffing. And to snowy Christmases spent with good friends. For this, too, I am grateful.

And so, one of the things I am most thankful for this year is you. To all of you who came out to a cooking class, read my blog, shared with me on Instagram, and journeyed with me to Paris, I am so appreciative of all your support. 2014 was an amazing year for me, due in large part to the wonderful connections I made with all of you. So I’m sending you a huge thank you!

I've got a new recipe for you: Baked French Toast with Pears, Hazelnuts and Blackberry-Cardamom Syrup. It’s just the thing to get everyone around the table for a family breakfast or New Year’s Day brunch.

Baked French Toast with Pears, Hazelnuts and Blackberry-Cardamom Syrup // Milly's Kitchen

You soak the bread the night before in a ginger-brown sugar custard. Simmer ripe pears in a luscious salted caramel sauce, stir in a handful of toasted hazelnuts, and you’re ready to go. Pop the whole thing in the oven in the morning and you have a simple, elegant breakfast that feeds a crowd. 

The recipe is below. I hope you enjoy it. And I hope you share it with those you are most grateful for. 

Wishing you a Happy and Bright New Year!

- Olaiya 


Baked French Toast with Pears, Hazelnuts, and Blackberry-Cardamom Syrup

  • 1 recipe syrup (see below)
  • 5 tablespoons butter, divided, plus additional for greasing the pan
  • 1 1-lb loaf of country white bread or challah, preferably a day or two old
  • ½ vanilla bean
  • 1 packed cup brown sugar, divided
  • 5 large eggs
  • 2 ½ cups whole milk
  • ½ teaspoon ground ginger
  • 1 teaspoon kosher salt, divided
  • 3/4 cup hazelnuts
  • 4 ripe pears

For syrup:

  • 1 cup blackberries, fresh or frozen

  • ½ cup maple syrup, preferably Grade B (which is darker and more delicious in my opinion)

  • ¼ teaspoon kosher salt

  • ¼ teaspoon ground cardamom

Use a little of the butter to grease a large baking dish. Cut the bread into slices one inch thick. Cut the slices in half diagonally. Arrange the bread in the baking dish in two or three rows, overlapping the slices of bread as necessary to make them fit. Set aside.

Place ½ cup of the brown sugar in a large bowl. Slice the vanilla bean in half lengthwise. Using a paring knife, scrape the seeds from the vanilla bean into the sugar. Use your fingers to rub the vanilla seeds into the sugar to distribute them evenly. Add the eggs, milk, ginger and ½ teaspoon of the salt. Whisk well to combine.

Pour the custard evenly over the bread in the baking dish. Depending on the size of your dish, you may need to gently push the slices down into the custard with a spoon or flexible spatula so the bread can soak up as much custard as possible.

Cover with plastic wrap and chill for at least 6 hours and up to 24 hours to allow the custard to soak into the bread. If you notice that there is custard pooling in the bottom of the baking dish, spoon some of the custard over the bread once or twice while it’s chilling. You can also place another roasting pan or pie dish on top of the soaking bread to gently push it down into the custard if your bread is on the sturdy side. The extent to which the custard is absorbed will depend on the type of bread you use and how dry it is.

Baked French Toast with Pears, Hazelnuts and Blackberry-Cardamom Syrup // Milly's Kitchen

When you are ready to cook the French toast, preheat the oven to 400°F. Remove the baking dish from the refrigerator. If there is still a bit of custard pooling at the bottom of the baking dish, tip out the excess. Set aside.

If you are using pre-roasted and skinned hazelnuts, roughly chop them and set aside. If you have raw hazelnuts, place them on a rimmed sheet pan and toast until fragrant, about 7 minutes. Remove the nuts from the pan so they don’t burn. Place them in the middle of a kitchen towel. Bring the four corners of the towel towards each other and twist them together until you have securely enclosed the nuts in the towel. Vigorously rub the hazelnuts together inside the towel for a minute or so. When you open the towel most of the skins should have fallen off. Roughly chop the toasted and skinned nuts and set aside. 

Baked French Toast with Pears, Hazelnuts and Blackberry-Cardamom Syrup // Milly's Kitchen

Peel and core the pears then slice them ⅛-inch thick. Heat 4 tablespoons of the butter in a large skillet over medium-high heat. When the butter has melted, add the remaining ½ cup brown sugar and ½ teaspoon salt. Add the pears and cook, stirring occasionally, until tender and the caramel starts to thicken, about 5 minutes. If your pears are quite ripe, it will take a little longer for the moisture to cook off and the caramel to thicken. Remove the pears from the heat and add the chopped hazelnuts. Stir to coat the nuts in caramel. 

Baked French Toast with Pears, Hazelnuts and Blackberry-Cardamom Syrup // Milly's Kitchen

Spoon the pears and nuts over the prepared bread, tucking some of the caramelized pear in between the slices. Cut the remaining tablespoon of butter into small pieces and dot the top of the French toast with it. Place in the oven and bake for 30-35 minutes, until the custard has set and the French toast is golden brown.

While the French toast is baking, make the syrup: Place the blackberries and syrup in a small saucepan and cook over medium heat until the berries are soft and starting to fall apart, about 5 minutes. Strain the syrup through a fine-mesh sieve into a small bowl, pushing on the berries with a spoon or spatula to extract as much berry pulp as possible. Stir the salt and cardamom into the warm syrup.

Rest the French toast for 5-10 minutes before serving with warm Blackberry-Cardamom Syrup.

Makes 6-8 servings

Baked French Toast with Pears, Hazelnuts and Blackberry-Cardamom Syrup // Milly's Kitchen