lemon

grilled hanger steaks with asparagus, spring onions and preserved lemon relish

grilled hanger steak with asparagus, spring onions and preserved lemon relish via millys-kitchen.com

If you’ve been following along here for a while, you know I’m someone who loves to make unrealistically grandiose plans. I’ve got list upon list brimming with big ideas for improving the house, the yard, this blog, my photography skills, my wardrobe and my general person (among other projects).

I’m itching to completely tear up the yard of our new house and transform it into the just-unkempt-enough cottage garden I’ve been dreaming of for over a decade. I want to rip out the kitchen floor, teach myself to lay tile and put down handmade hex tile from Morocco. I want to browse Pinterest from top to bottom until I finally find THE haircut for my unruly curls. I want to get up at dawn every morning to catch the day’s first rays with my film camera. I want to string lights from the trees in our backyard and host large, raucous dinner parties every weekend.

grilled hanger steak with asparagus, spring onions and preserved lemon relish via millys-kitchen.com

A past version of me would be spending the evening mapping out my plan of attack for all these summer projects rather than writing this blog post. There would be lots of lists and diagrams. Maybe even a full-on crazy wall like the ones you see in the movies with maps and mysterious photos and lots of zig-zagging red string.

But I’ve got a different plan this year. My plan is something called Operation Summer Simplicity. It involves letting the yard and garden do their thing for a season to see what’s what. It involves living with the perfectly fine kitchen floor I have until I decide what I really want. It involves occasionally getting up early to shoot with my film camera. Operation Summer Simplicity is all about leaving enough space in my days that I can actually enjoy the one truly phenomenal season we get here in Seattle. 

grilled hanger steak with asparagus, spring onions and preserved lemon relish via millys-kitchen.com

While I’m pretty sure there won’t be a weekly dinner club happening in my back yard, having friends over for an al fresco meal is one of the highlights of summer for me. To that end, I’ve decided I need an uncomplicated approach to hosting dinners here at the house. That’s where my trusty Weber grill comes into play. Fire it up, throw on a beautiful cut of meat and some seasonal vegetables, uncork a bottle of wine and you’re doing summer right. 

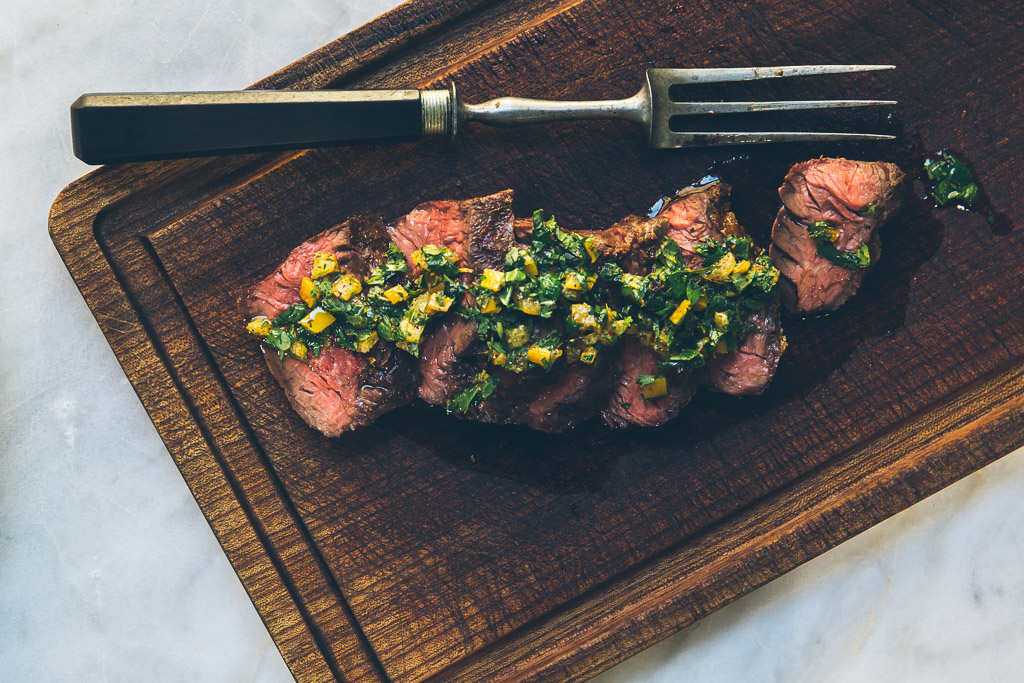
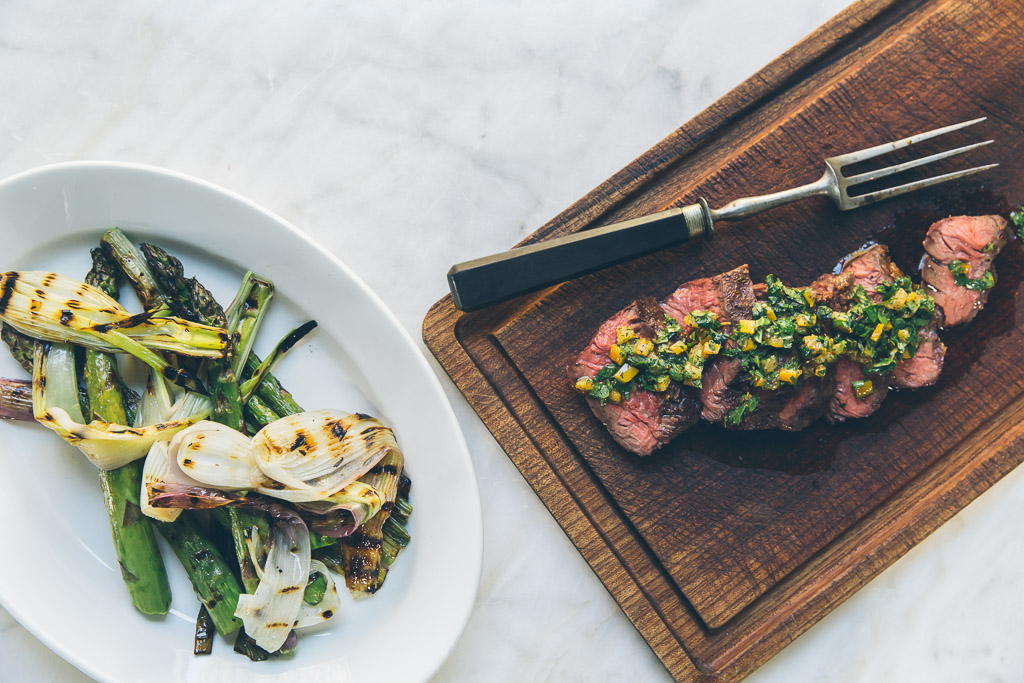
So know this, friends: if the weather is warm and you come to my house for dinner, you will very likely be eating something from the grill. Something like this Hanger Steak with Asparagus, Spring Onions and Preserved Lemon Relish, for example.

grilled hanger steak with asparagus, spring onions and preserved lemon relish via millys-kitchen.com

I had a chance to test this recipe out a couple weeks ago when our friends Alex, Kelsey, Carlos and Susanna came over for dinner on an unseasonably warm evening and I have to say it was perhaps the easiest, breeziest dinner party I’ve ever thrown. Of course that's partly because we had invited some of our chillest friends. But I'm going to give the Weber credit for the rest. Score victory number one for Operation Summer Simplicity. 


Grilled Hanger Steaks with Asparagus, Spring Onions and Preserved Lemon Relish

  • 2 hanger steaks, about one lb. each, patted dry with paper towels
  • Coarse sea salt
  • 1 ½ lbs asparagus (buy the fatests stalks you can find so they don't fall through the grill grate)
  • 6-8 thin spring onions
  • Extra virgin olive oil
  • 1 recipe Preserved Lemon Relish (see below)
  • Special equipment: a corded instant-read thermometer

*Notes: Ideally you want to salt the steaks at least 4 hours before you intend to grill them. If you forget or don’t have enough time, it’s not the end of the world, but salting the steaks in advance helps to season and tenderize them, so it’s worth the extra step. The steaks can be salted up to 24 hours in advance. 

- A corded instant-read thermometer may seem fussy, but unless you’re a professional, it’s really the only way to cook your steak perfectly every time. Bonus: you won’t have to open the oven door or grill lid a gazillion times and let all the heat escape while you’re cooking.

- Here's a great list of tips for grilling. Here's another.

grilled hanger steak with asparagus, spring onions and preserved lemon relish via millys-kitchen.com


At least 4 hours before you intend to grill the steaks, sprinkle them very generously with about 2 teaspoons of salt each. Lay the steaks on a plate and place them, uncovered, in the refrigerator. If you think of it, turn them over once or twice while they're hanging out in the fridge. This allows the surface to dry out more, which leads to better browning on the grill. Remove the steaks from the refrigerator about an hour before you intend to grill them and let them sit at room temperature.

Snap the woody ends off the asparagus and place them on a rimmed sheet pan. Trim any wilted ends from the onion greens. If they're long cut the green tops off the onions along with a bit of the pale green or white part to hold them together. Cut the hairs from the root-end of the onions, but leave enough of the root to hold the onions together. Cut the bulb end in half lengthwise if it's thick. Place the onion tops and bulbs on the sheet pan with the asparagus, keeping them separate. Pour enough olive oil on the asparagus and onions to coat them well and use your hands to rub the oil onto the vegetables, especially the tips of the asparagus. Generously sprinkle with salt.

Use your hands or a silicone pastry brush to generously coat the steaks with oil. Insert the thermometer into the center of one of the steaks. Take care not to angle it up or down or you'll get a false reading.

grilled hanger steak with asparagus, spring onions and preserved lemon relish via millys-kitchen.com

If you are using a gas grill: Light your grill. Turn all the burners to high and preheat the grill with the lid down until it is very hot, 10-15 minutes. 

Place your onions on the grill and cook without turning until they have nice char marks on one side and are starting to soften, 3-5 minutes depending on how hot your grill is. Turn the onions over then place your steaks and asparagus on the grill. Cook the asparagus, turning as needed until they are lightly charred and cooked through. The cook time for your asparagus will vary depending on their thickness. Check them often and take care not to let them get soggy, the goal is bright green, crisp-tender stalks. Remove the asparagus to the sheet pan when they’re done. Continue to cook the onions, turning as needed until they are soft and cooked through then place them on the sheet pan with the asparagus.

Cook your steaks until they are nicely browned and char marks appear on one side, about 2-4 minutes. Turn the steaks and cook until char marks appear on the other side, about 2-4 minutes more. Turn all the burners to medium-low, close the lid on the grill and continue to cook until the steaks reach 115° for rare, 120-125° for medium-rare or 130°-135° for medium. (The steaks will continue to rise in temperature as they rest.) Remove the steaks from the grill and rest for 5 minutes. Slice steaks and serve with grilled vegetables and Preserved Lemon Relish.

If you are using a charcoal grill: Build a 2-level fire in your grill like this (scroll down to number 5). Once your coals are hot and covered in ash, set the grill rack in place, cover the grill and let the rack heat for about 5 minutes.

When the grill rack is hot, grill your veggies as above. When they are almost done, move them to the cooler side of the grill to finish cooking, then place your steaks on the hotter side of the grill. Remove the vegetables to the sheet pan when done. Cook the steaks, uncovered, until they are nicely browned and char marks appear on one side, about 2-3 minutes. Turn the steaks and cook until char marks appear on the other side, about 2-3 minutes more. Move the steaks to the cooler half of the grill and continue to cook to desired doneness (see temperatures above). Remove the steaks from the grill and rest for 5 minutes. Slice steaks and serve with grilled vegetables and Preserved Lemon Relish.

Makes 4 servings.


Preserved Lemon Relish

  • 2 preserved lemons

  • 4 teaspoons finely grated lemon zest

  • ¼ cup cilantro leaves, chopped

  • ¼ cup mint leaves, chopped

  • ¼ cup parsley leaves, chopped

  • 1 teaspoon black pepper

  • ½ teaspoon chile flakes, or to taste

  • 1 cup extra virgin olive oil

  • Sea salt, to taste

grilled hanger steak with asparagus, spring onions and preserved lemon relish via millys-kitchen.com

Run the lemons under cold water to remove excess brine then quarter them. Scoop out the flesh with a spoon and discard. Finely chop the preserved lemon skin and place in a small bowl. Add the rest of the ingredients except the salt and stir well to combine. Taste and add salt if necessary. (Some preserved lemons are salty enough you won't need to add salt.)

Makes about 1 1/2 cups.

simple suppers: zucchini and chicken meatballs with fresh herbs

zucchini and chicken meatballs on millys-kitchen.com

For most of my life spaghetti and meatballs didn’t rank among the meals I consider comfort food. I did not grow up eating this ubiquitous dish. Unless, of course, you include the many cans of SpaghettiOs with Meatballs I ate as a kid. (Since soggy canned pasta seems like it shouldn’t count as food, I’m inclined not to.)

I didn’t like real spaghetti and meatballs until I tasted the superlative version served at La Medusa several years ago. Shortly after that, my friend Molly introduced me to the marvel that is a Cafe Lago meatball

For those of you who’ve never had the pleasure of sampling the meatballs served at this Seattle institution, I can tell you they are the real deal. The perfect blend of beef, pork, herbs, spices and salty parmesan, these meatballs are so juicy and tender they barely benefit from the addition of pasta or sauce.

I was hooked.

zucchini and chicken meatballs on millys-kitchen.com

I may be late to the game, but I like to think I’m making up for lost time in my culinary exploration of the world’s great meatballs. In addition to all manner of Italian meatballs, I’ve made Moroccan kefta, studded with chiles and preserved lemon. Turkish dumplings with garlicky lamb meatballs inside. Thai-spiced pork meatballs with Sriracha aioli. Persian koofteh bound with basmati rice and fragrant with mint.

zucchini and chicken meatballs on millys-kitchen.com

The common thread that ties all these savory spheres of ground meat together is their no-frills origins. Try as one might, there’s no disguising the meatball’s utilitarian roots: a little leftover meat, minced and tossed with an egg, yesterday’s bread crumbs and a few spices for good measure. 

It’s precisely this everything-but-the-kitchen-sink flexibility that makes the meatball so appealing. There’s no end to the number of flavors meatballs can accommodate, making them the perfect vehicle for using up whatever odds and ends are floating around the kitchen.

zucchini and chicken meatballs on millys-kitchen.com

When I opened my fridge yesterday, I found a few scallions, a couple lemons, some random herbs and a pile of zucchini balancing precariously on the edge of usability. I remembered a delicious turkey burger recipe from my favorite cookbook and--voilà!--these meatballs were born.

I’m calling these a Simple Supper because if you own a food processor, they come together in a flash. You can mix up the tangy, garlicky yogurt sauce while the meatballs are in the oven. Add a green salad or a few crudités for dipping in the yogurt and you’ve got a meal. 

zucchini and chicken meatballs on millys-kitchen.com

It may have taken me a while to discover how comforting the humble meatball can be. But I’m proud to report I’d now take a plate of homemade meatballs over a can of microwaved SpaghettiOs any day.


Zucchini and Chicken Meatballs with Fresh Herbs

  • 1 large zucchini
  • 2 teaspoons coarse sea salt)
  • 2 cloves garlic
  • ¼ cup loosely packed mint leaves
  • ¼ cup loosely packed cilantro leaves
  • 2 tablespoons loosely packed parsley leaves
  • 2 lbs ground chicken (dark meat)
  • 3 green onions, green part only, thinly sliced
  • 2 tablespoons finely grated parmesan
  • ¼ cup almond meal
  • 2 teaspoons cumin seed, toasted and ground
  • ½ teaspoon chile flakes
  • 1 large egg
  • Olive oil for sautéing
  • 1/2 cup loosely packed mixed herbs such as mint, cilantro, parlsey, dill or basil (I used cilantro and dill)
  • Finely grated lemon zest, to garnish
  • Garlic-Sumac Yogurt, to serve (recipe below)
zucchini and chicken meatballs on millys-kitchen.com

*Notes: I always double grind the meat when I’m making meatballs; it yields a more tender, juicy meatball that is less likely to fall apart when you cook it. I either ask the butcher to do it for me or just throw regular ground meat in my food processor for about 20 seconds to get a finer texture and more even distribution of fat. Of course, it’s not the end of the world if you don’t double-grind the meat, but I find it makes a much better meatball. 

- If you don’t have a food processor, you can ask your butcher to double grind the chicken. Grate the zucchini on the large holes of a box grater before salting and draining. Then mince the garlic by hand and roughly chop the herbs before adding them to the ground chicken. 

- These meatballs freeze beautifully. Once you have them formed, put them on a parchment-lined sheet pan and place them in the freezer. Once frozen, transfer the meatballs to a resealable bag. They will keep for up to two months in the freezer. They can be browned from frozen, but will require more time in the oven.

- If you don't need these meatballs to be gluten-free, you can replace the almond meal with dried breadcrumbs.

zucchini and chicken meatballs on millys-kitchen.com

Grate the zucchini using the shredding disk of your food processor. Place the grated zucchini in a colander or a mesh strainer set over a bowl. Sprinkle with 1 teaspoon of the salt. Set aside to drain for at least 15 minutes. 

Place the drained zucchini in a clean kitchen towel and wring to dry. You want to remove as much water as possible so your meatballs don’t fall apart when you cook them. Place the zucchini in a large mixing bowl.

Remove the shredding disk from your food processor and insert the s-shaped blade. Add the garlic and process to roughly chop it. Add the mint, cilantro and parsley and process until roughly chopped. Add the chicken and process for 20 seconds more, until the fat is more evenly distributed in the meat. Transfer the chicken mixture to the bowl with the zucchini. Add the green onion, 1 more teaspoon of salt, the parmesan, almond meal, ground cumin, chile flakes and egg. Mix well to combine. Use a two-tablespoon scoop to shape the mixture into balls. Place on a parchment-lined sheet pan and chill for at least 20 minutes.

zucchini and chicken meatballs on millys-kitchen.com

Preheat the oven to 400F. 

Heat a large, heatproof skillet (preferably cast iron or carbon steel) over medium heat. Add enough olive oil to generously coat the bottom. When the oil is shimmery, add the meatballs. Cook, turning as necessary until the meatballs are nicely browned, adding more oil to the pan if necessary.

Transfer the pan to the oven and cook until the meatballs are no longer pink in the middle, about 10 minutes longer. (You can cut into one to check doneness.)

To serve, sprinkle the meatballs with fresh herbs and lemon zest and accompany with Garlic-Sumac Yogurt.

Makes about 30 meatballs, 6-8 servings.

Adapted from Yotam Ottolenghi and Sami Tamimi.


Garlic-Sumac Yogurt

  • 2 cups Greek yogurt

  • 2 cloves garlic, grated on a microplane or minced

  • 2 teaspoons ground sumac

  • 2 tablespoons best quality extra virgin olive oil

  • 1 teaspoon finely grated lemon zest

  • 2 teaspoons lemon juice

  • Generous pinch sea salt

*Note: If you can't find sumac, you can leave it out. The yogurt will still be delicious.

Combine all the ingredients in a medium bowl and whisk well to combine. Taste and adjust seasonings to taste.

Makes about 2 cups.

zucchini and chicken meatballs on millys-kitchen.com