simple suppers

simple suppers: zucchini and chicken meatballs with fresh herbs

zucchini and chicken meatballs on millys-kitchen.com

For most of my life spaghetti and meatballs didn’t rank among the meals I consider comfort food. I did not grow up eating this ubiquitous dish. Unless, of course, you include the many cans of SpaghettiOs with Meatballs I ate as a kid. (Since soggy canned pasta seems like it shouldn’t count as food, I’m inclined not to.)

I didn’t like real spaghetti and meatballs until I tasted the superlative version served at La Medusa several years ago. Shortly after that, my friend Molly introduced me to the marvel that is a Cafe Lago meatball

For those of you who’ve never had the pleasure of sampling the meatballs served at this Seattle institution, I can tell you they are the real deal. The perfect blend of beef, pork, herbs, spices and salty parmesan, these meatballs are so juicy and tender they barely benefit from the addition of pasta or sauce.

I was hooked.

zucchini and chicken meatballs on millys-kitchen.com

I may be late to the game, but I like to think I’m making up for lost time in my culinary exploration of the world’s great meatballs. In addition to all manner of Italian meatballs, I’ve made Moroccan kefta, studded with chiles and preserved lemon. Turkish dumplings with garlicky lamb meatballs inside. Thai-spiced pork meatballs with Sriracha aioli. Persian koofteh bound with basmati rice and fragrant with mint.

zucchini and chicken meatballs on millys-kitchen.com

The common thread that ties all these savory spheres of ground meat together is their no-frills origins. Try as one might, there’s no disguising the meatball’s utilitarian roots: a little leftover meat, minced and tossed with an egg, yesterday’s bread crumbs and a few spices for good measure. 

It’s precisely this everything-but-the-kitchen-sink flexibility that makes the meatball so appealing. There’s no end to the number of flavors meatballs can accommodate, making them the perfect vehicle for using up whatever odds and ends are floating around the kitchen.

zucchini and chicken meatballs on millys-kitchen.com

When I opened my fridge yesterday, I found a few scallions, a couple lemons, some random herbs and a pile of zucchini balancing precariously on the edge of usability. I remembered a delicious turkey burger recipe from my favorite cookbook and--voilà!--these meatballs were born.

I’m calling these a Simple Supper because if you own a food processor, they come together in a flash. You can mix up the tangy, garlicky yogurt sauce while the meatballs are in the oven. Add a green salad or a few crudités for dipping in the yogurt and you’ve got a meal. 

zucchini and chicken meatballs on millys-kitchen.com

It may have taken me a while to discover how comforting the humble meatball can be. But I’m proud to report I’d now take a plate of homemade meatballs over a can of microwaved SpaghettiOs any day.


Zucchini and Chicken Meatballs with Fresh Herbs

  • 1 large zucchini
  • 2 teaspoons coarse sea salt)
  • 2 cloves garlic
  • ¼ cup loosely packed mint leaves
  • ¼ cup loosely packed cilantro leaves
  • 2 tablespoons loosely packed parsley leaves
  • 2 lbs ground chicken (dark meat)
  • 3 green onions, green part only, thinly sliced
  • 2 tablespoons finely grated parmesan
  • ¼ cup almond meal
  • 2 teaspoons cumin seed, toasted and ground
  • ½ teaspoon chile flakes
  • 1 large egg
  • Olive oil for sautéing
  • 1/2 cup loosely packed mixed herbs such as mint, cilantro, parlsey, dill or basil (I used cilantro and dill)
  • Finely grated lemon zest, to garnish
  • Garlic-Sumac Yogurt, to serve (recipe below)
zucchini and chicken meatballs on millys-kitchen.com

*Notes: I always double grind the meat when I’m making meatballs; it yields a more tender, juicy meatball that is less likely to fall apart when you cook it. I either ask the butcher to do it for me or just throw regular ground meat in my food processor for about 20 seconds to get a finer texture and more even distribution of fat. Of course, it’s not the end of the world if you don’t double-grind the meat, but I find it makes a much better meatball. 

- If you don’t have a food processor, you can ask your butcher to double grind the chicken. Grate the zucchini on the large holes of a box grater before salting and draining. Then mince the garlic by hand and roughly chop the herbs before adding them to the ground chicken. 

- These meatballs freeze beautifully. Once you have them formed, put them on a parchment-lined sheet pan and place them in the freezer. Once frozen, transfer the meatballs to a resealable bag. They will keep for up to two months in the freezer. They can be browned from frozen, but will require more time in the oven.

- If you don't need these meatballs to be gluten-free, you can replace the almond meal with dried breadcrumbs.

zucchini and chicken meatballs on millys-kitchen.com

Grate the zucchini using the shredding disk of your food processor. Place the grated zucchini in a colander or a mesh strainer set over a bowl. Sprinkle with 1 teaspoon of the salt. Set aside to drain for at least 15 minutes. 

Place the drained zucchini in a clean kitchen towel and wring to dry. You want to remove as much water as possible so your meatballs don’t fall apart when you cook them. Place the zucchini in a large mixing bowl.

Remove the shredding disk from your food processor and insert the s-shaped blade. Add the garlic and process to roughly chop it. Add the mint, cilantro and parsley and process until roughly chopped. Add the chicken and process for 20 seconds more, until the fat is more evenly distributed in the meat. Transfer the chicken mixture to the bowl with the zucchini. Add the green onion, 1 more teaspoon of salt, the parmesan, almond meal, ground cumin, chile flakes and egg. Mix well to combine. Use a two-tablespoon scoop to shape the mixture into balls. Place on a parchment-lined sheet pan and chill for at least 20 minutes.

zucchini and chicken meatballs on millys-kitchen.com

Preheat the oven to 400F. 

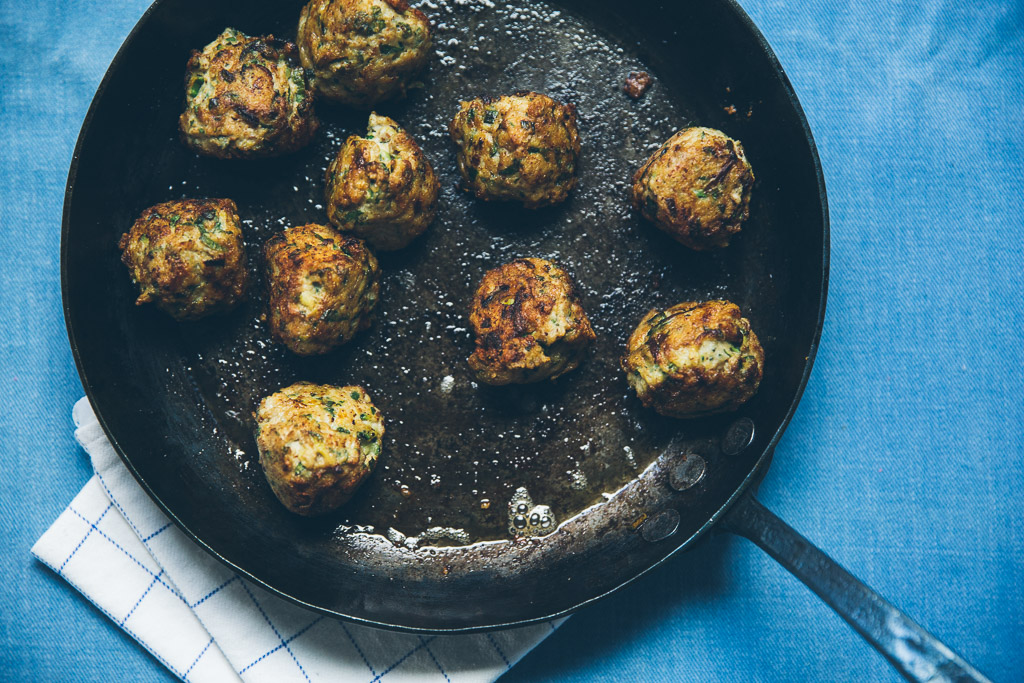
Heat a large, heatproof skillet (preferably cast iron or carbon steel) over medium heat. Add enough olive oil to generously coat the bottom. When the oil is shimmery, add the meatballs. Cook, turning as necessary until the meatballs are nicely browned, adding more oil to the pan if necessary.

Transfer the pan to the oven and cook until the meatballs are no longer pink in the middle, about 10 minutes longer. (You can cut into one to check doneness.)

To serve, sprinkle the meatballs with fresh herbs and lemon zest and accompany with Garlic-Sumac Yogurt.

Makes about 30 meatballs, 6-8 servings.

Adapted from Yotam Ottolenghi and Sami Tamimi.


Garlic-Sumac Yogurt

  • 2 cups Greek yogurt

  • 2 cloves garlic, grated on a microplane or minced

  • 2 teaspoons ground sumac

  • 2 tablespoons best quality extra virgin olive oil

  • 1 teaspoon finely grated lemon zest

  • 2 teaspoons lemon juice

  • Generous pinch sea salt

*Note: If you can't find sumac, you can leave it out. The yogurt will still be delicious.

Combine all the ingredients in a medium bowl and whisk well to combine. Taste and adjust seasonings to taste.

Makes about 2 cups.

zucchini and chicken meatballs on millys-kitchen.com

simple suppers: salmon chowder with fennel and corn

salmon chowder with fennel and corn // millys-kitchen.com

We’ve arrived at the in-between season. In between light and dark. Sun dresses and sweaters. Breezy picnics and holiday roasts. It’s that precarious moment that floats at the intersection of summer and fall, characterized by morning fog and the afternoon shedding of layers. 

salmon chowder with fennel and corn // millys-kitchen.com

I am writing this from my kitchen table, listening to a gentle breeze rock the blinds. It’s warm and there’s a fan oscillating lazily in the corner. But something feels different. I know you feel it, too. The air is different. The light is different. The trees are gilded at their edges.

I like that this in-between season usually only lasts a handful of weeks, its brevity leading me to savor it all the more. To slip in a few more hours in the garden or one more afternoon of reading in the sun. 

salmon chowder with fennel and corn // millys-kitchen.com

So this week’s Simple Supper is dedicated to the in-between season. When you want your cooking to reflect the brightness of summer and the comfort of fall all at once. This Salmon Chowder with Fennel and Corn is substantial enough to stand on it’s own as a meal. But it’s lighter than most chowders. And I’ve added delicate, herbaceous fennel (bulb and seed); sweet summer corn and enough white wine to lift and brighten the whole affair. 

salmon chowder with fennel and corn // millys-kitchen.com

To me, this is what summer-into-fall cooking should feel like. And the whole thing comes together in under an hour. Which should leave you plenty of time for any end-of-summer frolicking you might want to take care of.

As always, I hope you’ll make this dish your own. Let me know in the comments, below, if you have any questions on substitutions or techniques and/or if you’re feeling these Simple Suppers recipes. I love to hear from you!

salmon chowder with fennel and corn // millys-kitchen.com

Salmon Chowder with Fennel and Corn

  • 2 tablespoons extra virgin olive oil, plus additional to garnish
  • 1 teaspoon fennel seed
  • 1 small yellow onion, diced
  • ½ medium fennel bulb, diced, fronds reserved for garnish
  • 3 small carrots, peeled and sliced into rounds
  • ¼ teaspoon smoked paprika (regular paprika works, too)
  • Kosher or sea salt, to taste
  • ½ cup dry white wine
  • 1 bay leaf
  • 1 cup clam juice
  • 2 cups whole milk
  • 1 large Yukon Gold potato, peeled and cut into large dice
  • 1 ½ cups corn (from about 2 cobs of fresh corn or 1 14-oz. can)
  • ½ cup cream
  • ½ teaspoon freshly-ground black pepper
  • 1 lb. wild salmon, skin and pin bones removed and cut into 1-inch pieces
  • 1 tablespoon chopped parsley, to garnish
  • 3 tablespoons snipped chives, to garnish

*Notes: I originally developed this recipe to pair with Tieton Cider Works Wild Washington apple cider. It is delicous with cider and if you have access to Tieton Cider Works cider or another great dry or semi-dry apple cider, you should feel free to substitute it for the wine.

- I've made this chowder with king, sockeye and coho salmon. Surprisingly, I liked it best with the leanest of these of these, the coho. I think the milder flavor of coho works well with the delicate sweet corn and fennel. If you love big salmon flavor, try king or sockeye. I think white king would be especially nice.

- I learned the trick about adding the salmon off the heat from Becky Selengut. She's an amazing chef and a seafood guru. If you don't know her or her cookbooks, you should.

salmon chowder with fennel and corn // millys-kitchen.com

In a large, heavy-bottomed stockpot or Dutch oven, heat the olive oil over medium-high heat. Add the fennel seed and cook, stirring, for 30 seconds or until fragrant. Add the onion, fennel, carrots, smoked paprika and a generous pinch of salt and cook, stirring frequently, for 1 minute. Reduce the heat to medium-low, cover and cook until the vegetables are translucent and have softened a bit, about 8 minutes. Do not brown.

Add the white wine and bay leaf and increase the heat to medium. Cook, uncovered, for 3 minutes. Add the clam juice, milk, potato and corn. Bring the chowder to a bare simmer. (Do not let it boil or it will break; it will taste fine, but look curdled.) Continue to cook at a bare simmer, stirring occasionally, until the vegetables are quite tender, about 30 minutes. Stir in the cream and black pepper and bring the chowder back up to a bare simmer.

Remove the chowder from the heat and add the salmon. Cover and let sit for 5 minutes off the heat. This will cook the salmon through without overcooking it.

Serve the chowder garnished with a drizzle of olive oil and a sprinkling of fennel fronds, parsley, and chives.

Makes 4-6 servings.

salmon chowder with fennel and corn // millys-kitchen.com

simple suppers: huevos rancheros with salsa verde

huevos rancheros // millys-kitchen.com

I'm a big fan of cooking projects. (Hello from-scratch pie crust and braised octopus!) But I know that even the most adventurous home cook doesn't have the time to pull together a culinary masterpiece at every meal. I definitely don't.

So I'm introducing a new feature here on the blog: Simple Suppers. These are recipes that come together without too much fuss; use fresh, seasonal ingredients and are delicious enough you’ll want to add them to your permanent line-up. They’re the sorts of dishes we eat at my house when I’m not recipe testing or in the mood for a more challenging enterprise.

huevos rancheros // millys-kitchen.com

So without further delay, I give you: Huevos Rancheros! That brunch staple that is oh-so-easy to make, satisfying and infinitely customizable. All of which make it an ideal dinner for one or a fantastic brunch for the whole fam. 

huevos rancheros // millys-kitchen.com

I hope you’ll make this simple supper your own. And I’d love to hear back in the comments what exciting variations you come up with!


huevos rancheros with salsa verde

Huevos Rancheros with Salsa Verde

  • 8 medium corn tortillas
  • 8 large eggs
  • Butter, for frying eggs
  • 1 recipe black beans (see below), warmed
  • 1 recipe salsa verde (see below), warmed
  • Kosher or sea salt
  • 4 radishes, very thinly sliced into rounds
  • 1 serrano or jalapeño pepper, very thinly sliced into rounds
  • Crumbled cotija cheese, to garnish
  • Cilantro leaves, to garnish
  • Chive blossoms, to garnish (optional)
huevos rancheros // millys-kitchen.com

For the black beans

  • 1 tablespoon neutral-tasting oil (I used canola)

  • ½ medium onion, diced

  • Kosher or sea salt

  • 2 teaspoons ground cumin

  • Pinch chili flakes

  • 1 medium tomato, peeled and diced (canned works fine)

  • 1 ½ cups cooked black beans (homemade or canned)


For the salsa verde

  • 1 pound fresh tomatillos, husked, rinsed, and quartered (you can use canned when fresh aren't in season)

  • 1 fresh serrano chile, roughly chopped (remove the seeds for less heat)

  • 1/2 large white onion, roughly chopped

  • 2 garlic cloves

  • 1/2 cup water

  • 1/2 cup finely chopped cilantro

  • 1-2 tablespoons fresh lime juice, or to taste


huevos rancheros // millys-kitchen.com

*Notes: I’m crazy for green sauces with eggs, so my version is topped with a bright, spicy salsa verde (which you should definitely make a double batch of and put on everything you make for the next week!), but a red sauce or even a salsa fresca would be great, too.

The sky’s the limit when it comes to garnishes. Here are a few to try: finely shredded cabbage, sour cream or crema, a melty cheese like pepper jack or sharp cheddar, halved cherry tomatoes, diced onion, sliced green onions or crispy tortilla strips.

I like my huevos rancheros with a fried egg, but poached or scrambled work, too.

Lastly, don't be intimidated by the fact that you need to make beans and salsa for the huevos; they both come together in a snap!


Start by making the beans: Heat the oil in a medium sauté pan over medium heat. Add the onion and a pinch of salt. Reduce heat to low and cook until the onion has softened and turned golden brown, about 10 minutes. 

While the onion is sautéing, make the salsa verde: Place the tomatillos, chile, onion, garlic, water and 1 teaspoon salt in a blender. Process until you have a coarse purée. Transfer the mixture to a large sauté pan and simmer, stirring occasionally, until slightly thickened, 10-15 minutes. Add the cilantro. Taste and season with lime juice (you may not need much if your tomatillos are tart like mine were) and salt. Set aside until you're ready to assemble the huevos.

When the onions for the beans are tender, add the cumin and chile flakes. Cook for 1 minute then add the tomato and the beans. Cover and cook until the flavors come together, about 5 minutes.

To assemble the Huevos Rancheros: Heat a large cast iron or carbon steel pan over medium-high heat.  When hot, cook the tortillas in batches until warmed through. I like a little char on my tortillas, so I leave them on a little longer. Wrap the heated tortillas tightly in aluminum foil and set aside. 

Next fry your eggs. Heat the same pan you used to cook the tortillas over high heat. Add about two teaspoons butter to the pan and swirl. It should melt immediately and start bubbling vigorously, otherwise, your pan isn’t hot enough. Crack 4 eggs into the pan (or as many as your pan will hold) and cook until the edges are lacy and crisp and the whites are completely set, about two minutes. Use a metal spatula to separate the eggs and transfer them to a platter or sheet pan. Repeat the process to fry the rest of the eggs.

When all of the eggs are fried, divide the tortillas among four plates. Top with some of the warm beans. Place two eggs on top of the beans on each plate and season the eggs with a sprinkle of salt. Top the eggs with a generous amount of the warm salsa verde. Garnish with the radishes, sliced chiles, cheese, cilantro and chive blossoms and serve immediately.

Makes 4 servings.

huevos rancheros // millys-kitchen.com

Salsa Verde adapted from Gourmet Magazine