pie

italian plum pie

italian plum pie

I’m writing you this week from Brussels. Beau and I are staying with friends and recharging between the Paris photography workshop we hosted and the retreat we’re leading in Portugal. Since we arrived, our days have mostly involved sleeping late, cooking with all the gorgeous fall produce, leisurely meals with friends and long walks through the forest. Needless to say, I do not want to leave.

double-ginger blackberry plum pie

Image: Olaiya Land

Pie is a surprisingly divisive topic. I’ve seen perfectly sane bakers on the verge of a fist fight over whether the best crusts are made with butter or lard. I’ve heard pastry chefs talk mountains of trash over other chefs’ under-baked or over-browned pies. I’ve seen people almost in tears because of a soupy filling, ready to throw in the towel and give up pie-making forever.

I get it. Pie is not the easiest baked good to master. The different water and pectin content of fruit makes the filling tricky. A golden, flaky crust takes patience and attention to detail. I understand why so many of you are intimidated to bake up a pie of your own. 

But you shouldn’t be.

Image: Olaiya Land

I’m not going to go so far as to say that pie is easy. There are about a dozen steps for baking a lovely one. To do it right takes the greater part of a morning or afternoon. But a bubbling-hot pie, fresh from the oven is a thing of beauty. And a still warm slice with a scoop of vanilla ice cream is one of life’s great pleasures. 

In this respect, pie is like a lot of other great experiences. It’s daunting and takes work and sometimes feels unattainable. Like actually understanding wine. Or finally buying a pair of jeans that make your ass look amazing. Or finding that perfect someone to grow old and grey with. 

Image: Olaiya Land

Or venturing to a glorious city like Paris on your own--which is what I’m currently doing. Despite the fact that this is my favorite city in the world, and that I’ve been here more times than I can count, and that I actually enjoy being alone, I feel out of sorts and awkward. I woke up feeling like this whole trip was a bad idea and that I’d be much happier at home in my own bed. 

Luckily, I’ve had these feelings of homesickness and insecurity often enough to know that they aren’t real. They’re just my mind trying to trick me into playing it safe. 

Life, however, is way too short for always playing it safe. There are too many inspiring people to meet and too many new places to discover. And too many pies to bake.

Image: Olaiya Land

So I’m here to remind you that if you think there’s something spectacular on the other side of your dreams, it’s always worth the discomfort it takes to get there. Even if the thing or person (or pie) turns out not to be as life-changing as you’d hoped, the journey will leave you that much richer.

Image: Olaiya Land

Double-Ginger Blackberry Plum Pie

  • 1 recipe flaky pie dough (see below)
  • 2 lbs firm-ripe plums (I used Italian prune plums, but any mix of plums will work)
  • 2 teaspoons fresh lemon juice
  • 2 ½ tablespoons cornstarch, divided
  • 9 tablespoons sugar, divided
  • ½ teaspoon ground ginger
  • 1½ oz. (1/4 cup) candied ginger
  • Pinch salt
  • 8 oz blackberries (about 2 cups)

Flaky Pie Dough

  • 1 lb + 2 oz (4 cups) all-purpose flour

  • 2 tablespoons sugar

  • 1 1/2 teaspoons kosher salt

  • 8 oz (2 sticks) butter, cut into 1/2-inch pieces and chilled

  • 5 oz (1/2 cup + 2 tablespoons) lard, cut into 1/2-inch pieces and chilled

  • 2 teaspoons apple cider vinegar

  • 3/4 cup cold water

  • 1 whole egg beaten with 1 tablespoon water (or 3 tablespoons cream or milk), to glaze

  • 1-2 tablespoons turbinado, demerara or sanding sugar (regular old sugar will work, too)


*Notes: I straddle the Great Pie Crust Debate by using both butter and lard in my crust. The butter adds flavor, but also extra flakiness as the water in the butter is transformed to steam in the oven and creates little pockets throughout the dough. The lard creates flakes as well, adds tenderness and, due to its higher melting point, makes the dough easier to work with. I render my own leaf lard or buy it from Bob's Quality Meats or Rain Shadow Meats here in Seattle. If you don’t want to use lard, I recommend an all-butter crust (just sub butter for the lard in this recipe)--it will be delicious and only a bit harder to work with. If you work quickly and your ingredients are super cold before you begin, you shouldn't even notice any difference.

- Freezing your lard before you begin will make it easier to cut into pieces.

- Some varieties of plums can release a lot of juice once you sprinkle sugar on them. If your plums give off a lot of liquid, you’ll need to pour most of it off before baking to avoid a soggy crust and loose filling.

- If you manage to save some pie for later, don’t refrigerate it! This ruins the beautiful, flaky texture of the crust. Just tuck it under a dish towel and leave on the counter overnight.  

Image: Olaiya Land

Before you begin, make sure your butter, lard and cold water have been in the refrigerator for at least 30 minutes. If the weather is warm or your kitchen tends to be toasty, chill your flour as well.

In a large bowl, mix together the flour, sugar and salt. Separate the pieces of chilled butter and toss them in the flour mixture to coat. Do the same with the lard. When all the pieces of fat have been coated in flour, pick up a piece of butter or lard between your thumb and first two fingers. Slide your thumb over the butter or lard while pressing down on it in order to form a long, thin strip. Drop this strip back into the bowl so it becomes coated with flour. Continue until all the pieces of butter and lard have been flattened. Some of the flakes will break and the dough will take on a slightly crumbly or sandy appearance, which is just fine. Place the bowl in the freezer for 5-10 minutes to re-chill the fat.

Image: Olaiya Land

Drizzle the cold water and vinegar onto the chilled flour and fat mixture, tossing constantly with a flexible silicone or rubber spatula or a large spoon. Continue adding water until the mixture is moist enough to form a dough when you pinch it together. If you have used ¾ cup of water and the dough seems dry, give it a few more turns with your spatula or spoon and then pinch off a golf ball sized piece of dough. Squeeze it and see if it wants to come together into a dough.  If it is too crumbly and won’t form a dough, add a bit more water, a couple teaspoons at a time, until the mixture forms a dough when you pinch it together.

Turn out the dough (it will be shaggy) onto a large work surface and gather it together into a ball. Do not knead it as this will toughen the dough. Divide it in half with a bench scraper or knife. Form each half into a ball and then flatten each ball into a disk about 3/4-inch thick. Wrap each disk in plastic wrap or parchemnt and chill for at least an hour before rolling. (The dough can be refrigerated for up to 2 days, or placed in a ziploc bag and frozen for up to 2 months.  If frozen, thaw the dough in the refrigerator overnight and soften slightly at room temperature before rolling out.)

Image: Olaiya Land

Roll out one disk of dough to roughly 1/4-inch thickness. Place the dough into a pie plate. Lift and press it into the edges of the plate.  Do not stretch the dough into the edges as this will make your crust shrink as it bakes. Trim and crimp the edges of your crust and place the pan in the freezer for at least 15 minutes.

On a lightly floured work surface, roll out the other disk of dough to roughly 1/4-inch thickness.  Cut out a circle roughly 1 inch larger than the top diameter of your pie plate.  For a latticed pie, cut this circle into wide strips.  Place the strips on a plate and refrigerate while you make the filling.

Image: Olaiya Land

When you are ready to bake the pie, arrange a rack in the middle of the oven and preheat it to 425°F.  

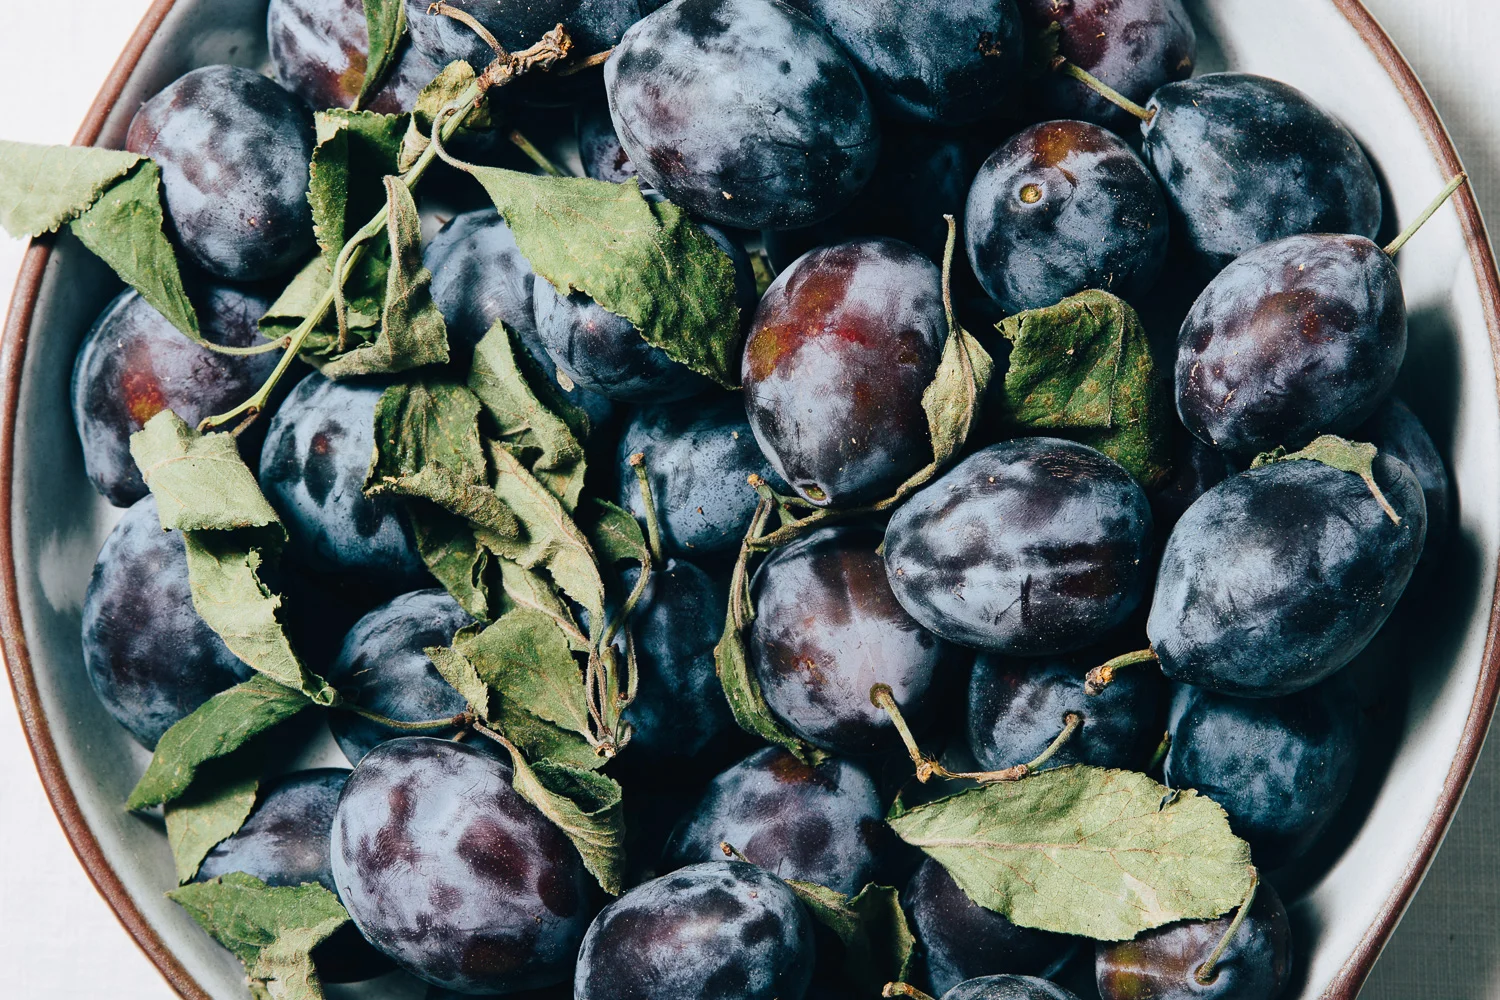
Cut the plums into quarters if they're large or halves if they're small, discarding the pits. Place the plums in a large mixing bowl and toss gently with the lemon juice and ½ cup of the sugar. Set aside to rest for 20-30 minutes. Pour off the juice from the plums, discarding all of it except for ½ cup. Toss the plums (and ½ cup juice) with two tablespoons of the cornstarch, the candied and dried ginger and a pinch of salt. 

Place the blackberries in a medium mixing bowl and toss with the remaining 1 ½ teaspoons of the cornstarch and 1 tablespoon of sugar. 

To fill the pie crust, pour half of the plum mixture onto your well-chilled or frozen bottom crust. Arrange half of the blackberries over the plums. Top with the rest of the plum mixture and then the rest of the blackberries. Place the dough strips from the refrigerator on top of the berries, weaving them into a lattice pattern. Trim the edges to overhang by ¾ inch. Fold the top edges of the lattice over the bottom crust, tuck the edges under and crimp. Place the filled and topped pie back in the freezer to chill for 15 minutes. 

(I know, I know. There’s a lot of chilling and freezing and waiting around. But taking the time to par-freeze your pie will help keep your crust from slumping in the oven.)

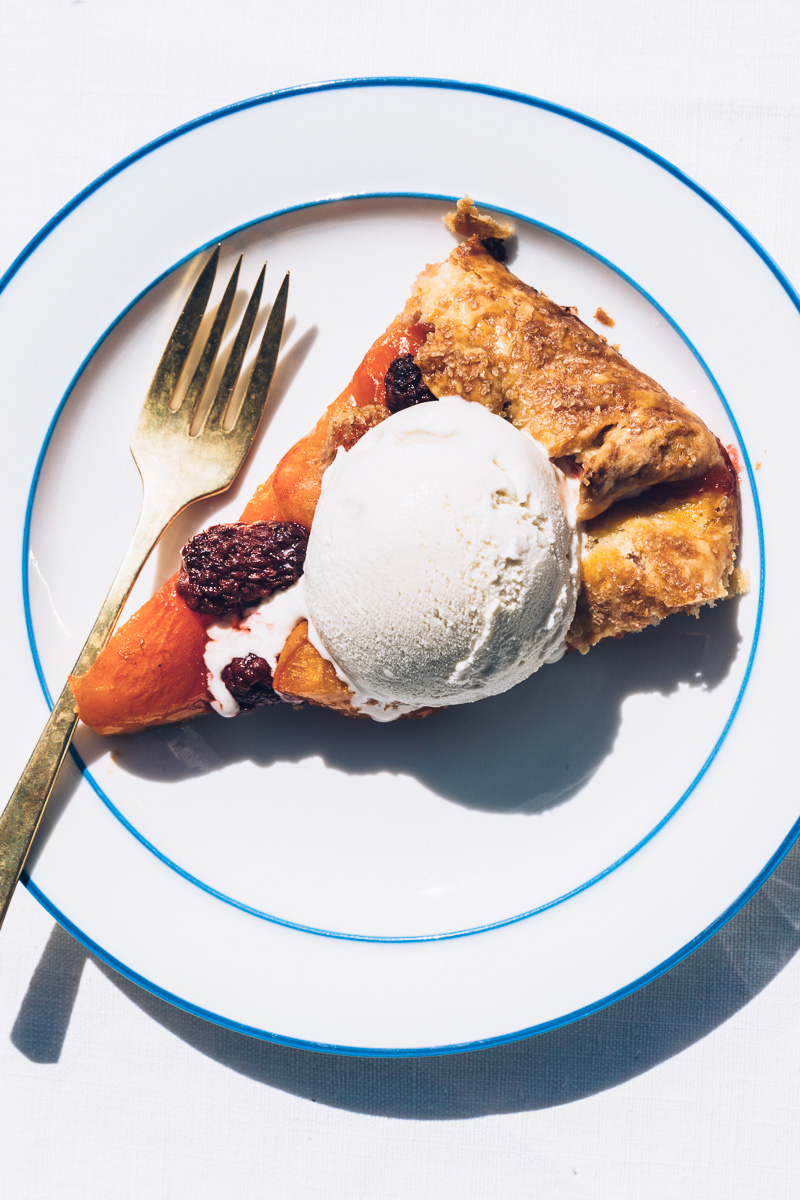
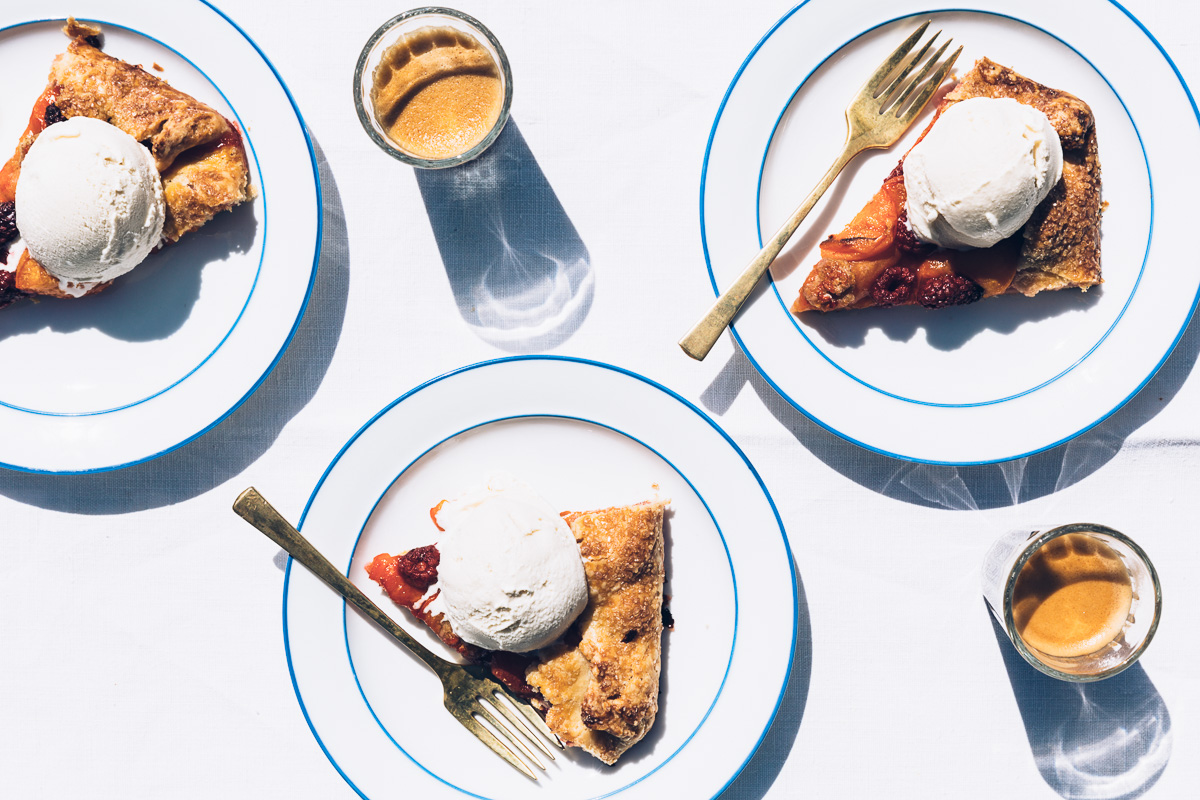
Brush the top crust with the egg wash (or cream or milk) and then sprinkle with the sugar. Place the pie on a sheet pan and bake until the crust is lightly browned, about 30 minutes. Reduce the oven temperature to 350°F and continue baking until the crust is dark golden brown, about 45-60 minutes longer.  I like my crust deeply caramelized.

Remove the pie from the oven and allow it to cool before serving. (The longer you let it cool, the easier it will be to slice.)

Serves 6-8.

Image: Olaiya Land

apricot triple berry galette

Image: Olaiya Land

Seattle has bestowed an improbably beautiful June upon us. Normally, it rains right up to (and often through) the Fourth of July. But this year, the days have been bright and warm and the nights perfect for sleeping. My street is fragrant with jasmine and roses bending under the weight of their blooms. The tomato plants in my neighbors' gardens are growing like jungle vines.

The days are magnificently long, too. (I’m writing this at 9.16pm and the sun is only just starting to set). Which means Beau and I have been fixing simple dinners--whatever vegetables we have, thrown on the grill along with a few sausages or maybe a pork chop, and a bottle of rosé--and eating most of our meals outside. This is my idea of summer perfection.

Image: Olaiya Land

Baking has felt decidedly unappealing--all that time and mess and heating up the house when I could be spending time outdoors. But last week at the farmers market, I spied a pile of the season’s first tiny apricots. They were so cute with their downy, blushing cheeks--I couldn’t not buy them. I loaded up my basket and told myself I’d figure out what to do with them later.

Naturally, I let them sit on my counter, until they teetered on the very edge of being usable.

Image: Olaiya Land
Image: Olaiya Land

Then I decided to suck it up and turn on the oven. It was time for a galette. 
 
With their tart, fruit filling and buttery crust, galettes are one of my favorite pastries. Their free-form nature makes them relatively easy to throw together on the fly (and thus perfectly in line with my no-fuss summer cooking policy), especially when made with this super easy galette dough.

Image: Olaiya Land
Image: Olaiya Land
Image: Olaiya Land

After I pulled this beauty out of the oven, all caramelized and bubbling, Beau and I cut ourselves thick slices, topped them with vanilla ice cream and took them outside to eat in the afternoon sun. I didn’t regret turning on the oven or dirtying a few dishes for one second.


Image: Olaiya Land

Apricot Triple Berry Galette

  • ½ recipe Galette Dough
  • 1 lb ripe apricots, pitted and halved if small, quartered if larger
  • 1 ½ cups mixed berries (I used raspberries, golden raspberries and tayberries)
  • 3-5 tablespoons sugar, divided (or to taste)
  • 1 teaspoon cornstarch
  • Salt
  • 1 egg
  • Coarse sugar, such as Turbinado, Demerara or sanding sugar (regular old sugar will work, too)
  • Vanilla ice cream, creme fraiche or sweetened whipped cream, to serve

Preheat the oven to 400°. Line a large rimmed baking sheet with parchment paper. On a lightly floured work surface, roll out the disk of dough to roughly 1/4-inch thickness. Transfer to the baking sheet (the pastry will likely hang over the edges a little bit). Refrigerate the for 10 minutes.
 
While the dough is in the fridge, place the apricots in a large bowl and place the berries in a medium bowl. Add 3 tablespoons of sugar, the cornstarch and a tiny pinch of salt to the apricots. Toss, then taste and add more sugar if your apricots are a bit tart. Add 1 tablespoon of sugar and a tiny pinch of salt to the berries. Toss, taste and add more sugar if your berries need it.
 
Spread the apricots on the pastry to within 2 inches of the edge. Arrange the berries over the apricots. Fold the edge over the filling, pleating as you go. In a small bowl, whisk the egg with a tablespoon of cold water and brush it over the dough then sprinkle with the sugar. (For an extra pretty galette, place it in the fridge or freezer for 15-20 minutes before baking--this keeps it from slumping in the oven.) 
 
Bake in the center of the oven for 50-60 minutes, until golden brown and bubbling. Let the galette cool slightly before cutting into wedges and serving with ice cream, creme fraiche or sweetened whipped cream.
 
Serves 6-8.

Image: Olaiya Land

Galette Dough
13 ¾ oz (3 cups) all-purpose flour
2 tablespoons sugar
1 ¾ teaspoons kosher salt
9 oz (1 cup plus 2 tablespoons  or 2 ¼ sticks) chilled unsalted butter, cut into ½ inch cubes
8 tablespoons (or more) ice water
1 ½ teaspoons apple cider vinegar
 
*Note: This is a tender (as opposed to flaky) dough because it's made in the food processor. It's the most failsafe, forgiving dough I've ever encountered (it's been my go-to for over a decade) and a great place to start if you're nervous at all about working with dough. If you don't have a food processor, you can substitute my pie dough, or use the method described in my pie recipe to rub the butter into the dry ingredients. This will yield a flakier, but equally delicious galette dough.

- This dough can be refrigerated for up to 2 days, or placed in a ziploc bag and frozen for up to 2 months. If frozen, thaw the dough in the refrigerator overnight and soften slightly at room temperature before rolling out.

Image: Olaiya Land

Blend the flour, sugar and salt in a food processor to combine. Add the butter, one piece at a time, using on/off turns. Process until the dough looks like sand with some pebbles in it. Drizzle in the cider vinegar while pulsing the dough. Then add the 8 tablespoons of ice water and blend until moist clumps form. 
 
The mixture should be moist enough to form a dough when you pinch it together. If you have used 8 tablespoons of water and the dough seems dry, give it a few more pulses in the food processor and then pinch off a golf ball sized piece. Squeeze it and see if it wants to come together into a dough. If it’s too crumbly and won’t form a dough, blend in a bit more water, a teaspoon at a time, until the mixture forms a dough when you pinch it together.
 
Turn out the dough onto a large work surface and gather it together into a ball. Do not knead it as this will toughen the dough. Divide it in half with a bench scraper or knife. Form each half into a ball and then flatten each ball into a disk about ¾-inch thick. Wrap each disk in plastic wrap and chill for at least an hour before rolling. (Ok, to be honest, this dough is so forgiving, I’ve rolled it out without chilling it. But that’s only for emergencies. You’ll get a much nicer galette if you chill the dough!)
 
Makes 2 dough disks (enough for 2 galettes).