berries

apricot triple berry galette

Image: Olaiya Land

Seattle has bestowed an improbably beautiful June upon us. Normally, it rains right up to (and often through) the Fourth of July. But this year, the days have been bright and warm and the nights perfect for sleeping. My street is fragrant with jasmine and roses bending under the weight of their blooms. The tomato plants in my neighbors' gardens are growing like jungle vines.

The days are magnificently long, too. (I’m writing this at 9.16pm and the sun is only just starting to set). Which means Beau and I have been fixing simple dinners--whatever vegetables we have, thrown on the grill along with a few sausages or maybe a pork chop, and a bottle of rosé--and eating most of our meals outside. This is my idea of summer perfection.

Image: Olaiya Land

Baking has felt decidedly unappealing--all that time and mess and heating up the house when I could be spending time outdoors. But last week at the farmers market, I spied a pile of the season’s first tiny apricots. They were so cute with their downy, blushing cheeks--I couldn’t not buy them. I loaded up my basket and told myself I’d figure out what to do with them later.

Naturally, I let them sit on my counter, until they teetered on the very edge of being usable.

Image: Olaiya Land
Image: Olaiya Land

Then I decided to suck it up and turn on the oven. It was time for a galette. 
 
With their tart, fruit filling and buttery crust, galettes are one of my favorite pastries. Their free-form nature makes them relatively easy to throw together on the fly (and thus perfectly in line with my no-fuss summer cooking policy), especially when made with this super easy galette dough.

Image: Olaiya Land
Image: Olaiya Land
Image: Olaiya Land

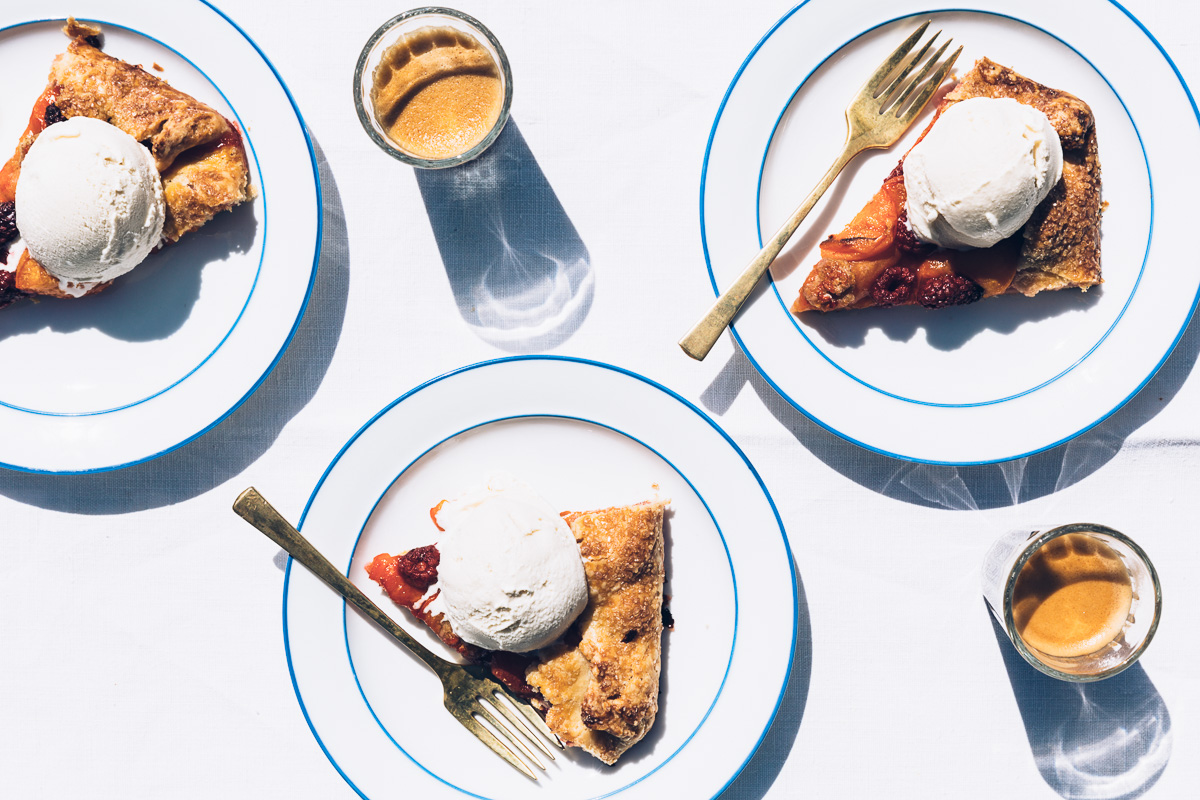
After I pulled this beauty out of the oven, all caramelized and bubbling, Beau and I cut ourselves thick slices, topped them with vanilla ice cream and took them outside to eat in the afternoon sun. I didn’t regret turning on the oven or dirtying a few dishes for one second.


Image: Olaiya Land

Apricot Triple Berry Galette

  • ½ recipe Galette Dough
  • 1 lb ripe apricots, pitted and halved if small, quartered if larger
  • 1 ½ cups mixed berries (I used raspberries, golden raspberries and tayberries)
  • 3-5 tablespoons sugar, divided (or to taste)
  • 1 teaspoon cornstarch
  • Salt
  • 1 egg
  • Coarse sugar, such as Turbinado, Demerara or sanding sugar (regular old sugar will work, too)
  • Vanilla ice cream, creme fraiche or sweetened whipped cream, to serve

Preheat the oven to 400°. Line a large rimmed baking sheet with parchment paper. On a lightly floured work surface, roll out the disk of dough to roughly 1/4-inch thickness. Transfer to the baking sheet (the pastry will likely hang over the edges a little bit). Refrigerate the for 10 minutes.
 
While the dough is in the fridge, place the apricots in a large bowl and place the berries in a medium bowl. Add 3 tablespoons of sugar, the cornstarch and a tiny pinch of salt to the apricots. Toss, then taste and add more sugar if your apricots are a bit tart. Add 1 tablespoon of sugar and a tiny pinch of salt to the berries. Toss, taste and add more sugar if your berries need it.
 
Spread the apricots on the pastry to within 2 inches of the edge. Arrange the berries over the apricots. Fold the edge over the filling, pleating as you go. In a small bowl, whisk the egg with a tablespoon of cold water and brush it over the dough then sprinkle with the sugar. (For an extra pretty galette, place it in the fridge or freezer for 15-20 minutes before baking--this keeps it from slumping in the oven.) 
 
Bake in the center of the oven for 50-60 minutes, until golden brown and bubbling. Let the galette cool slightly before cutting into wedges and serving with ice cream, creme fraiche or sweetened whipped cream.
 
Serves 6-8.

Image: Olaiya Land

Galette Dough
13 ¾ oz (3 cups) all-purpose flour
2 tablespoons sugar
1 ¾ teaspoons kosher salt
9 oz (1 cup plus 2 tablespoons  or 2 ¼ sticks) chilled unsalted butter, cut into ½ inch cubes
8 tablespoons (or more) ice water
1 ½ teaspoons apple cider vinegar
 
*Note: This is a tender (as opposed to flaky) dough because it's made in the food processor. It's the most failsafe, forgiving dough I've ever encountered (it's been my go-to for over a decade) and a great place to start if you're nervous at all about working with dough. If you don't have a food processor, you can substitute my pie dough, or use the method described in my pie recipe to rub the butter into the dry ingredients. This will yield a flakier, but equally delicious galette dough.

- This dough can be refrigerated for up to 2 days, or placed in a ziploc bag and frozen for up to 2 months. If frozen, thaw the dough in the refrigerator overnight and soften slightly at room temperature before rolling out.

Image: Olaiya Land

Blend the flour, sugar and salt in a food processor to combine. Add the butter, one piece at a time, using on/off turns. Process until the dough looks like sand with some pebbles in it. Drizzle in the cider vinegar while pulsing the dough. Then add the 8 tablespoons of ice water and blend until moist clumps form. 
 
The mixture should be moist enough to form a dough when you pinch it together. If you have used 8 tablespoons of water and the dough seems dry, give it a few more pulses in the food processor and then pinch off a golf ball sized piece. Squeeze it and see if it wants to come together into a dough. If it’s too crumbly and won’t form a dough, blend in a bit more water, a teaspoon at a time, until the mixture forms a dough when you pinch it together.
 
Turn out the dough onto a large work surface and gather it together into a ball. Do not knead it as this will toughen the dough. Divide it in half with a bench scraper or knife. Form each half into a ball and then flatten each ball into a disk about ¾-inch thick. Wrap each disk in plastic wrap and chill for at least an hour before rolling. (Ok, to be honest, this dough is so forgiving, I’ve rolled it out without chilling it. But that’s only for emergencies. You’ll get a much nicer galette if you chill the dough!)
 
Makes 2 dough disks (enough for 2 galettes).

mini dark chocolate cakes with basil cream and summer berries

mini dark chocolate cakes with basil cream and summer berries // millys-kitchen.com

Visiting Paris never gets old. It doesn’t matter how many times I’ve been, I always find fresh inspiration in the City of Light.

I was there last month leading two culinary tours. With each group, I spent a week cooking, eating, drinking and generally reveling in the beauty of Paris. I’ve been often enough now that I can navigate from memory. Which changes your experience of a place. Without my nose buried in a map, I was able to spend more time contemplating the city.

paris culinary tour // millys-kitchen.com

Which led to my latest observations about Paris:

The city is full of secret little corners and vignettes: People napping or reading or playing pétanque in the small, verdant parks that dot the city; hidden courtyards overflowing with fragrant roses and jasmine . 

paris culinary tour // millys-kitchen.com

Parisian women actually do wear bright red lipstick and look ridiculously sexy pretty much all the time. 

If you become a regular at a cafe, the owner might one day pull out a dusty bottle of eau de vie from his personal stock in the cellar and pour you a shot to drink with him in the middle of the afternoon. Just because. 

Parisian men wear cologne and several times a day, one of them will walk past leaving you in an intoxicating wake. 

paris culinary tour // millys-kitchen.com

It’s hard to be in a hurry in Paris. Things happen when they happen. You might wait in line for 30 minutes at the grocery store. Your server is smoking and can’t be bothered to get you another glass of wine. The restaurant you wanted to go to is inexplicably closed. 

paris culinary tour // millys-kitchen.com

But you make your way home with your groceries. And when she’s done with her cigarette, in language bordering on the rapturous, your server will take the time to recommend just the right wine. And you’ll discover a delightful new restaurant around the corner from the one you were originally going to. I love this looseness and the fact that you never quite know what might happen on any given day. 

Oh, and this chocolate cake: 

mini dark chocolate cakes with basil cream and summer berries // millys-kitchen.com

I learned to make this cake at Tours de Cuisine, a small cooking school and wine cellar in the 11th arrondissement. I always take my culinary tours there, partly because the proprietors, Vincent and André provide such a warm welcome and such delicious food and wine. And partly because it’s so pleasing to watch what at first appears to be total chaos--a jar of flour over here, a stick of butter somewhere over there, where are the eggs again?--transform over the course of a few hours into a wonderful meal. 

paris culinary tour // millys-kitchen.com

When we arrive at Tours de Cuisine, I always hold my breath, wondering if my group of Americans will be put off by Vincent and André’s laissez-faire approach to cooking instruction. But inevitably, they love it. The organic way the classes unfurl, so different from most American cooking classes with their neatly-printed recipe packets, orderly trays of prepped ingredients and precise timelines.

paris culinary tour // millys-kitchen.com

This cake was the highlight of a recent pastry class at Tours de Cuisine. It’s a very Parisian affair. Just a few ingredient tossed together on the fly yield a dark and silky chocolate cake that’s infinitely variable. It can be dressed up or down. It's fantastic crowned with a coffee glaze, studded with candied citrus zest or drizzled with warm salted caramel. But I like it best fancied up with a dollop of basil cream and a handful of summer berries.

It reminds me of Paris. And how a little chaos can give rise to beautiful surprises.

mini dark chocolate cakes with basil cream and summer berries // millys-kitchen.com
paris culinary tour // millys-kitchen.com

Mini Dark Chocolate Cakes with Basil Cream and Summer Berries

  • 3 ½ oz. (100 grams) dark chocolate, roughly chopped
  • 3 ½ oz. (100 grams) unsalted butter, cut into cubes
  • 1 teaspoon espresso powder or instant coffee
  • Pinch salt
  • 3 ½ oz. (100 grams) sugar
  • 1 heaping tablespoon all-purpose flour
  • 2 large eggs
  • 1 recipe Basil Cream (see below)
  • 2 cups mixed summer berries (I used raspberries, strawberries and salmon berries)
  • Powdered sugar, for dusting

*Notes: The secret to these moist little cakes is steaming them. You will need a silicone mini cake mold like this one in order to turn the cakes out after you steam them. I know it's a bit fussy, but this technique is well worth the effort. I am not a chocolate dessert person at all and these cakes make me swoon every time I eat them because they are so moist and dense and delicious.

If you don’t want to deal with the whole steaming business, you can cook your cakes in a 400°F (205°C) oven for about ten minutes. You don't need a silicone mold for this, but be sure to generously butter your cake tins and dust them with cocoa powder before pouring in the batter. 

I used 70% dark chocolate from Theo for this recipe and it made super chocolatey cakes that weren't at all too sweet.

*For a gluten-free version: substitute nut flour or a gluten-free flour mix for the all-purpose flour. 


Melt the butter and chocolate in a double boiler. If you don’t have a double boiler, fill a small saucepan with 1 inch of water and bring to a simmer. Place the butter and chocolate in a medium heat-proof bowl and place over the saucepan of simmering water. Stir until melted. Add the espresso powder or instant coffee and salt and stir to dissolve. Set aside to cool slightly.

Place the eggs and sugar in a medium bowl and whisk until the sugar has dissolved and the mixture is slightly fluffy, about 2 minutes. Gently stir the chocolate mixture into the eggs and sugar. Sprinkle the flour over the top and stir to combine.

It seems that many French people own electric steamers like this one. If  you happen to have a fancy electric steamer, you are in luck, as it is the easiest way to cook these cakes. 

If you, like me, do not own one of these beauties, you’re going to have to get creative to steam your cakes. I ended up using a dutch oven with an inverted baking dish inside. It wasn’t the prettiest, but it got the job done. I suggest looking through your cupboards to see what sort of makeshift steamer you can come up with. An Asian steamer basket would be great, but a large pot with something heatproof inside should work just fine. 

When you have your steamer set up, pour an inch or so of water in the bottom. Place your mold in the steamer and fill the molds almost to the top (the cakes will expand a bit as they cook). Cover the mold with foil to keep too much water from getting in. Heat the water until you have steam, then cover and cook the cakes for 20-25 minutes. The time will vary depending on the size of your cakes. Start checking at 20 minutes by inserting a paring knife into one of the cakes to make sure it is set all the way through. Remove the mold from the steamer and set aside for 15 minutes to cool slightly. Transfer to the refrigerator and chill completely before un-molding, at least an hour. 

To serve cakes, make sure they aren't ice cold. They don't need to be room temperature, but I found the texture is best if you let them warm up for 20-30 minutes at room temperature. Serve with a dollop of basil cream and a small handful of mixed berries. Dust with powdered sugar if desired.


Basil Cream

  • 1 cup (235 mL) heavy cream
  • 15 large basil leaves
  • 2 tablespoons super-fine sugar

Gently bruise the basil leaves by hitting them with the back of a wooden spoon or scrunching them in your hand. This will help release the essential oils. Do not chop the basil or it will blacken and result in grey cream. 

Bring the cream to a gentle simmer in a small saucepan. Add the basil leaves. Remove the pot from the heat, cover and let steep for 30 minutes. Strain the infused cream through a fine mesh sieve. Cover the cream and refrigerate until very cold (or it won’t whip properly).

Transfer the chilled cream to a medium bowl. Add the sugar and whip until soft peaks form. 


mini dark chocolate cakes with basil cream and summer berries // millys-kitchen.com

baked french toast with pears, hazelnuts and blackberry-cardamom syrup

Baked French Toast with Pears, Hazelnuts and Blackberry-Cardamom Syrup // Milly's Kitchen

I heard someone speaking the other day about the fear of catastrophe that follows intense joy. Like a streak of lightning after thunder. As though, gazing upon your sleeping babe, your soulmate, your safe and beautiful home, the happiness you feel is too great. So big it aches in your chest. Incomprehensible. And so you must conjure some horrible disaster in your mind to ward off the fear of what might be. A psychic sacrifice to the demons that poke and prick at us all. 

I'm all too familiar with that feeling. 

More often than I’d like to admit, I am afraid that the good things I have might be snatched away from me. Who am I to receive such gifts, experience such joy?, I think. To forestall the unthinkable, I tell myself: Don't get too comfortable. Be vigilant. Work harder. 

But to think like this is to not be fully alive. So for the past several years, I've been trying to let the negative and the dark hold less sway. To be in the here and now and to be wholeheartedly grateful for the many blessings I have.

Baked French Toast with Pears, Hazelnuts and Blackberry-Cardamom Syrup // Milly's Kitchen

So as one year turns into another, I try to carve out a quiet moment to imagine fresh adventures. And to look back over my year at the many things I have to be grateful for.

This year, that list is huge. 

I got married to a kind and loving man who has made me laugh precisely every single day since we met. I have a husband who loves me as I am and helps me remember that nothing is ever as daunting as it seems with a friend at your side. For this, I am beyond grateful.

Baked French Toast with Pears, Hazelnuts and Blackberry-Cardamom Syrup // Milly's Kitchen

My work is more inspiring and fulfilling than I ever could have imagined. When I left a business that I helped found and had poured my entire being into, to teach and write and lead culinary adventures, I was terrified. There were lots of days spent wanting to stay in bed with the covers pulled over my head. What if everyone thought my plan was frivolous or stupid? Worse, what if no one showed up?

But you did show up. The tour I led to Paris last year was a lifechanger. Forming friendships with the women who came with me to Paris and watching them marvel in the city’s delights, was one of the high points of my year. For this I am grateful.

Baked French Toast with Pears, Hazelnuts and Blackberry-Cardamom Syrup // Milly's Kitchen

As was connecting with all of you through this blog. In the beginning, I thought this space would be about posting recipes and sharing tips. Explanations of food science and proper technique. But when I sit down to write, this is what comes out. Thoughts on why cooking and gathering loved ones around the table is so essential. Things I hadn’t articulated clearly before. Even to myself. And the ability to catapult back in time. To summers past and trips to France. To the Thanksgivings of my childhood when my grandmother was still turning out huge trays of her oyster stuffing. And to snowy Christmases spent with good friends. For this, too, I am grateful.

And so, one of the things I am most thankful for this year is you. To all of you who came out to a cooking class, read my blog, shared with me on Instagram, and journeyed with me to Paris, I am so appreciative of all your support. 2014 was an amazing year for me, due in large part to the wonderful connections I made with all of you. So I’m sending you a huge thank you!

I've got a new recipe for you: Baked French Toast with Pears, Hazelnuts and Blackberry-Cardamom Syrup. It’s just the thing to get everyone around the table for a family breakfast or New Year’s Day brunch.

Baked French Toast with Pears, Hazelnuts and Blackberry-Cardamom Syrup // Milly's Kitchen

You soak the bread the night before in a ginger-brown sugar custard. Simmer ripe pears in a luscious salted caramel sauce, stir in a handful of toasted hazelnuts, and you’re ready to go. Pop the whole thing in the oven in the morning and you have a simple, elegant breakfast that feeds a crowd. 

The recipe is below. I hope you enjoy it. And I hope you share it with those you are most grateful for. 

Wishing you a Happy and Bright New Year!

- Olaiya 


Baked French Toast with Pears, Hazelnuts, and Blackberry-Cardamom Syrup

  • 1 recipe syrup (see below)
  • 5 tablespoons butter, divided, plus additional for greasing the pan
  • 1 1-lb loaf of country white bread or challah, preferably a day or two old
  • ½ vanilla bean
  • 1 packed cup brown sugar, divided
  • 5 large eggs
  • 2 ½ cups whole milk
  • ½ teaspoon ground ginger
  • 1 teaspoon kosher salt, divided
  • 3/4 cup hazelnuts
  • 4 ripe pears

For syrup:

  • 1 cup blackberries, fresh or frozen

  • ½ cup maple syrup, preferably Grade B (which is darker and more delicious in my opinion)

  • ¼ teaspoon kosher salt

  • ¼ teaspoon ground cardamom

Use a little of the butter to grease a large baking dish. Cut the bread into slices one inch thick. Cut the slices in half diagonally. Arrange the bread in the baking dish in two or three rows, overlapping the slices of bread as necessary to make them fit. Set aside.

Place ½ cup of the brown sugar in a large bowl. Slice the vanilla bean in half lengthwise. Using a paring knife, scrape the seeds from the vanilla bean into the sugar. Use your fingers to rub the vanilla seeds into the sugar to distribute them evenly. Add the eggs, milk, ginger and ½ teaspoon of the salt. Whisk well to combine.

Pour the custard evenly over the bread in the baking dish. Depending on the size of your dish, you may need to gently push the slices down into the custard with a spoon or flexible spatula so the bread can soak up as much custard as possible.

Cover with plastic wrap and chill for at least 6 hours and up to 24 hours to allow the custard to soak into the bread. If you notice that there is custard pooling in the bottom of the baking dish, spoon some of the custard over the bread once or twice while it’s chilling. You can also place another roasting pan or pie dish on top of the soaking bread to gently push it down into the custard if your bread is on the sturdy side. The extent to which the custard is absorbed will depend on the type of bread you use and how dry it is.

Baked French Toast with Pears, Hazelnuts and Blackberry-Cardamom Syrup // Milly's Kitchen

When you are ready to cook the French toast, preheat the oven to 400°F. Remove the baking dish from the refrigerator. If there is still a bit of custard pooling at the bottom of the baking dish, tip out the excess. Set aside.

If you are using pre-roasted and skinned hazelnuts, roughly chop them and set aside. If you have raw hazelnuts, place them on a rimmed sheet pan and toast until fragrant, about 7 minutes. Remove the nuts from the pan so they don’t burn. Place them in the middle of a kitchen towel. Bring the four corners of the towel towards each other and twist them together until you have securely enclosed the nuts in the towel. Vigorously rub the hazelnuts together inside the towel for a minute or so. When you open the towel most of the skins should have fallen off. Roughly chop the toasted and skinned nuts and set aside. 

Baked French Toast with Pears, Hazelnuts and Blackberry-Cardamom Syrup // Milly's Kitchen

Peel and core the pears then slice them ⅛-inch thick. Heat 4 tablespoons of the butter in a large skillet over medium-high heat. When the butter has melted, add the remaining ½ cup brown sugar and ½ teaspoon salt. Add the pears and cook, stirring occasionally, until tender and the caramel starts to thicken, about 5 minutes. If your pears are quite ripe, it will take a little longer for the moisture to cook off and the caramel to thicken. Remove the pears from the heat and add the chopped hazelnuts. Stir to coat the nuts in caramel. 

Baked French Toast with Pears, Hazelnuts and Blackberry-Cardamom Syrup // Milly's Kitchen

Spoon the pears and nuts over the prepared bread, tucking some of the caramelized pear in between the slices. Cut the remaining tablespoon of butter into small pieces and dot the top of the French toast with it. Place in the oven and bake for 30-35 minutes, until the custard has set and the French toast is golden brown.

While the French toast is baking, make the syrup: Place the blackberries and syrup in a small saucepan and cook over medium heat until the berries are soft and starting to fall apart, about 5 minutes. Strain the syrup through a fine-mesh sieve into a small bowl, pushing on the berries with a spoon or spatula to extract as much berry pulp as possible. Stir the salt and cardamom into the warm syrup.

Rest the French toast for 5-10 minutes before serving with warm Blackberry-Cardamom Syrup.

Makes 6-8 servings

Baked French Toast with Pears, Hazelnuts and Blackberry-Cardamom Syrup // Milly's Kitchen