grapefruit

grapefruit curd tart + how to plan your perfect birthday

Image + styling: Olaiya Land

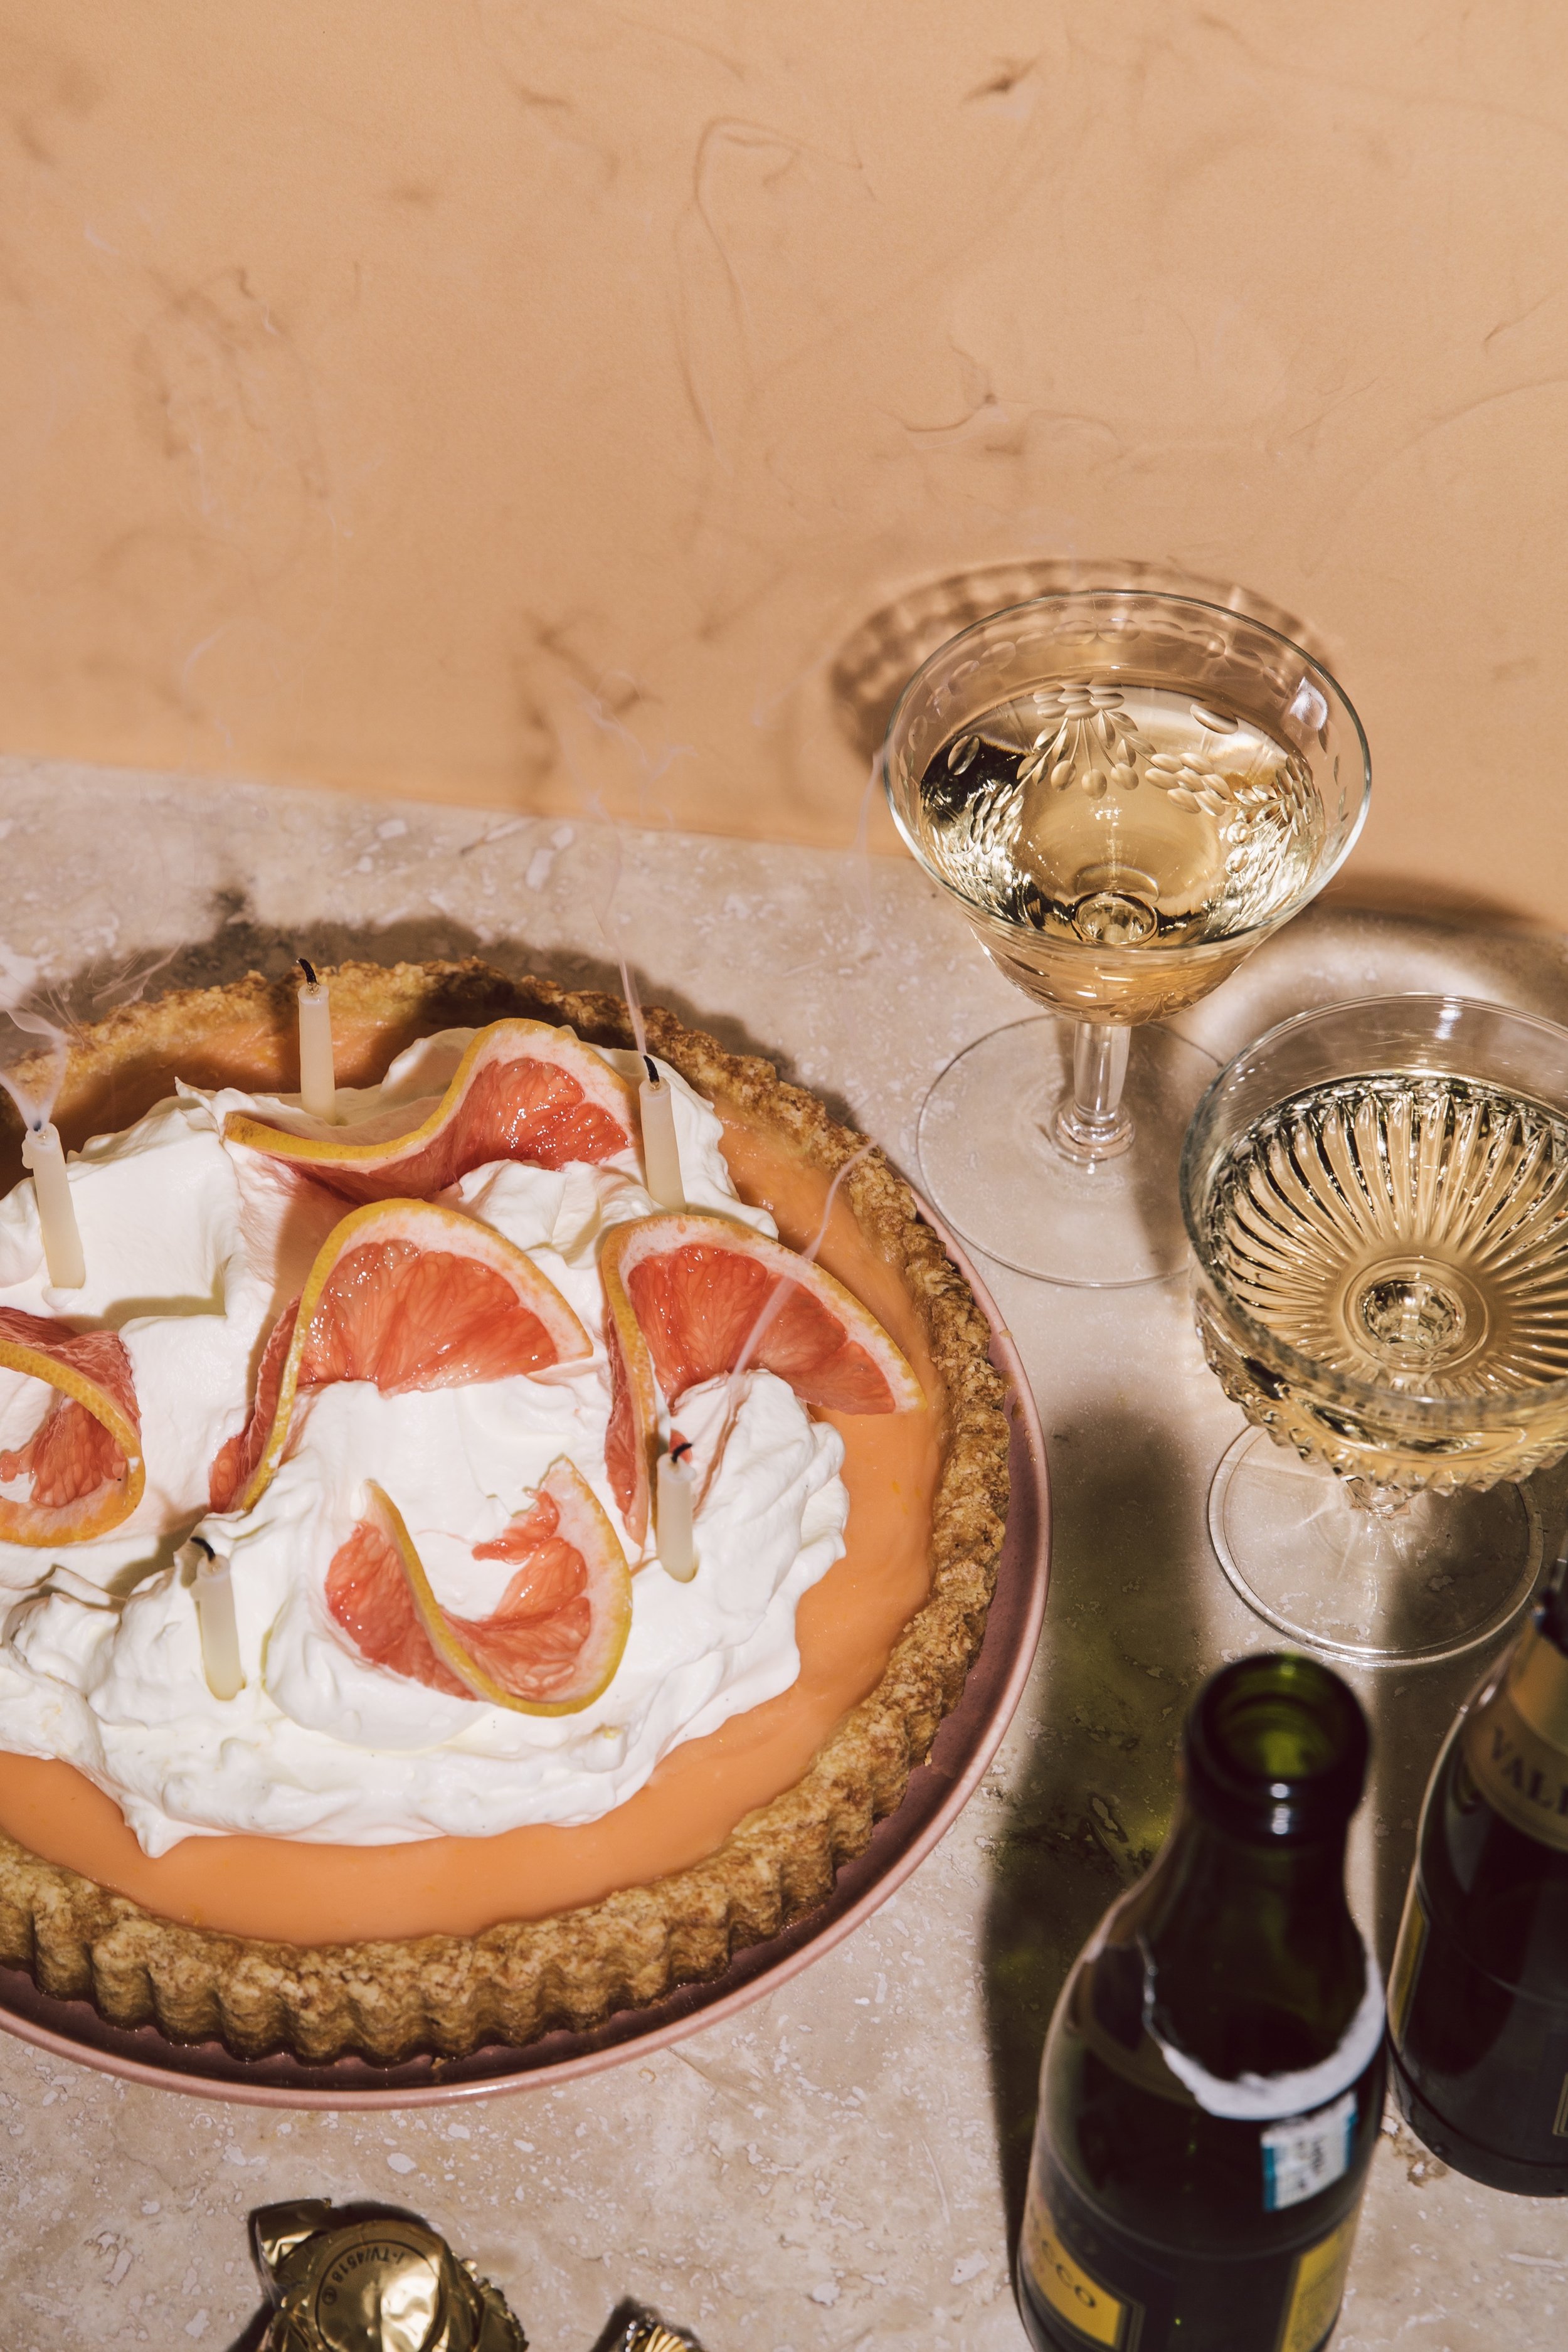
I had a birthday over the holidays. In honor of which I made myself this grapefruit curd tart. Because grapefruit is one of my favorite flavors. And because grapefruit goes really well with champagne. And because I love champagne.

Some people might think a person shouldn’t have to bake her own birthday dessert. I have to disagree.

We live in an age of endless to-do lists. Tsunamis of work obligations. The creeping suspicion (developed after too many hours on Instagram) that our ass is too big. Or too small. Or not clad in the right brand of aggressively tight workout gear. Or too often glued to our couch as we binge-watch Netflix.

Image + styling: Olaiya Land

Which is why we need a day set aside to remember that everything about us is OK. Beautiful even. Regardless of how few items we’ve checked off our productivity app. Or how our boss feels about our TPS reports. Or the size of our backside.

And what better occasion to proclaim “fuck it” to all the obligations of adulthood and spend the day doing exactly what you want than your birthday???

Yes, it is impractical. Yes, you might feel like you don’t deserve it. Yes, it might even feel a little sinful. And yes, it will be 100% WORTH IT.

To help you fully celebrate yourself, I’ve put together a list of the 10 Birthday Commandments. As someone with a Christmas birthday who still manages to make the day her own, I consider myself something of an expert. Consider this your modern self-care manifesto.

IMG_0002.JPG

The 10 Birthday Commandments

  1. Sleep in. Ask your partner to get the kids ready for school. Tell your roommates to wake you under absolutely no circumstances. Because you need plenty of delicious sleep to wake up feeling like the goddess that you are.

  2. Skip work. Yes, I mean it. Take a personal day. Call in sick. Bribe your boss with cronuts for a month. I don’t care. Do whatever it takes to get the whole day to yourself. Remember: work is highly detrimental to the art of celebrating yourself.

  3. Start the day out by eating your favorite things. Chicken and waffles? Pancakes? Leftover pizza? Birthday cake? Yup. Kick that diet mindset to the curb. Nothing is verboten on your b-day. To make your birthday morning extra delightful, make sure you have what you need for said breakfast on hand. Hangry is no way to start the day.

  4. Wear your favorite outfit. Feel like zipping into a skin-tight dress and super high heels that make you feel sexy AF? Do it. Prefer to spend the day in your softest tights and hoodie? It’s all good. Today is a day for living your best life.

  5. Proclaim yourself queen for the day. Seriously. This is a thing we do in my family. When it’s your birthday, you get to choose the food, the music, the pace, the movie. Make sure your friends and fam are on board beforehand though or things could get a little heated.

  6. As Your Royal Highness, you now have permission to fill your day with things you love to do. Get a massage. Take in an art exhibit solo. Hit a spin class to get yourself energized. Have lunch with your best friends at your favorite restaurant. Make it happen!

  7. Buy yourself a present. As nice as it is to receive presents from others, your friends and family are not mind-readers. Only you can buy yourself exactly what you want. Right color. Right size. Right details. Buy yourself something that brings you joy, and feel no guilt.

  8. Let your squad celebrate you. Even if you aren’t used to being the center of attention. Letting your friends and family shower you with love is one of the best parts of having friends and family.

  9. But don’t expect anyone to make your day unforgettable. Don’t get me wrong--a perfectly executed surprise party or a bottle of champagne for two by firelight are pretty special. But unless you are supremely lucky, they aren’t going to happen every single year. Which is why I’m a big fan of taking matters into your own hands. Communication is key. Let those around you know what you want and need on your special day. Then plan some (or all) of the festivities yourself. It’s your day; you get to live it however you like.

  10. Disregard any (or all) of these commandments if they don’t fit your personality. Add your own birthday commandments if you want. The most important thing is that you fill your day with all the things and people you love most. And that you create a moment to celebrate your beautiful, amazing, perfect self.

Image + styling: Olaiya Land

Grapefruit Curd Tart

  • 1/2 recipe pâte sucrée (see below)
  • 1 teaspoon unflavored powdered gelatin
  • 2 tablespoons cold water
  • 160g (3/4 cup + 1 tablespoon) granulated sugar
  • 2 whole eggs
  • 2 egg yolks
  • 160mL (2/3 cup) freshly-squeezed grapefruit juice
  • 1 1/2 tablespoons fresh lemon juice
  • 1 1/2 teaspoons finely grated grapefruit zest
  • Pinch kosher or sea salt
  • A few drops red food coloring (optional)
  • 70g (5 tablespoons) cold unsalted butter, cut into 5 pieces
  • 240mL (1 cup) heavy cream
  • 2 tablespoons powdered sugar (optional)
  • Few thin slices grapefruit to decorate the tart (optional)

Pâte Sucrée

  • 320g (2 1/2 cups) all-purpose flour
  • 3 tablespoons granulated sugar
  • 3/4 teaspoon kosher or flaky sea salt
  • 220g (2 sticks) unsalted butter, cut into 1/2-inch pieces
  • 2 large egg yolks, lightly beaten
  • 60mL (1/4 cup) ice water, plus more if needed

*Notes: The pâte sucrée can be frozen up to 1 month. Defrost overnight in the refrigerator before proceeding with the recipe.

- The tart shell can be baked a day in advance. Cool it completely in the pan then wrap tightly in plastic wrap until you’re ready to fill it.

- I prefer to top the tart with the whipped cream just before serving. But it can be assembled and topped with the whipped cream up to a day in advance without losing much in terms of texture. If you go this route, be sure to use powdered sugar in the whipped cream as it helps stabilize it. Place the tart on a large plate and invert a large bowl over the top to protect the whipped cream before putting it in the fridge. (This is also how I stored the leftovers.)

- Remove the tart from the fridge 30 minutes before serving.

Image + styling: Olaiya Land

For the crust: Pulse the flour, sugar and salt in a food processor to combine. Add the butter and process until the mixture resembles coarse meal, about 10 seconds. Add the yolks and pulse to just combine. With the machine running, add the ice water in a slow, steady stream through feed tube until the dough just holds together (no longer than 20 seconds). Check the dough by stopping the machine then pinching some of the dough together in your hand. It should come together into a ball when you squeeze it. Don’t wait for the dough to come together in the machine.

Turn the dough out onto a clean work surface. Gather it together into a ball then divide the dough in half. Shape each half into a 1/2-inch thick disk. Wrap in plastic and refrigerate for at least an hour (and up to 2 days).

Roll out one disk of dough to roughly 1/4-inch thickness. Transfer the dough to an 8-inch shallow, removable-bottom tart pan. Lift and press it into the edges of the pan. Do not stretch the dough into the edges as this will make your crust shrink as it bakes. Trim the edges of the crust. One trick I use is to press the sides down into the flutes of the tart pan to make them a little thicker then the bottom. I use a rolling pin to roll over the top of the tart, trimming off any excess dough. Then I use my fingers to push the sides up just slightly past the top edge of the pan. Use a fork to prick holes evenly over the bottom of the tart (this is called docking). Place the tart pan in the freezer until the dough is frozen solid (15-20 minutes).

When you are ready to bake the tart shell, arrange a rack in the middle of the oven and preheat it to 400°F (205°C). Line the frozen shell with parchment paper and then fill it with pie weights (I use beans. You can also use rice.)

Bake the shell until the edges are starting to brown, about 25 minutes. Carefully remove the parchment and pie weights (they will be very hot), reduce the oven to 375°F (190°C) and continue to bake until the center is golden brown and dry, about 15 minutes more. (Cover the edges with aluminum foil if they are darkening too quickly.) Transfer the tart shell to a wire rack and cool completely in the pan. When you’re ready to fill the cooled tart shell, carefully remove it from the tart pan and place it on a serving plate.

For the curd: Whisk together the gelatin and cold water in a small bowl, and set aside to let the gelatin absorb the water. Set a fine mesh sieve over a medium bowl and set aside.

Place the sugar, eggs, juices, zest and salt in a medium, heavy-bottomed saucepan. Whisk well to combine. Cook over medium-low heat, stirring often, until just warm to the touch. Add 1 piece of the butter and cook, stirring constantly with a heatproof spatula to prevent scorching, until the butter is almost melted. Repeat with the remaining pieces of butter. If using, add food coloring 1 drop at a time, stirring well after each addition, until you reach your desired color.

Cook the mixture, whisking frequently, until it thickens enough to coat the back of a spoon. If you want to use a candy thermometer, cook the curd until it reaches 175° F (79°C).

Once the curd thickens, remove the pan from the heat and pour the curd through the fine mesh strainer into the bowl to remove any bits of cooked egg. Microwave the small bowl of gelatin for 10 seconds, until it is liquid. Add the liquefied gelatin to the bowl of grapefruit curd and whisk well.

Pour the curd into the baked and cooled tart shell and transfer it to the refrigerator. Chill until the curd is set, at least an hour.

To serve: Place the cream and powdered sugar (if using) in a stand mixer fitted with the whisk attachment. Beat at medium-high speed until firm peaks form. Take care not to overwhip the cream. Mound the whipped cream in the middle of the chilled tart and spread with the back of a spoon to make decorative swoops. Arrange the grapefruit slices over the whipped cream and serve.

Makes 1 8-inch tart

Pâte Sucrée recipe from Martha Stewart’s Cooking School. Curd recipe adapted from SugarHero!

Image + styling: Olaiya Land

grapefruit vanilla bean trifle

Image: Olaiya Land

In the dreary days of February, my mind turns to spring dreams. Green grass and tiny daffodils elbowing their way up through the soil. The season's first asparagus stalks and baby morels. Raspberries. Strawberries. Apricots! Easter hams and rhubarb pies.

All of which leaves me feeling rather let down when I come back down to Earth and remember we’re still sailing through the mid-winter doldrums.

Image: Olaiya Land

This is a time of year that requires extra creativity in the kitchen. The novelty of autumn’s bounty of apples, pears and squash is long gone. Tender spring things are still weeks away. And Kale, popular and Instagram-friendly as it is, can only take you so far.

Luckily, this is the month we are given citrus.

Image: Olaiya Land

Jewel-toned citrus in all its shapes and forms is the answer to the culinary blues. Bright and subtly floral, it’s the winter ingredient that tricks our palettes into thinking spring is nearly here. 

Sweet-tart grapefruit is my very favorite member of the citrus family. It's annual appearance at the grocery store never fails to brighten my day. Sort of like a beloved uncle who comes around once a year with bad jokes and pocketfulls of candy. 

Image: Olaiya Land
Image: Olaiya Land

It’s difficult to improve upon a perfectly ripe grapefruit section scooped straight from the rind. But as I looked around our kitchen at the mounting piles of grapefruit, I decided it was time to kick things up a notch and transform my winter citrus bounty into something a touch more fancified. 

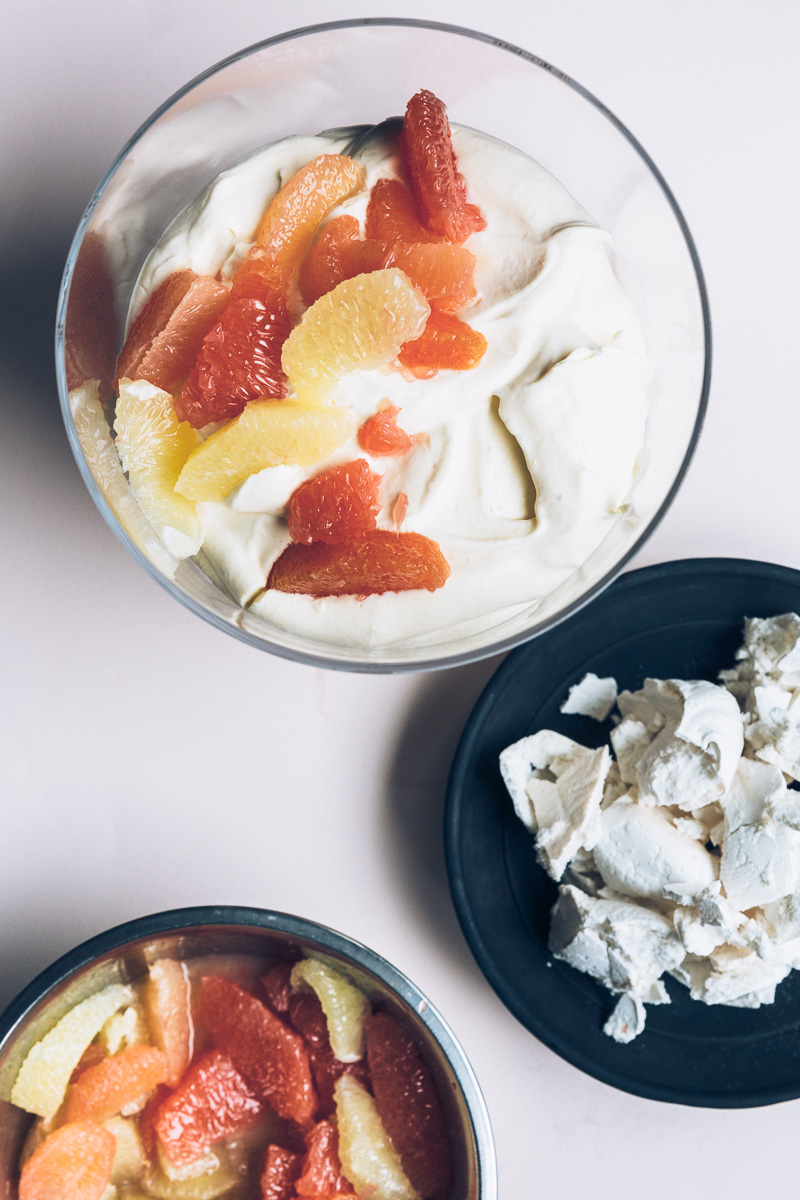
Which leads us to this Grapefruit Vanilla Bean Trifle. It’s a delicious pile of controlled chaos--towering layers of cake, cream, meringue and citrus that collapse into a fluffy, creamy mess when you scoop them into your bowl. This is the sort of dessert that will help you shake off a winter funk. The sort of dish that will make you forget winter all together.

At least until you reach the bottom of the trifle dish.

Image: Olaiya Land

Grapefruit Vanilla Bean Trifle

  • 5 large, ripe grapefruit (I used a mix of red, pink, gold and white grapefruit)
  • 3 cups heavy cream
  • 2 tablespoons sugar
  • 1 recipe Grapefruit Curd, chilled (see below)
  • 1 recipe Vanilla Bean Meringues (see below)
  • 1 recipe Grapefruit Olive Oil Cake, cooled completely (see below)


*Note: This trifle is most beautiful right after you assemble it, before the citrus can release any juices. But it is about a gazillion times more delicious the next day. I recommend you make this a day in advance and store it covered in the fridge until you’re ready to serve it. Leave off the last layer of meringue crumbles until right before you serve it so they stay crunchy.

- Almost all the components of this trifle can be made in advance. The cake can be baked up to 2 days in advance. The curd can be made up to a week in advance. The merengues can be baked a week or more in advance if you bake them fairly dry and store them in an airtight container. 

Image: Olaiya Land

Remove the skin and pith from the grapefruit. Cut the flesh into supremes over a medium bowl so you catch all the juices. (Here’s a video on how to do it.) Set aside.

Place the cream in the bowl of a stand mixer along with the sugar and beat to stiff peaks using the whisk attachment. (You can also use a hand beater or a wire whisk and a mixing bowl.) Take care not to over beat the cream--you want it stiff, but not grainy. Gently fold the chilled grapefruit curd into the whipped cream until only a few faint streaks of yellow remain. 

Cut the cooled cake into roughly 1-inch pieces. Arrange the cake pieces in the bottom of a trifle dish or large bowl in a tight layer. Depending on the size of your dish, you may not use all the cake pieces. You can freeze them for another use, or--my favorite option--snack on them alongside your afternoon cup of coffee or tea. 

Spread half the grapefruit cream mixture over the cake. Arrange half the grapefruit sections over the cream. (Take care to lift them from their juices with your fingers or a slotted spoon so the trifle isn’t too wet.) Crumble a layer of meringue pieces over the grapefruit. Spread the rest of the grapefruit cream over the meringue and top with the rest of the grapefruit sections. Crumble additional pieces of meringue over the trifle just before serving.

Serves 8-10.


Grapefruit Curd

  • 1 tablespoon plus 1 teaspoon finely grated grapefruit zest (from 1 large grapefruit--grate an additional 2 teaspoons zest for the olive oil cake, below)

  • ¾ cup freshly-squeezed grapefruit juice

  • ¼ cup plus 1 tablespoon freshly-squeezed lemon juice

  • 1 cup sugar

  • 5 large eggs

  • 4 large yolks (save the yolks from your meringues for this)

  • Pinch kosher salt

  • 10 tablespoons unsalted butter, cut into 10 pieces


Set a fine mesh sieve over a medium bowl and set aside.

Place the juices, zest, sugar, eggs and salt  in a medium heavy saucepan. Whisk well to combine. Cook over medium-low heat, stirring often with a heatproof spatula, until just warm to the touch. Add 1 piece of the butter and cook, stirring constantly with the spatula to prevent scorching, until the butter is almost melted. Repeat with the remaining 9 pieces of butter. 

Continue to cook, stirring often until the curd has thickened and is beginning to bubble, about 1 minute longer. 

Strain the curd into the bowl and discard the zest and any bits of cooked egg. Cool for 15 minutes then place a sheet of plastic wrap directly on the surface of the curd (to prevent a skin from forming) and chill in the refrigerator until very cold, at least 4 hours.

The curd will keep, covered, in the refrigerator for a week or frozen for up to 3 months. Defrost in the refrigerator before serving.

Makes about 3 cups.


Vanilla Bean Meringues

  • 9 oz superfine sugar (about 1 cup plus 2 tablespoons)

  • 1 vanilla bean (I used a Tahitian vanilla bean since they are beautifully floral)

  • 1 1/2 tablespoons cornstarch

  • Pinch salt

  • 6 oz egg whites (from about 5 large eggs)--reserve the yolks for curd

  • 2 teaspoons white wine vinegar


Place a rack in the middle of the oven and preheat to 250° F. Line a rimmed sheet pan with parchment paper. 

Place the sugar in a small bowl. Split the vanilla bean lengthwise and scrape out the seeds with a paring knife. Add the vanilla seeds to the bowl with the sugar. Using your fingers, rub the seeds into the sugar; this will keep the vanilla from clumping together in the meringues. Add the cornstarch and salt. Whisk to combine and break up any clumps.

Using a stand mixer fitted with the whisk attachment, whip the egg whites at medium speed until soft peaks form, 2-3 minutes.

Increase the speed a little and slowly sprinkle in the sugar mixture. It should take you about a minute or more; adding the sugar too quickly or before the eggs form soft peaks will result in a less stable meringue that might spread or weep. A minute or so after all of the sugar mixture has been added, add the vinegar. Increase the speed to medium-high and continue to whip until the meringue forms very stiff peaks, 5-8 minutes longer. You will know the meringue is stiff enough when it will hold the whisk attachment perfectly upright with no other support.  

Spoon the meringue into 6 heaping mounds, each about 4 inches wide on the parchment-lined sheet pan (be sure they aren’t touching). If you want drier, crunchier meringues, use the back of a spoon to flatten each meringue a bit so they are thinner. If you like more marshmallowy meringues, leave them as fluffy mounds.

Bake the meringues until they are crisp and dry to the touch on the outside but still white (not golden or cracked), about 80-90 minutes for flat meringues and about 2 hours for thick ones. Check on the meringues periodically to make sure they aren’t coloring or cracking. If they are, rotate the sheet pan and reduce the oven temperature by 25 degrees.

When the meringues are done, turn off the oven and let the meringues cool completely in the oven. If you're not using them right away, store the cooled meringues in a tightly sealed container (I like a large mason jar). They will keep for a week or two, depending on how dry they are cooked, in a well-sealed container.

Makes 6 large meringues.


Grapefruit Olive Oil Cake
Adapted slightly from Yossy Arefi

  • 1 cup (200g) sugar

  • 1 3/4 cups (225g) all-purpose flour

  • 1 teaspoon baking powder

  • 1/2 teaspoon baking soda

  • 1/2 teaspoon salt

  • 3/4 cup (175ml) fruity olive oil

  • 1/4 cup (55g) unsalted butter, melted and cooled

  • 1 tablespoon finely grated grapefruit zest

  • 4 large eggs, at room temperature

  • 1 cup (240ml) whole-milk kefir or buttermilk, at room temperature (I used kefir)


Follow this recipe, omitting the rosemary and substituting 1 tablespoon finely grated grapefruit zest for the lemon zest.


grapefruit-fennel shortbread cookies

grapefruit fennel shortbread cookies on millys-kitchen.com

Hello people!

Are you in the holiday spirit yet? Despite having a mountain of work to finish this month, I’m feeling especially festive. Since we’ll be spending the holidays in Paris this year, Beau and I have decided to skip getting a tree. We haven’t strung any lights. And there are no prettily wrapped presents waiting to be opened on Christmas morning.

grapefruit fennel shortbread cookies on millys-kitchen.com

What I have done is: 
1) Play a lot of Christmas music. (There’s nothing like singing along to All I Want for Christmas is You by Mariah Carey at the top of your lungs. Sorry neighbors!)  

2) Host a holiday pop-up dinner with my friend Kyle where I got to feed a bunch of awesome folks. I never get tired of seeing peple eat, drink and laugh around my table.

3) Spend time with good friends (which might have led to a few too many rounds of late-night Manhattans).

4) Bake like a crazy person. I’ve made waaay too many of these kuri squash and olive oil cakes, a mountain of seeded toffee bark, jars of coconut curd, stacks of these cheesy crackers, 6 batches of these German spice cookies. And last but not least, these grapefruit-fennel shortbread cookies.

grapefruit fennel shortbread cookies on millys-kitchen.com

These cookies weren’t originally on the agenda. But when Holly and Natalie from The Modern Proper emailed to say they were putting together a #calmandbrightcookienight, I said I was in. Because there’s no such thing as too many cookies at the holidays!

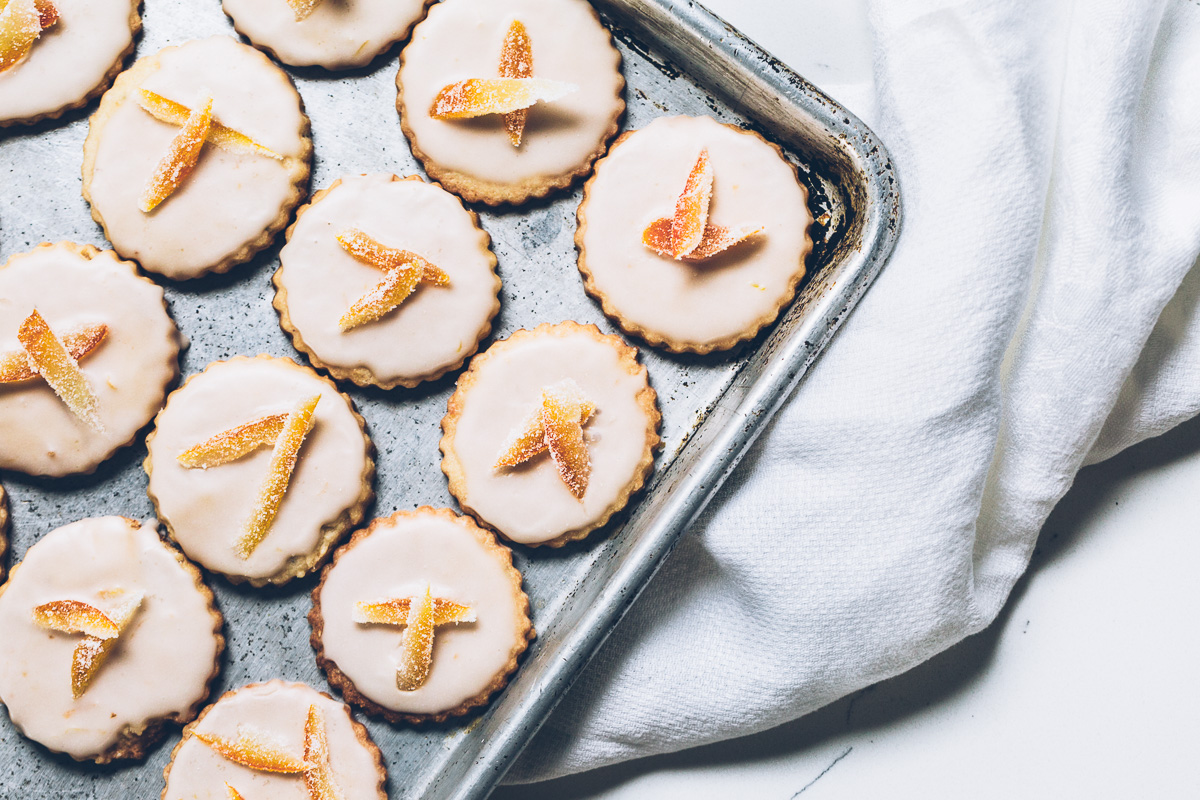
These turned out to be my favorite of all the homemade holiday gifts I've made this year. They’re subtly sweet with a bright hit of citrus. But it’s the herbaceous fennel that seals the deal for me. If you like sweets with a little savory twist, these guys are for you. 

As always, I hope you’ll make this recipe your own. Cook them as the recipe directs or get creative and try a different citrus (I’m thinking meyer lemon would be stellar) or different spice. Chop up candied citrus and throw it in the batter along with a handful of nuts. Glaze. Don’t glaze. Roll them in sanding sugar before baking. Or give them a dip in some melted chocolate. It’s up to you. 

grapefruit fennel shortbread cookies on millys-kitchen.com

For even more sweet inspiration join the #calmandbrightcookienight celebration! Below is a list of all the bakers contributing to the festivities. If you've been having trouble figuring out what to bake this year, we’ve got you covered. Check out all these gorgeous holiday cookies--hopefully you’ll find a new favorite blogger or two to follow! 

Wishing you all a Calm and Bright holiday,

Olaiya


The Modern Proper | Coconut Thumbprint Cookies with Salted Caramel
Wood and Spoon | Candied Walnut Chocolate Chip Cookies
Floating Kitchen | Chocolate Peppermint Thumbprint Cookies 
Brewing Happienss | Mint Chocolate Gingerbread Cookies 
The Vintage Mixer | Ginger Creams with Browned Butter Icing 

Wu Haus | Raw Vegan Gingerbread Cookie Sandwiches
The Almond Eater | Homemade Almond Biscotti
Chocolate + Marrow | Brown Butter Gingerbread Madeleines   
Hungry Girl Por Vida | Lemon Pistachio Linzer Cookies
Honestly YUM | Ricciarelli (Italian Almond Cookies) 

Husbands That Cook | Chocolate Sugar Cookies
The Judy Lab | Sea Salt Chocolate Chocolate Chip Cookies
Gather and Dine | Chocolate Almond Spelt Cookies
Betty S Liu | Cardamom Persimmon Cookies with Olive Oil Dark Chocolate Ganache
Harvest and Honey | Milk & Cookies

Bakerita | Chocolate Rugelach (gluten free + refined sugar free) 
The Fauxmartha | Snowball Cookies
The Kitchen Paper | Soft Toffee Cookies
Life Is But A Dish | Chocolate Peppermint Cream Cookies
Oh Honey Bakes | Pomegranate Pistachio and Almond Biscotti 

The Brick Kitchen | Coconut Raspberry Wagon Wheels
Alexandra Cooks | Classic Cream Cheese Cutout Cookies
Hello My Dumpling | Ginger Viennese Whirl Cookies with Matcha Passion Fruit Filling
Snixy Kitchen | Peppermint Chocolate Marshmallow Cookies
Tending the Table | Almond Macaroons with Satsuma Marmalade

PDX Food Love | Chocolate Bourbon Swirl Meringues
Lasting Ingredient | Lemon Lime Shortbread
Heart Beet Kitchen | Chocolate Peppermint Crinkle Cookies
Carly Diaz | Dark Chocolate Pistachio Shortbread Cookie
Cloudy Kitchen | Early Grey Shortbread
Lena’s Kitchen Blog | Shortbread Cookies Three Ways 


Grapefruit-Fennel Shortbread Cookies

  • 9 oz. (2 cups plus 2 tablespoons) all-purpose flour, plus additional for rolling and shaping
  • 2 oz. (1/2 cup) cornstarch
  • 2 teaspoons finely ground fennel seed
  • 1 teaspoon kosher salt
  • 9 oz. (2 1/4 sticks) unsalted butter, room temperature
  • 3 oz. (6 tablespoons) sugar
  • 2 tablespoons finely-grated grapefruit zest (from 1 large grapefruit)
  • ¼ cup freshly-squeezed grapefruit juice
  • 1 recipe Grapefruit Glaze (recipe below)
  • ½ cup thinly sliced candied grapefruit or orange zest (recipe below)

*Notes: Rolling shortbread cookies out can be challenging if your dough is too cold or too warm. The trick is to check it frequently once you’ve removed it from the fridge and to roll it when it’s just pliable but still cool to the touch. If the edges crack immediately when you roll it, it’s too cold. Just push the cracks back together and let the dough warm up a bit more. If the dough gets too warm and wants to stick to your work surface and pin, place it back in the fridge to firm up a bit before proceeding. 

- Alternately, if you don’t want to roll the dough out, you can roll the dough into a log and go the slice-and-bake route.

- Feel free to use store-bought candied citrus peel to garnish these. (If you’re in Seattle, PFI has really good quality candied citrus around the holidays.) If you’d like to make your own, the recipe is below.

- These cookies would be delicious made with other citrus fruits and/or spices. You may need to adjust the amount of zest and juice up or down a bit depending on how tart or bitter your fruit is. 

grapefruit fennel shortbread cookies on millys-kitchen.com

In a medium bowl, sift together the flour, cornstarch, fennel and salt. Set aside.

In the bowl of an electric mixer fitted with the paddle attachment, cream the butter on medium speed until smooth, 1-2 minutes.  Add the sugar and continue to cream until smooth, 2-3 more minutes. Add the zest and juice and mix just to combine. On low speed, gradually add the flour mixture and mix until just incorporated. Mix for 30 seconds more.

Spoon half of the dough into the middle of a large piece of plastic wrap. With lightly floured hands, gently pat the dough into a ½-inch thick round. Wrap tightly and refrigerate until firm. Repeat with the rest of the dough. 

When firm, remove the dough from the refrigerator and let it sit at room temperature for 5-10  minutes. Remove from the plastic wrap and place on a lightly floured surface. Sprinkle a little flour on top of the dough and on your rolling pin. Roll to ¼-inch thickness, rotating the dough often and flouring as needed to make sure it doesn’t stick to your work surface. Cut to desired shape, periodically flouring your knife or cookie cutter so the dough doesn’t stick. Transfer to a parchment-lined sheet pan and freeze solid. (I know all this chilling and shaping and freezing may sound a bit fussy, but it will keep your cookies from slumping or spreading when you bake them. Freezing your dough = the key to pretty cookies and pie crusts.)

Bring your dough scraps together into a ball and chill briefly before re-rolling and cutting more cookies. You can re-roll your scraps twice. More than that will start make your cookies tough.

Preheat your oven to 350°F. Place the cookies at least 1 inch apart on a parchment-lined sheet pan (not the one you froze them on--that will prolong the bake time). Bake for 10 minutes. Rotate your pan(s) and continue to bake until the bottom edges are just golden brown, about 4 minutes more. Take care not to overcook the cookies.

Transfer the sheet pan to a wire rack to cool for 5 minutes. Then transfer cookies to the wire rack to cool. When completely cool, dip your cookies face-down in the grapefruit glaze and top with sliced candied citrus peel if desired.

Makes about 4 dozen 2-inch cookies.


Grapefruit Glaze

  • 16 oz (about 4 cups) powdered sugar, sifted

  • 3-4 tablespoons freshly-squeezed grapefruit juice

Place the sifted sugar in a medium bowl. Gradually whisk in 3 tablespoons of the juice. If the glaze seems too thick, add more juice, one teaspoon at a time. You want a glaze that flows like honey and briefly forms a ribbon on the surface when you pour it from a spoon. 

This will keep for several days if you place a sheet of plastic wrap directly on the surface of the glaze before tightly wrapping the whole bowl in plastic wrap.

Makes about 1 cup of glaze.


Candied Citrus Peel

  • 8 large lemons or 4 oranges or 2 grapefruit

  • 2 cups granulated sugar, plus additional for rolling if desired

grapefruit fennel shortbread cookies on millys-kitchen.com

Using a sharp paring knife, slice along the curve of each citrus fruit from top to bottom cutting through the peel but not into the fruit (make 4 cuts for lemons, 6 for oranges or 8 for grapefruit). Use your fingers to remove the peel from the fruit. If the pith is thick, remove some of it by flattening the piece of peel and slicing horizontally. Be careful not to remove all of the pith or you will have flimsy little pieces of candied zest. Cut each piece of peel lengthwise into 1/4-inch-wide strips. 

Place the sliced peel in a saucepan and cover with cold water. Bring the water to the boil and then drain. This removes excess bitterness from the peel. Repeat this process at least two times. Taste the peels, if they are still bitter for your taste, repeat one more time.

Place the sugar in a saucepan and add 2 cups of water. Bring to the boil. Add the peels, reduce heat and cook at a gentle simmer, stirring occasionally, until the peels are translucent and soft, 45-60 minutes. The time will vary based on the thickness of the peels.

Use a slotted spoon to transfer the strips of peel to a metal cooling rack set over a parchment-lined sheet pan. When dry, roll in sugar if desired. Candied peels will keep for several weeks in an airtight container.

Makes about 2 ½ cups.